The golden hour, with its enchanting sun-kissed glow, romantic warmth, and captivating light flares, is the holy grail for photographers seeking to capture the perfect natural light in their images. This magical time, however, is as brief as it is beautiful, and often at the mercy of unpredictable weather conditions. But don’t let these limitations dim your creative spark! With a bit of ingenuity and the right lighting equipment, you can master the art of mimicking this coveted natural phenomenon. This guide will teach you the techniques of studying sunlight’s interaction with objects and shadows, enabling you to meticulously craft scenes and backgrounds that convincingly replicate the allure of the golden hour, regardless of the time or weather.
Video 1 – How to Create a Fake Golden Hour with Full Strobes
Video 2 – How to Create a Fake Golden Hour with Pocket Strobes
This golden hour lighting tutorial is a part of our Advanced Lighting Course on SLR Lounge Premium. To explore a whole new world of photography using flash, be sure to check it out! Let’s dive right in.
Fake Golden Hour Tips
Let’s review the key concepts for creating a fake golden hour from the videos above and show you more examples.
Match the Light Direction

Find your composition based on the lighting. The key for realism is to position the flash where the sun would actually be. Notice in this scene that even though there’s no sunlight, since it’s later in the day, the existing light is coming from behind.
Understand How Much Power You Need

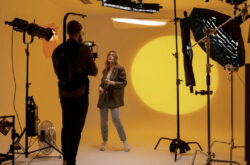
Since we’re mimicking the sun, we’re going to need a lot of light. A medium to high powered flash is recommended for recreating golden hour. The photos in this article use 2 Godox AD200s with CTO Gels to match the true look of golden hour lighting. The entire set up is mounted on a stand using the MagMod MagShoe and MagMod MagRing.

In order to make your fake golden hour look real, you’ll need to light enough of the background elements to replicate the sun. Simply put, the closer the distance and the smaller the field of view in camera, the less light power you’ll need to convincingly recreate golden hour. For example, to cover about 10-15 feet between you and the subjects (such as a bride and groom), you’ll likely need 50-150 watt-seconds, which you can achieve by using 1-3 flashes, or a single medium strobe. Using tighter lenses, such as an 85mm or 70-200mm will make fake golden hour easier than using wider angle lenses because there will be fewer elements in the field of view.
During golden hour, sunlight washes over everything. Sadly, 50 watt-seconds won’t do the trick to accurately recreate this effect. If the scene or environment you wish to capture is too large to feasibly light to fake golden hour, there is nothing wrong with backlighting; it simply creates a different look.
Increase Power According to Distance
Because you’ll need to light everything in your field of view, you’ll need more power to cover greater distances. Another thing to keep in mind while lighting to fake golden hour is the loss of flash power based on your camera settings. High Speed Sync (or HSS) does not really work well with mimicking golden hour lighting because of inconsistent recycle times. For example, if you’re firing your flash at full power with a shutter speed 1/1000, aperture f/1.4, and ISO 100, you’re losing 5-8 stops of light.

One solution involves using a 3-5 stop ND filter, which will reduce all light to 3-5 stops and allow for slower shutter speeds to keep flash within normal sync speed. As a result, power will increase by 5-8 stops.
To get even more power out of your flash, consider adding more ISO. For example, you can set your camera settings to shutter speed 1/60, aperture to f/1.4, and ISO to 200 while using full flash power, you’ll have gained 1 stop (or 200%) flash power. However, if you boost the ISO to 640 with shutter speed at 1/200 and aperture at f/1.4, that is equivalent to 2.5 stops, or 600% additional power. Ultimately, we get more power out of our gear by using an ND filter, boosting our ISO, and speeding up the shutter with each ISO step.
Position Your Flash to Mimic the Sun

To mimic true golden hour lighting, place the light far enough in the background that the light covers the entire background. In the image below, the light is raised to the tree line as though the sunlight is peeking over the trees.

Choose a Convincing Composition
The key to pulling off the whole “fake golden hour” shot is the final composition.

In the test image above, you’ll notice a significant expanse of the sky and an uneven light distribution on the camera’s left, seeping through the other crack in the rock. Any hint of the sky in the shot can disrupt the authenticity of the photo.

Finalize in Lightroom Photo Editing
The final magic touch comes in Lightroom. The shot straight out of camera needed a bit more punch in contrast and a little more warmth in the highlights/white balance. The Visual Flow’s Modern Presets were used for the images below. They keep the scene similar to how it was shot but also enhances it enough to make the subjects pop from the background. In general, a fake golden hour will need to be warmed up in editing.

For the image below image, the Modern Pack was used again. All of the tools can be found in the Retouching Toolkit from Visual Flow.

First, enhance the vignette.

Next, add a radial burn.

Lastly, emphasize the sun flare with a brush right over the light.
Avoid Bad Flare Effects

To get a good golden hour fake flare, you should first place the subject between the camera and light in a position that does not cause the light to blow out details close to the face. Instead, in a portrait situation, you want the flare to barely bleed through to maintain highlight details next to the subject’s head. If you cover the flash entirely, the image will look more backlit than a representation of golden hour.
Bad flare effects occur when details in the hair and face are blown out. Avoid this by placing the light behind your subjects’ heads and slowly step to the side to reveal more and more light, until you reveal just enough light for the perfect capture. Because the amount of flare will vary, be sure to take multiple shots to get the shot you need.
Gear Options and Alternatives for Fake Golden Hour
This technique can be achieved with a variety of gear, it all depends on what budget you have, this is something we discuss in more depth in our Re-creating Golden Hour Workshop as well. The end result will vary depending on the wattage of each light source (mainly between using a flash vs. a strobe) but as rule of thumb, you’ll need at least 400ws of power to convincingly recreate sunlight.
Pocket Flashes
Strobes
Remote Triggers
- Canon ST-E3-RT Speedlite Transmitter
- Yongnuo Wireless Speedlite Transmitter
- Godox XProC TTL Wireless Flash Trigger
- Profoto Air Remote
Accessories
- Mag Gel Holder
- Mag Gel Standard Set
- MagRing
- Manfrotto 5001B Nano Stand
- Fovitec Photography & Video Light Stand Kit
Like a Magician
Now you would think recreating a giant 432,474 mile diameter ball of gas that’s 93 million miles away would be difficult, but it’s actually quite simple. All you need is a powerful strobe, move it up 92.999 million miles closer, and viola, Sun galore!