
I’m in love with light. I’m infatuated with a beautiful highlight and drawn to a mysterious shadow. I love the freedom and control of creating light that expresses my vision, mood or story whether in the studio or on location.
After I first mastered traditional lighting setups, I sought to learn about more advanced, challenging or creative approaches to lighting. Upon researching, it seemed that there really were very few advanced or extremely creative tutorials, but instead only some behind the scenes.
For this reason, I created my newly released, 135-page ebook, “Creative Studio Lighting Guide” with 30 creative studio lighting setups. This is your guide to creativity in the studio whether you are trying out a new modifier or using usual tools in an unusual way.
I’d like to take a moment to walk you step-by-step through one of these setups from the free segment of my guide to show how basic studio lighting modifiers can be utilized for creative results.
Lighting Gear Used
- 2 Profoto D1 Air 500 Watt
- Light 1 – Profoto 5 degree Grid
- Light 2 – Profoto 3x4ft Softbox
Other Gear Used
- Cinefoil (optional)
- Avenger D600 boom arm
Setup
Light 1:
- Distance from subject: 9 inches
- Distance off center: 0 inches
- Height above eye level: 5 inches
- Power (F stops): F/11
Light 2:
- Distance from subject: 0 inches
- Distance off center: 0 inches
- Height above eye level: 0 inches
- Power (F stops): F/22
Camera Gear & Settings
Camera: Canon 5D Mark III
Lens: Canon 70-200mm 2.8 II at 130mm
ISO: 100
Shutter Speed: 1/200
Aperture: 11

The goal of this setup is to create lighting that has both high key elements (glowing background) and dramatic shadows. This setup is perfect for a variety of subject matter whether portraits, beauty or even boudoir. The highlights allow you to define your subject’s form while the shadows establish the dramatic mood.
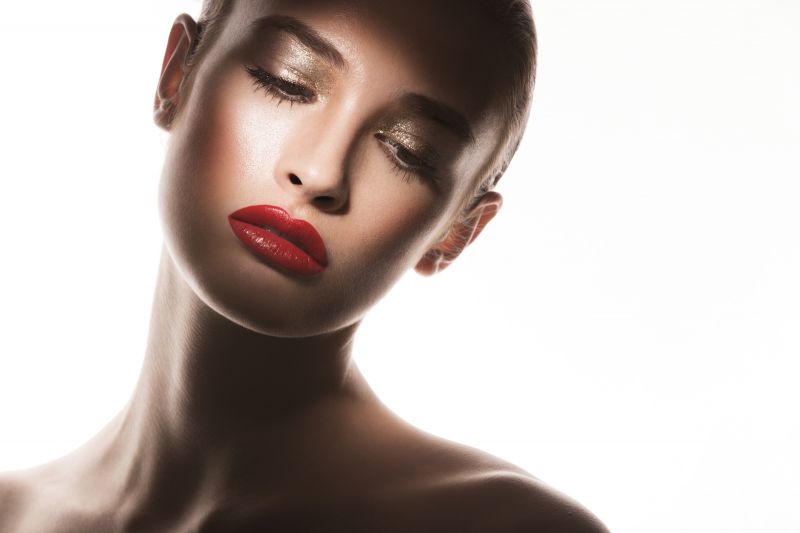
Let’s take a look step-by-step at considerations for building this dramatic two-light setup.
Step 1
First, place a strobe with softbox directly behind and against the subject to create a pure white background with highlights that wrap around the body and jawline. The closer you have the softbox to the subject, the more the light will wrap. Here a 3x4ft softbox has been utilized. You may alternatively light a white seamless paper to create a white background effect if this is what you prefer, or if shooting full length.

For the beauty images I am creating, I want my subject as close to that softbox as possible and really love the wrapping highlights. Keep in mind that there are a few challenges when shooting into a light source. First, if you are using a large softbox, be sure to add the inner piece of diffusion to the softbox if it comes with your modifier. By adding this diffusion, you allow the light to spread out even more and create a more even source from the front of the softbox. Without this diffusion, you may have a hot spot that leads to distracting highlights or lens flare.
Next, if you do have a hot spot created by the softbox (creating flare or haze to your image), be sure to try to hide that hotspot behind your subject. Place it behind their shoulders or if you must, directly behind their head. This helps block out a problem area.
Tip: Because you are shooting into a light source, your photograph may be a bit flat and lack true blacks. If you like this effect but feel the photo is still flat, consider adding a black point or contrast in ACR (Adobe Camera Raw) or Lightroom.
Step 2
Next, place a strobe with a 5-degree grid (or smallest grid available) pointed at the center of the subject’s face. A small degree grid helps create a focused area of light, especially if you can bring the light closer to the subject. If the light is further from your subject, it has time to spread out and cover a large area. Instead, bringing the light very close to your subject keeps the area of illumination to a much smaller and more focused area.

Consider having the strobe on a boom arm to allow you to center it over the subject’s face without obscuring your photograph. If desired, lower the light just out of the frame to keep the area of light more circular/focused and to ensure catchlights in the eyes.
The result you will see is beautiful light wrapping around the subject from the softbox with a focused beam of light on the subject’s face.
Tip: Because of the very narrow area of light created by the grid, your subject will have a very limited range of motion. A movement of a few inches to the left, right, front or back will cause the subject to fall into shadow. Small subject movements combined with small adjustments of the light will likely be necessary.
Step 3
One other option for making this shot more dramatic is to add a ‘flag’ to the scene. A flag can be used to block off light from the top of the subject’s head. This makes the light look even more focused and concentrated. You can use cardboard, CineFoil or other object to restrict the light. This step is not necessary, but it can lead to some truly striking results.

Takeaways


Just utilizing two lights can help you create stunning and dramatic effects in the studio. A single softbox gives you a pure white background with beautiful highlights that wrap around your subject. A concentrated (small) grid close to your subject allows you to create the shadows and a beautifully focused beam of light. If you want to restrict the beam even more or create more dramatic shadows, consider using a flag to block the light from part of the face.


If you’d like even more creative lighting setups you can download 5 additional ones completely free here.


Get Connected!