
Couples photography gives photographers a unique opportunity to capture memorable moments for their clients and create compelling images for their portfolio. These sessions often happen on-location in beautiful settings that lend themselves well to incredible portraits. Mastering the art of photographing couples, however, goes beyond booking great locations or using specific photography techniques. If you’re looking to get into (or improve your skill set for) engagement and wedding photography, you’ll need to develop a workflow that incorporates techniques for both shooting and communicating with your clients. Below, we’ve put together a collection of couple photography tips you can use to elevate your couples portraits.
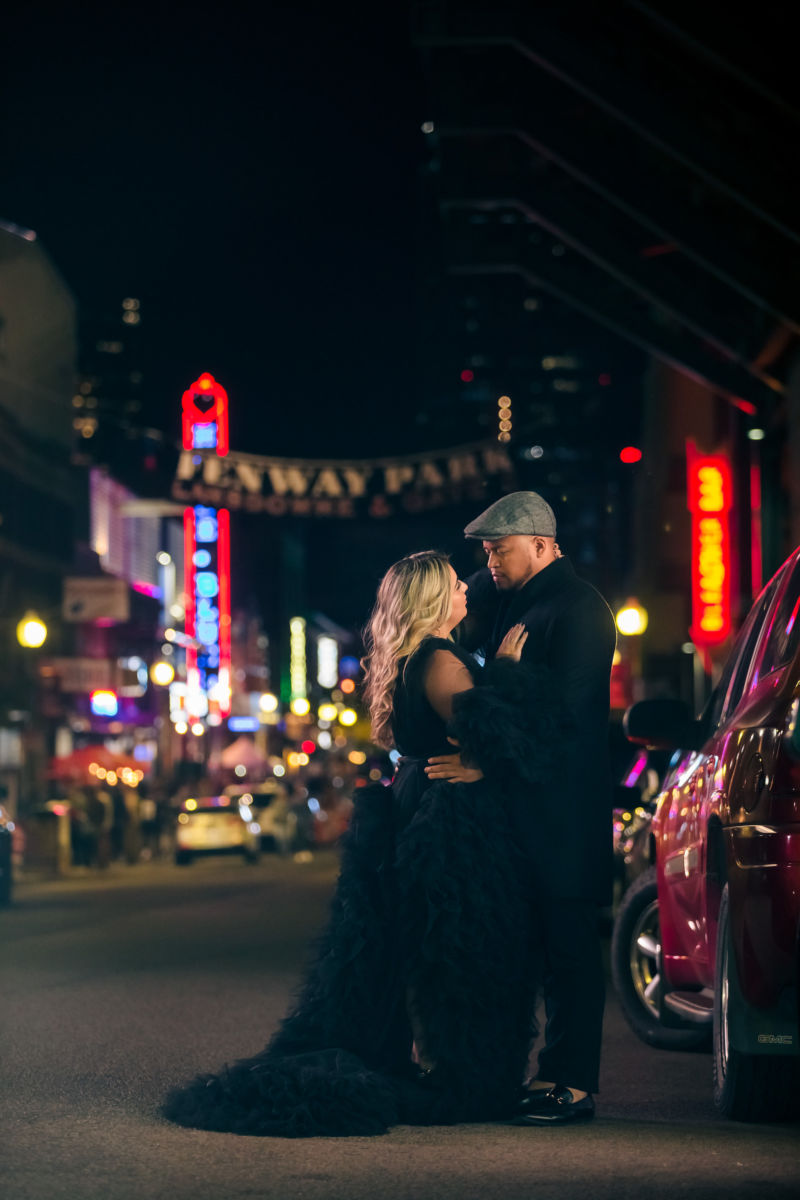
To further inspire your journey into capturing couples portraits, we are exclusively featuring images created by our SLR Lounge Premium Members. We’re honored to be a part of their photography journey and incredibly proud of the images they have created. These members exemplify our belief that investing in your education and skillset is important, even for established professionals, creating the imagery you see below. To get featured in articles like this and to learn more about our program, check out SLR Lounge Premium.
Couple Photography Tips and Inspiration
- Understand Your Client’s Vision
- Scout Locations
- Choose a Lighting Style
- Use Foundation Posing
- Start with the Basics
- Show Your Clients the Images
- Always Consider Composition
- Edit to Match the Style of the Shoot
Tip 1: Understand Your Client’s Vision

A great photography session begins during the initial meeting and subsequent talk-throughs with your clients. These conversations give you an opportunity to better understand your client’s vision and deliver photos they love. Over the years, we’ve found that the best way to do this is to have an end product in mind when planning for the shoot, such as a print, a wall art collection, or a photo album. You can use this end goal as a means to figure out what your clients want. We use an exercise we call the W.A.V.E., or Wall Art Vision Exercise. Here are some specific questions to ask your clients when taking this approach:
- Ask your clients to imagine their home
- Ask them to imagine a spot in their home where they might hang a piece of wall art from the session (either a single framed print or a wall art collage)
- Inform your clients that the wall art could cost $1,000+ (this preps them for purchasing quality products and let’s them take the exercise more seriously)
- Remind your clients they would see this wall art daily
- Ask your clients what photo(s) they envision being used for the wall art (an epic & moody wide-angle shot, a bright and airy candid portrait, a backlit silhouette, etc.)
In addition to helping you better serve your clients, using the W.A.V.E. also provides a means of boosting your revenue if you plan to sell prints. You’ll know out of the gate the type of wall art your clients are interested in, and you’ll have a better idea of what you need to do to deliver photos that they’ll want to print and hang.
Tip 2: Scout Locations

Once you’ve decided on a location based on your client’s interests and covered any details regarding permits, you’ll need to scout the location to find the best backgrounds, angles, and light. This is one of the most important couple photography tips on the list. You can show up 30-60 minutes early on the day of the session to do this, which is ideal, or you can check it out virtually way beforehand using Google Earth or some other similar site or service.
Many photographers will arrive on-location and scout out 10+ spots, each featuring different (yet often similar) backdrops, to really feel like they’re making the most of that location. However, if you take your time and scout the “best” spots to match your vision, you can usually limit it to two or three different locations and then work each one with creative angles, pose variations, and so on to spend more time shooting and less time walking all over the place.
To help you plan for lighting, you can use helpful apps, like Sun Surveyor, which will show you the position of the sun based on your location at a specific time. Using apps like this will help ensure you hit your spots when the light is right where you want it to be.
Tip 3: Choose a Lighting Style

Based on talk-throughs with your clients, you should have established the lighting style they’re most interested in before the day of the shoot. One way to do this is to ask your clients to put together a moodboard with a short description of what they like about the photos they’ve chosen (such as the lighting, poses, outfits, locations, etc.). The Wall Art Vision Exercise mentioned above can also help establish your clients preferred lighting style.

If your clients prefer bright and airy shots with natural, golden hour lighting (as many clients do), then you’ll plan to shoot during golden hour using natural light and perhaps a 5-in-1 reflector to get the look you’re after. Of course, you can always re-create golden hour as well, when necessary. Otherwise, if your clients prefer a moodier look, you will need to bring the appropriate lighting gear to make that happen.
Whichever look you choose, try to stay consistent so that the set of images you create remain cohesive throughout. This will make it easier for you to design blog and/or album spreads, as well as wall art collages.
Couple Photography Tips – 4: Use Foundation Posing
Posing can make or break your session. It’s common to try and memorize poses from Pinterest and elsewhere early on in your journey, but recalling specific poses during a shoot, when you’re under pressure, can prove difficult. Instead, we recommend learning our very own foundation posing framework.
We created this framework to take the guesswork out of posing and get consistent results. It also helps your clients get comfortable because they can quickly learn the five basic foundation poses they’ll use throughout the session. Whether you’re new to couples photography or you’ve been shooting a while and have struggled with posing, you’ll love using this system.
Before you snap any photos, put your camera down and run through each of the five poses with the couple.
The V-Up
The subjects’ shoulders are hinged on the back and their bodies form the shape of a V, facing toward each other.

The Closed Pose
The couple faces in with their feet pointing at each other.


The Open Pose
The couple stands apart (though usually holding hands), facing (or facing away from) the camera.

The Stacked Pose
Somewhat like a prom pose (but better), one person stands in front of the other with both people facing the same direction.


The Reverse Pose
Similar to the closed pose, but at a different angle, the couple should face opposite directions while one faces the camera.

Tip 5: Start with the Basics

Now that you have your poses down, we recommend starting your couple photography session with the basics. You can get more creative as the session rolls on, but try to ease into the session with basic poses, having the couple smile, looking at the camera, and then each other, and so on. You can also start with some candid action shots, like walking, to let the couple know that they can be themselves. Starting with some clean, basic portraits will help your clients get comfortable and gain confidence right out of the gate, especially if you follow the next bit of advice in this collection of couple photography tips.
Tip 6: Show Your Clients the Images

Unless your clients are professional models, they’re probably going to feel a little shy or awkward when first posing in front of your camera. Even if they’re old pros when it comes to selfies, they won’t be able to control how they look during this session, leaving them at your mercy. You can help them quickly overcome this fear by showing them the images on the back of your camera. Let them see how great they look. Plus, if they want to make any adjustments, it’s best to figure that out early on.
Couple Photography Tips – 7: Always Consider Composition

No matter the genre, minding composition “rules” will no doubt elevate your photos. More than that, composition can serve a specific purpose in setting up your shots. For example, if you plan to capture a photo slated for use in a “Save the Date” invite, you’ll need to leave enough empty space in the frame to place words for the card. Here are some other basic composition tips to consider when photographing couples. Whenever possible, stack as many of these compositional techniques into a single photo as possible (while still creating a great looking image).
Leading Lines

Symmetry


Framing

Colors

Reflections

Tip 8: Edit to Match the Style of the Shoot

The last, but not least, of these couple photography tips sort of goes without saying, but it’s worth keeping in mind that your editing style should match the style of the shoot.

If you’ve set up an editorial pose or dramatically lit shot, edit for that look with more contrast and play between highlights and shadows. On the other hand, if the photos feature more of a light and airy style, keep the edit on the brighter side.
Conclusion
We hope you found helpful information in this collection of couple photography tips and inspiration from the images shared by our Premium community. Be sure to put these tips into practice the next time you prep and shoot couples portraits.


Get Connected!