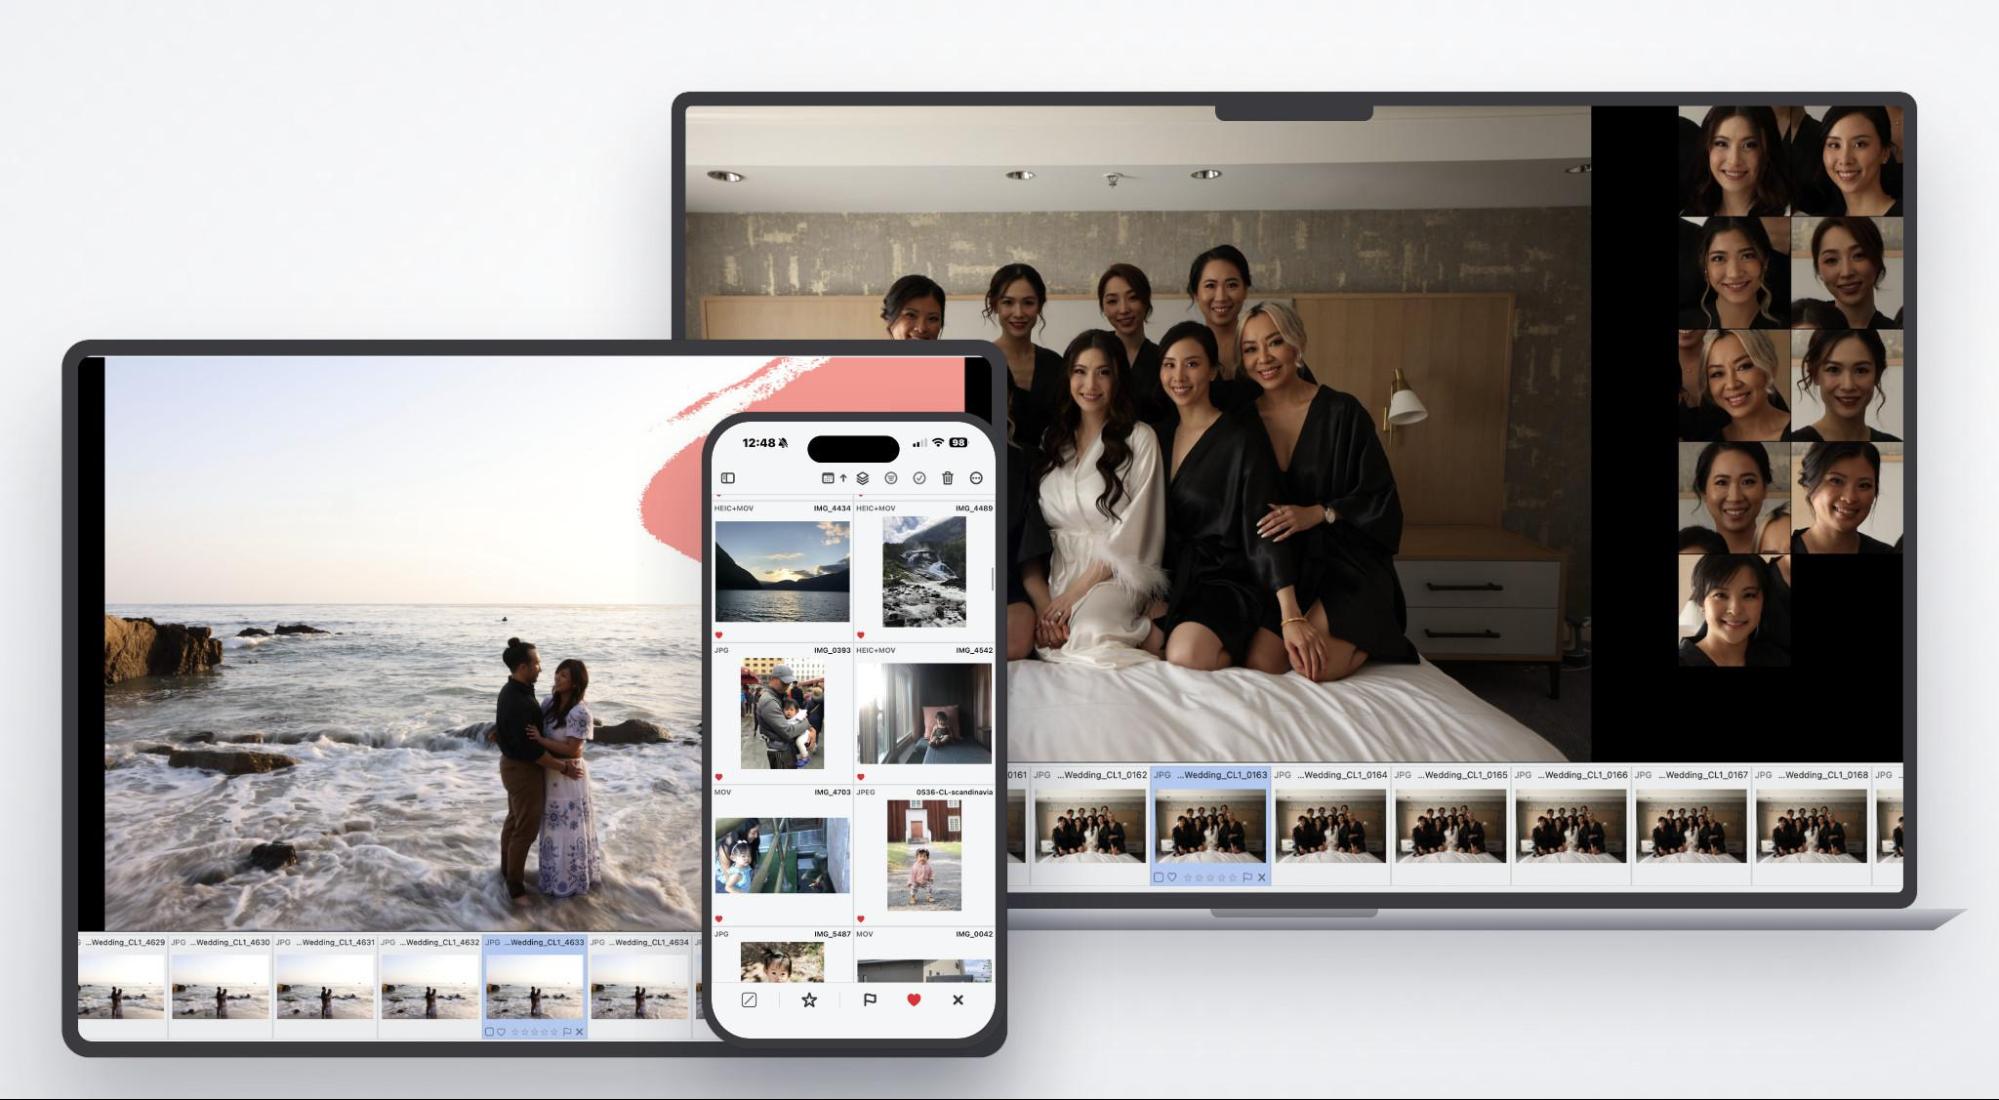
If you’re an Apple user looking for a seamless photo editing workflow that works across your Mac, iPad, and/or iPhone, pay attention! In this PhotoCuller review, you’ll find out just how much easier your workflow could get.
We’ve all been there before: downloading files from a memory card in Finder, trying to keep dozens of folders organized, then opening another app to sort keepers from rejects, waiting forever to determine whether our “keeper” photos are sharp or whether anyone blinked in a group portrait. Then color correction, and maybe another app for retouching. That’s four or five apps and hours of your time before you deliver anything to anyone.
In 2026, the headaches of file management and basic culling should not still exist, yet for many, this is a major source of delay or procrastination. How can we streamline this step, improve the safety of our downloaded images, and drastically improve turnaround times? With an application such as PhotoCuller.
PhotoCuller handles the download and backup, then transitions straight into culling with star ratings, keywords, and metadata, and finally routes every file to wherever it belongs, automatically. Let’s dive in.
What is PhotoCuller?
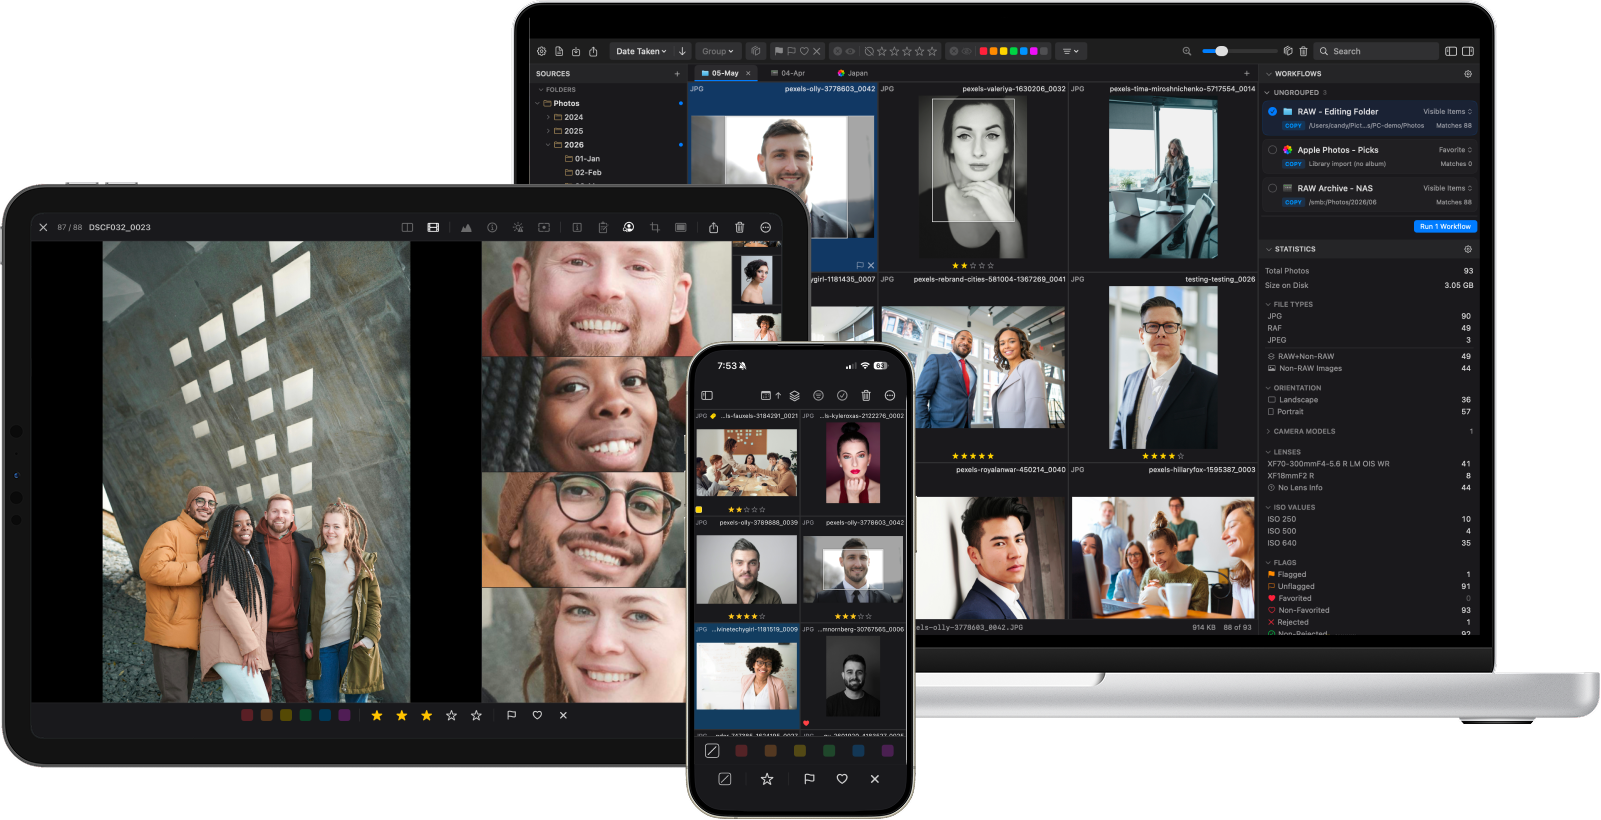
First of all, let’s go over some key points. PhotoCuller works on Apple Silicon (M-series) Macs running macOS 15 Sequoia or later, and on similar-generation iPads and iPhones running iOS 18.6 or later. It does not require an internet connection to work, so you can perform workflow tasks even while you’re off the grid on an adventure, or at a destination wedding without wifi, etc.
PhotoCuller is a foundational software application that structures and manages your overall workflow. It exists to create a smooth, seamless environment for downloading, organizing, and culling your photos. Unlike most other file management apps, however, PhotoCuller integrates powerful tools that make the more time-consuming aspects of culling much, much easier.
Indeed, sorting your keepers from your rejects used to be a tedious, laborious task. It was not fun; there was minimal creativity or “artistic vision” involved in simply making sure your images were sharp or checking all the smiles, etc, in a group portrait.
In our 15+ years of experience as a wedding & portrait photography studio, the worst-case scenario is that if you’re using the wrong software (and the wrong mental state) to cull your photos, it can take an entire 8-hour day to sort through 1000-2000 photos. However, with the right tools and mindset, that process can be reduced to just minutes or 1-2 hours!
This is why we were excited to check out PhotoCuller. It can save us time at exactly the critical point where we’re consuming a lot of time, and yet, if we COULD speed up the workflow, it wouldn’t harm our creative vision. With that said, let’s get into the details!
- OS COMPATIBILITY: macOS 15 Sequoia or later, Apple Silicon only (no Intel Macs, no Windows); iOS/iPadOS 18.6 or later
- PRICE: $49 Desktop (up to 2 Macs) / $79 Bundle (up to 4 devices across Mac, iPhone, and iPad)
- LICENSE: One-time purchase, no automatic renewal. The Mac license never expires. Both tiers include 2 years of Mac updates; the Bundle adds 2 years of iPhone and iPad access. An additional year of updates is $29.
- FREE TRIAL: 30 days, full-feature, no credit card required
- INTERFACE: Grid View, Full View, and a sortable List View, plus loupe, side-by-side comparison, and the Subject Panel
- INTEGRATION W/ EXTERNAL APPS: Yes, including Apple Photos albums, network locations and NAS, and routing out to other editors (Lightroom, Photoshop, etc.)
- FILE COMPATIBILITY: JPG, RAW (Nikon, Canon, Sony, Fujifilm, Panasonic, & more), TIF, PNG, HEIC, with XMP sidecar awareness
Here is how you use PhotoCuller: instead of manually downloading your image files using Apple Finder, or trusting a catalog system such as Lightroom or Apple Photos to keep track of where everything went, you start your workflow by opening PhotoCuller and letting it ingest all your files from your memory cards. As the app downloads your photos to your computer, you can automatically apply any metadata you wish, such as copyright info and keywords.
Simultaneously, you can also create a backup copy of your images, transferring them onto an external drive, a cloud storage folder, or a NAS. Being able to perform this critical step in an automated way is a huge help, but the workflow definitely does not stop there! What comes next, the actual culling, is where significant time savings will happen.
Step One | Ingest & Automatic Folder Structures
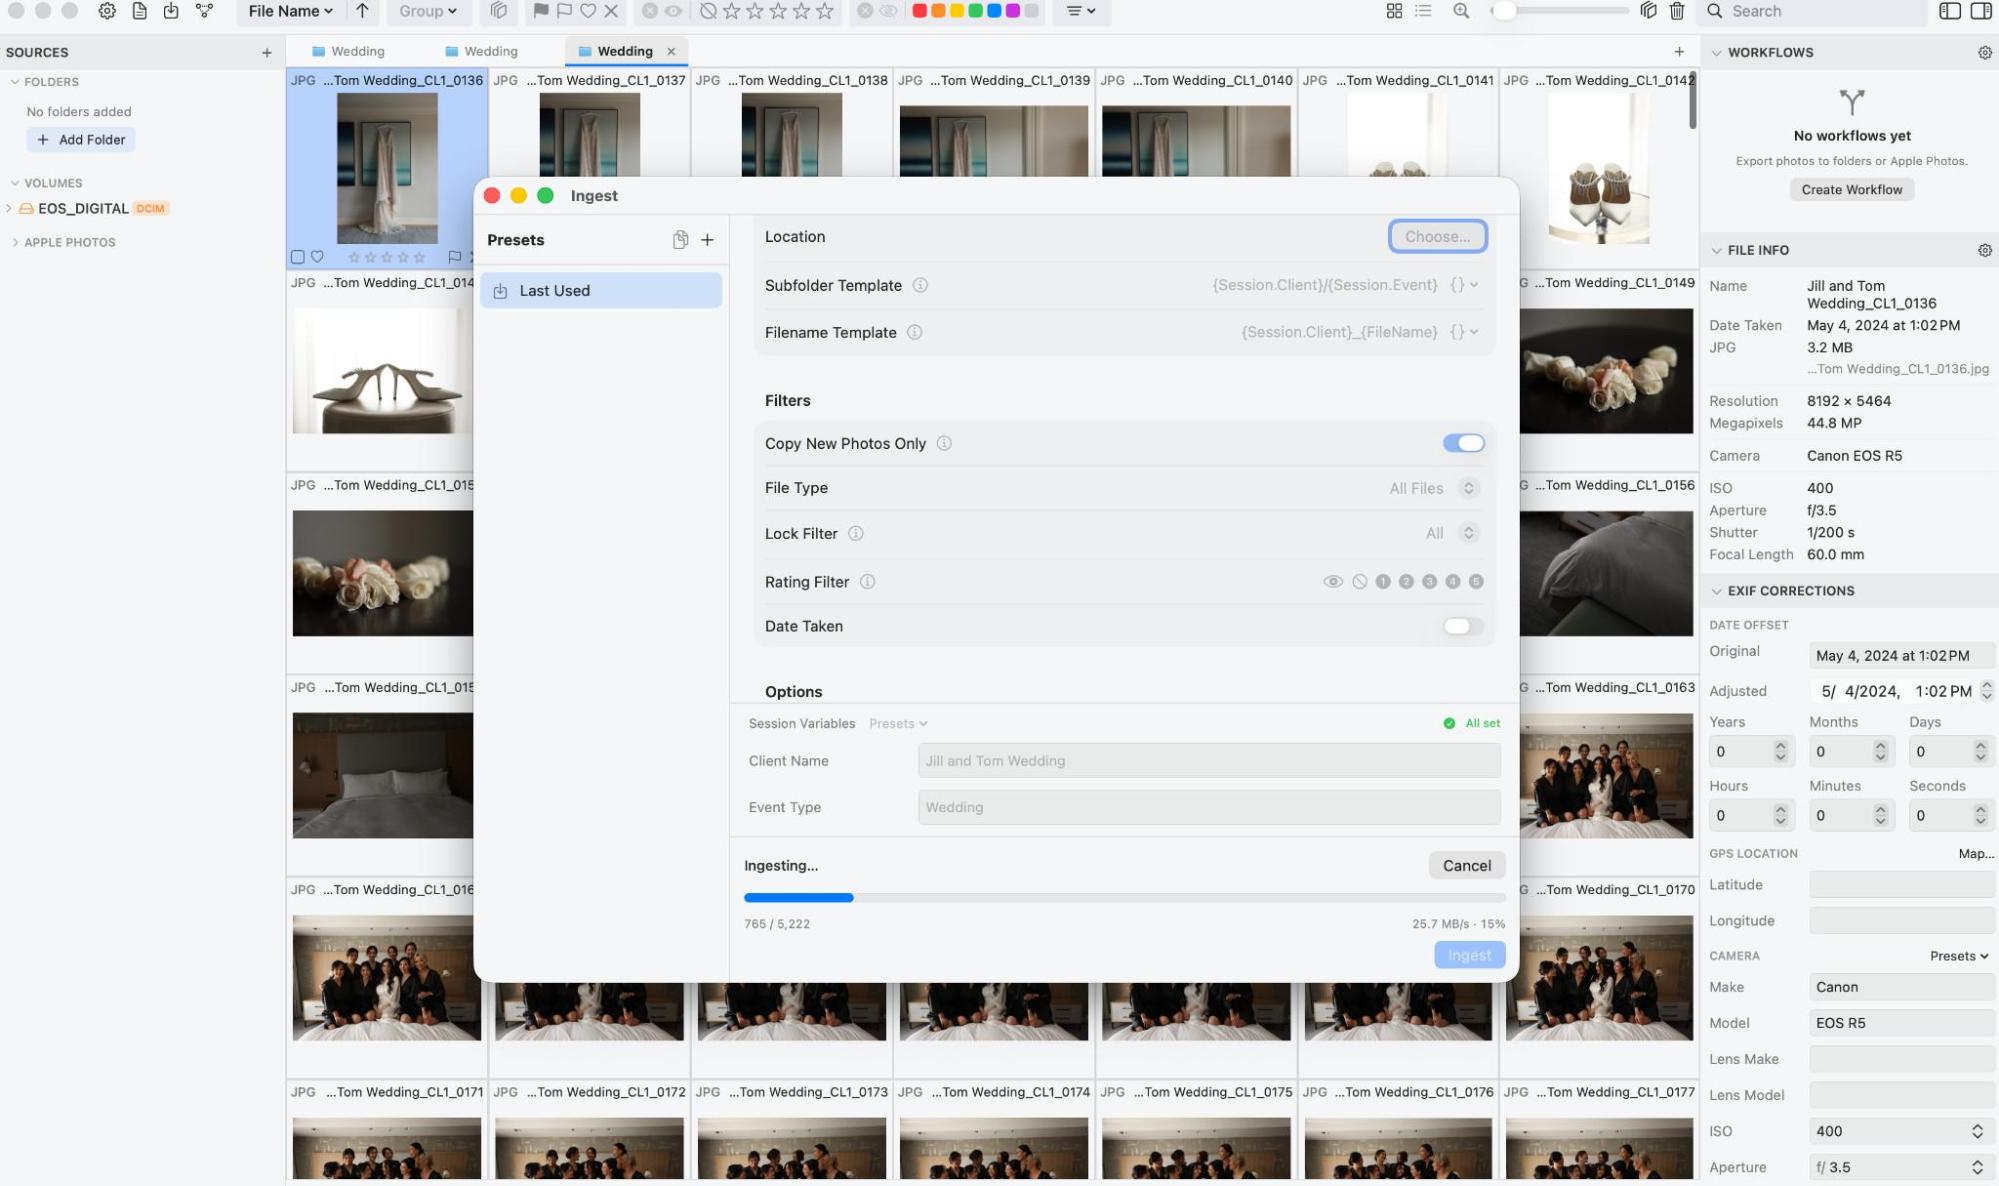
Ingesting a card. The Subfolder Template reads {Session.Client}/{Session.Event} and the Filename Template reads {Session.Client}_{FileName}, with the Session Variables filled in below as “Jill and Tom Wedding” and “Wedding.” Set those two fields once and the entire card files and renames itself.
This is the part of PhotoCuller we’d want every photographer to see, because it solves a problem most of us have simply learned to live with.
Look at the two template fields in the middle of that Ingest panel. The Subfolder Template is set to {Session.Client}/{Session.Event} and the Filename Template to {Session.Client}_{FileName}. Those curly braces are variables, and underneath, in the Options section, PhotoCuller asks you to fill in the Session Variables it needs: Client Name, entered here as “Jill and Tom Wedding,” and Event Type, entered as “Wedding.”
That’s the whole interaction. Two text fields at the start of a card offload, and every file lands in a correctly named folder with a correctly prefixed filename. No dragging in Finder, no renaming batches later, no folder called Wedding final FINAL v2 six months from now. Consistency in folder structure costs nothing when it’s enforced automatically at ingest and costs enormously when it depends on your discipline at 2am after a wedding.
The Filters section above it is the other half of the story. Copy New Photos Only means plugging in a half-offloaded card doesn’t duplicate anything, which matters more than it sounds when you’re swapping cards all day. You can also filter the ingest by file type, by rating, or by date taken, so a card carrying two jobs doesn’t have to come in as one undifferentiated pile.
You can watch it working at the bottom of the panel: 765 of 5,222 files at 25.7 MB/s. Meanwhile the right-hand FILE INFO panel is already populated for the first files to land, and the EXIF Corrections section below it offers a date offset tool, which is the fix for the classic problem of a second shooter’s camera clock being set to the wrong time zone. Shift the dates and your two-camera timeline lines back up.
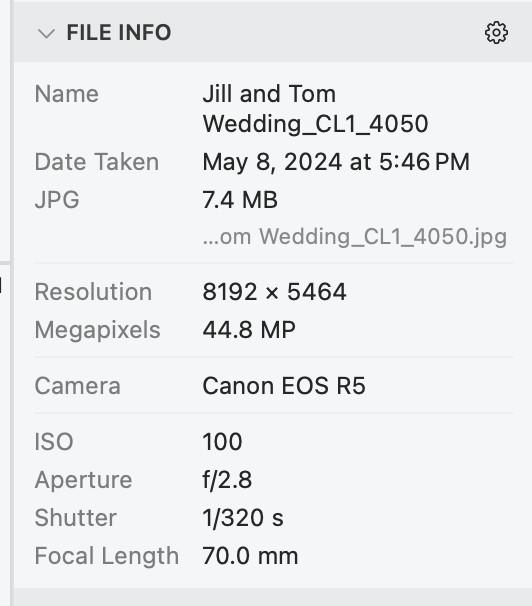
The FILE INFO panel. Filename, capture date, file size, resolution, megapixels, camera, and the full exposure triangle, without opening a separate inspector.
Worth noting too: PhotoCuller can treat a RAW+JPEG pair as a single item rather than two files you manage in parallel. You rate it once, you route it once, and the app keeps the pair together. Anyone who has accidentally culled the JPEGs while leaving 900 orphaned raw files behind will appreciate this immediately.
Step Two | Culling, Ratings, Flags & Color Labels
Once your files are in, the grid is where you’ll spend most of your time. PhotoCuller supports the full set of marking tools you’d expect: star ratings, flags, favorites, rejects, and color labels, all visible directly on the thumbnails so you can see the state of an entire shoot at a glance.

The marking vocabulary in use across one sequence. Star ratings sit under each frame, an orange flag marks the first, a red X and red shading mark a reject, blue indicates the current selection, and an orange color label sits at bottom left. Everything is visible without opening a single image.
In the screenshot above you can see that vocabulary at work across a single sequence of a couple walking with their dog. Some frames carry five stars, others three or one. One is flagged. One is shaded red because it has been rejected. Another carries an orange color label, and the blue frame is simply the current selection.
This is the raw material that the Workflows feature later uses to route everything automatically, which is why the marking vocabulary being this rich actually matters. Every mark you make here becomes a rule you can act on later.
Indeed, the biggest time-saver (or time-waster) in most photo editing workflows is the busywork before the fun part. This is where we used to feel the most anxious and intimidated in our early years as professional photographers.
You may have captured hundreds or even thousands of images in one day. Maybe you already edited and shared one or two of your favorites on social media. Then, reality sets in: actually going through every photo might take innumerable hours, even days.
This is where PhotoCuller will save the day. Within the same application as your download & backup workflow, you can tackle the culling process using a whole host of advanced tools that, to the best of our knowledge, cannot collectively be found elsewhere in one single app.
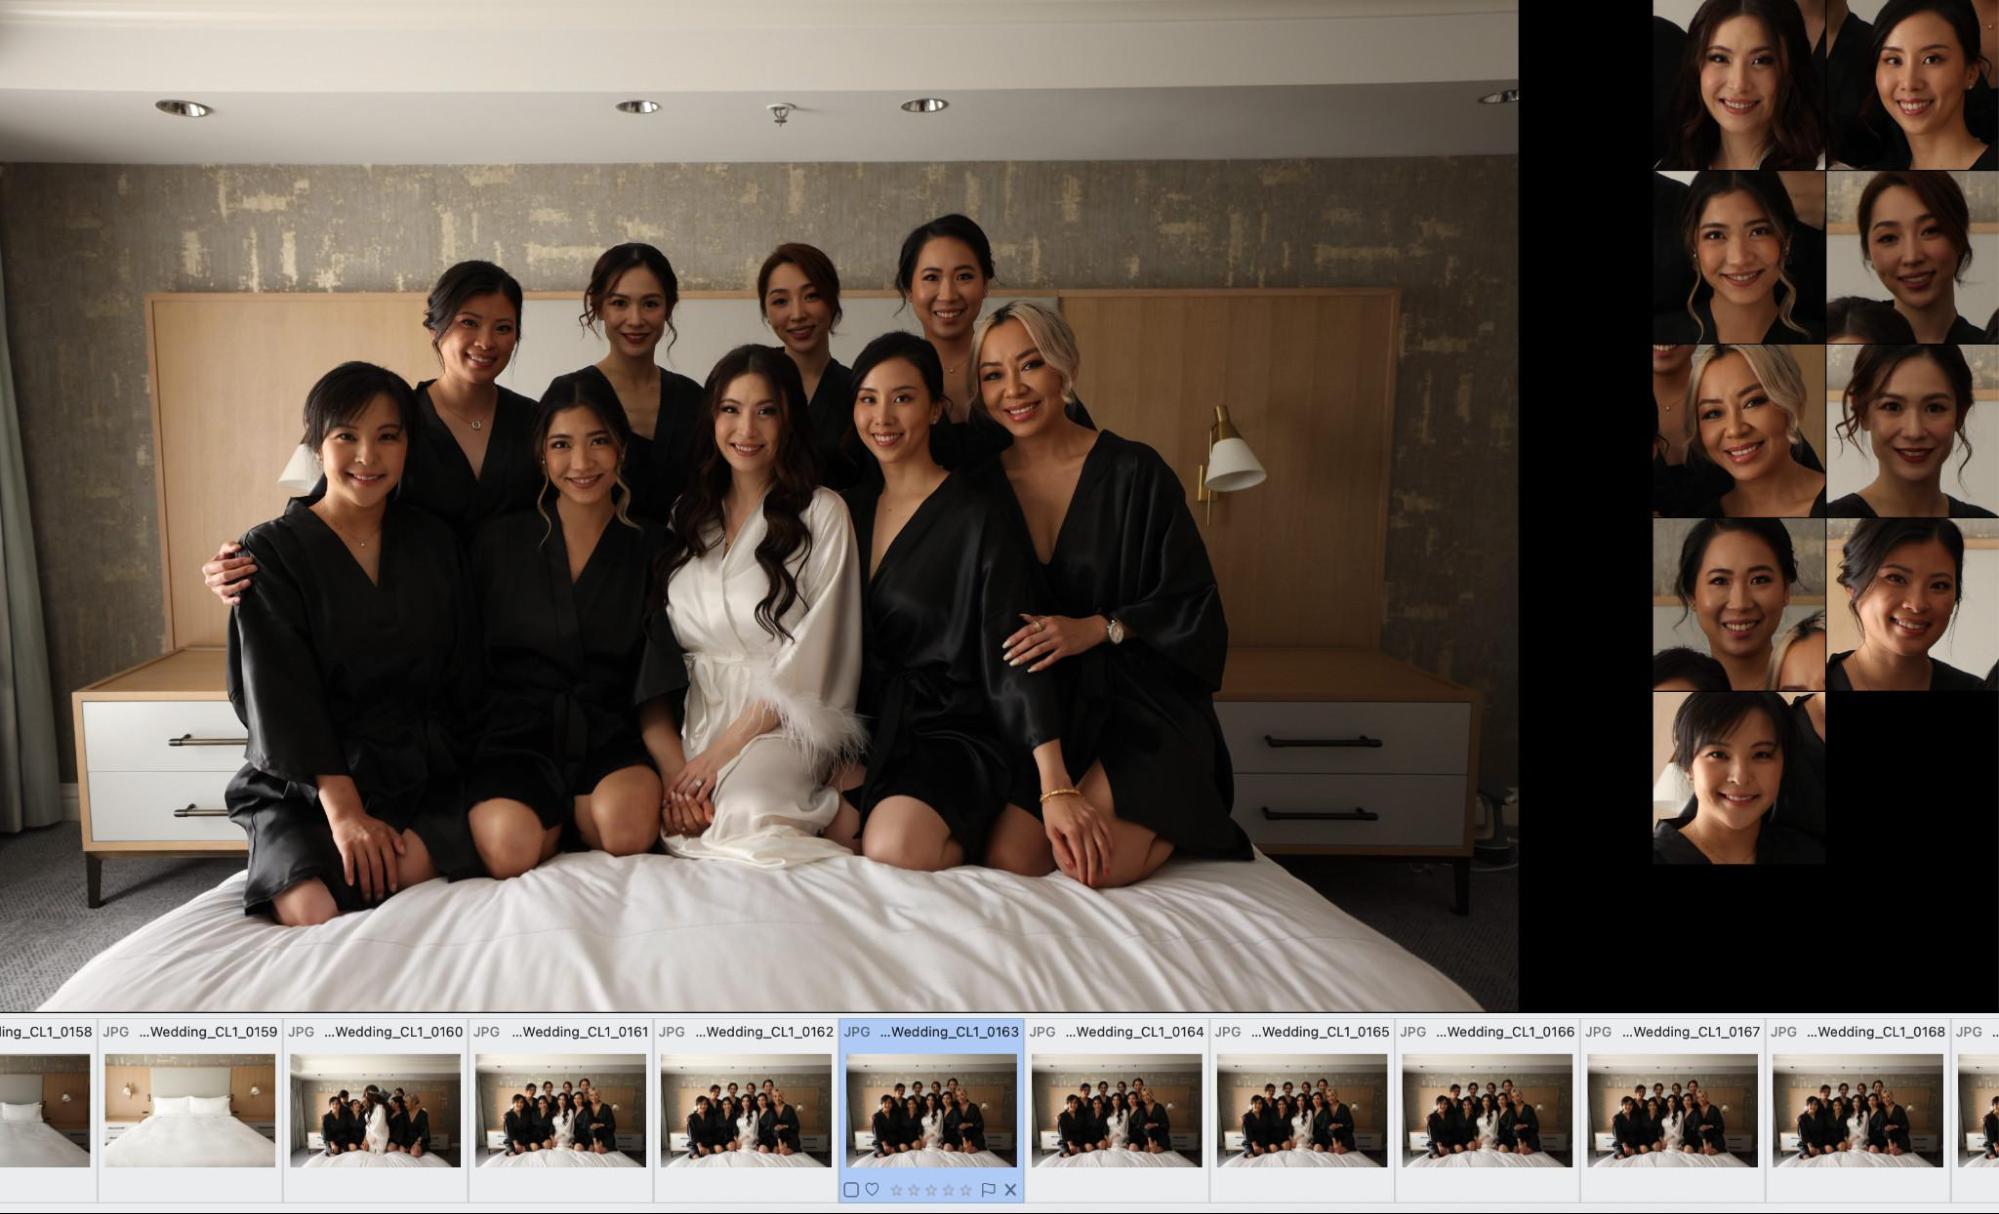
The Subject Panel on a bridal party. PhotoCuller detected all nine faces in the frame and stacked them along the right edge as enlarged crops, so every expression can be checked without zooming and panning around the image. Clicking on a face in the panel zooms into that face as well for even more detailed sharpness review.
For us as wedding and portrait photographers, checking faces for blinking eyes or imperfect smiles is critical. The PhotoCuller Subject Panel, as you can see, suddenly makes that process incredibly swift. For your photos without faces, it will detect dogs, cats, and the main subjects of a photo if they are objects.
Here’s the specific problem it solves. In a nine-person bridal party like the one above, the traditional method is to zoom to 100%, pan to the first face, check the eyes, pan to the second, check, pan to the third, and so on. That’s nine separate inspections per frame, and there are a dozen frames of this pose. The Subject Panel does that navigation for you, stacking every detected face as an enlarged crop down the side. One glance and you know whether anyone blinked.
It scales down as well as up. On a single-subject frame, the panel simply gives you one large crop instead of nine small ones.
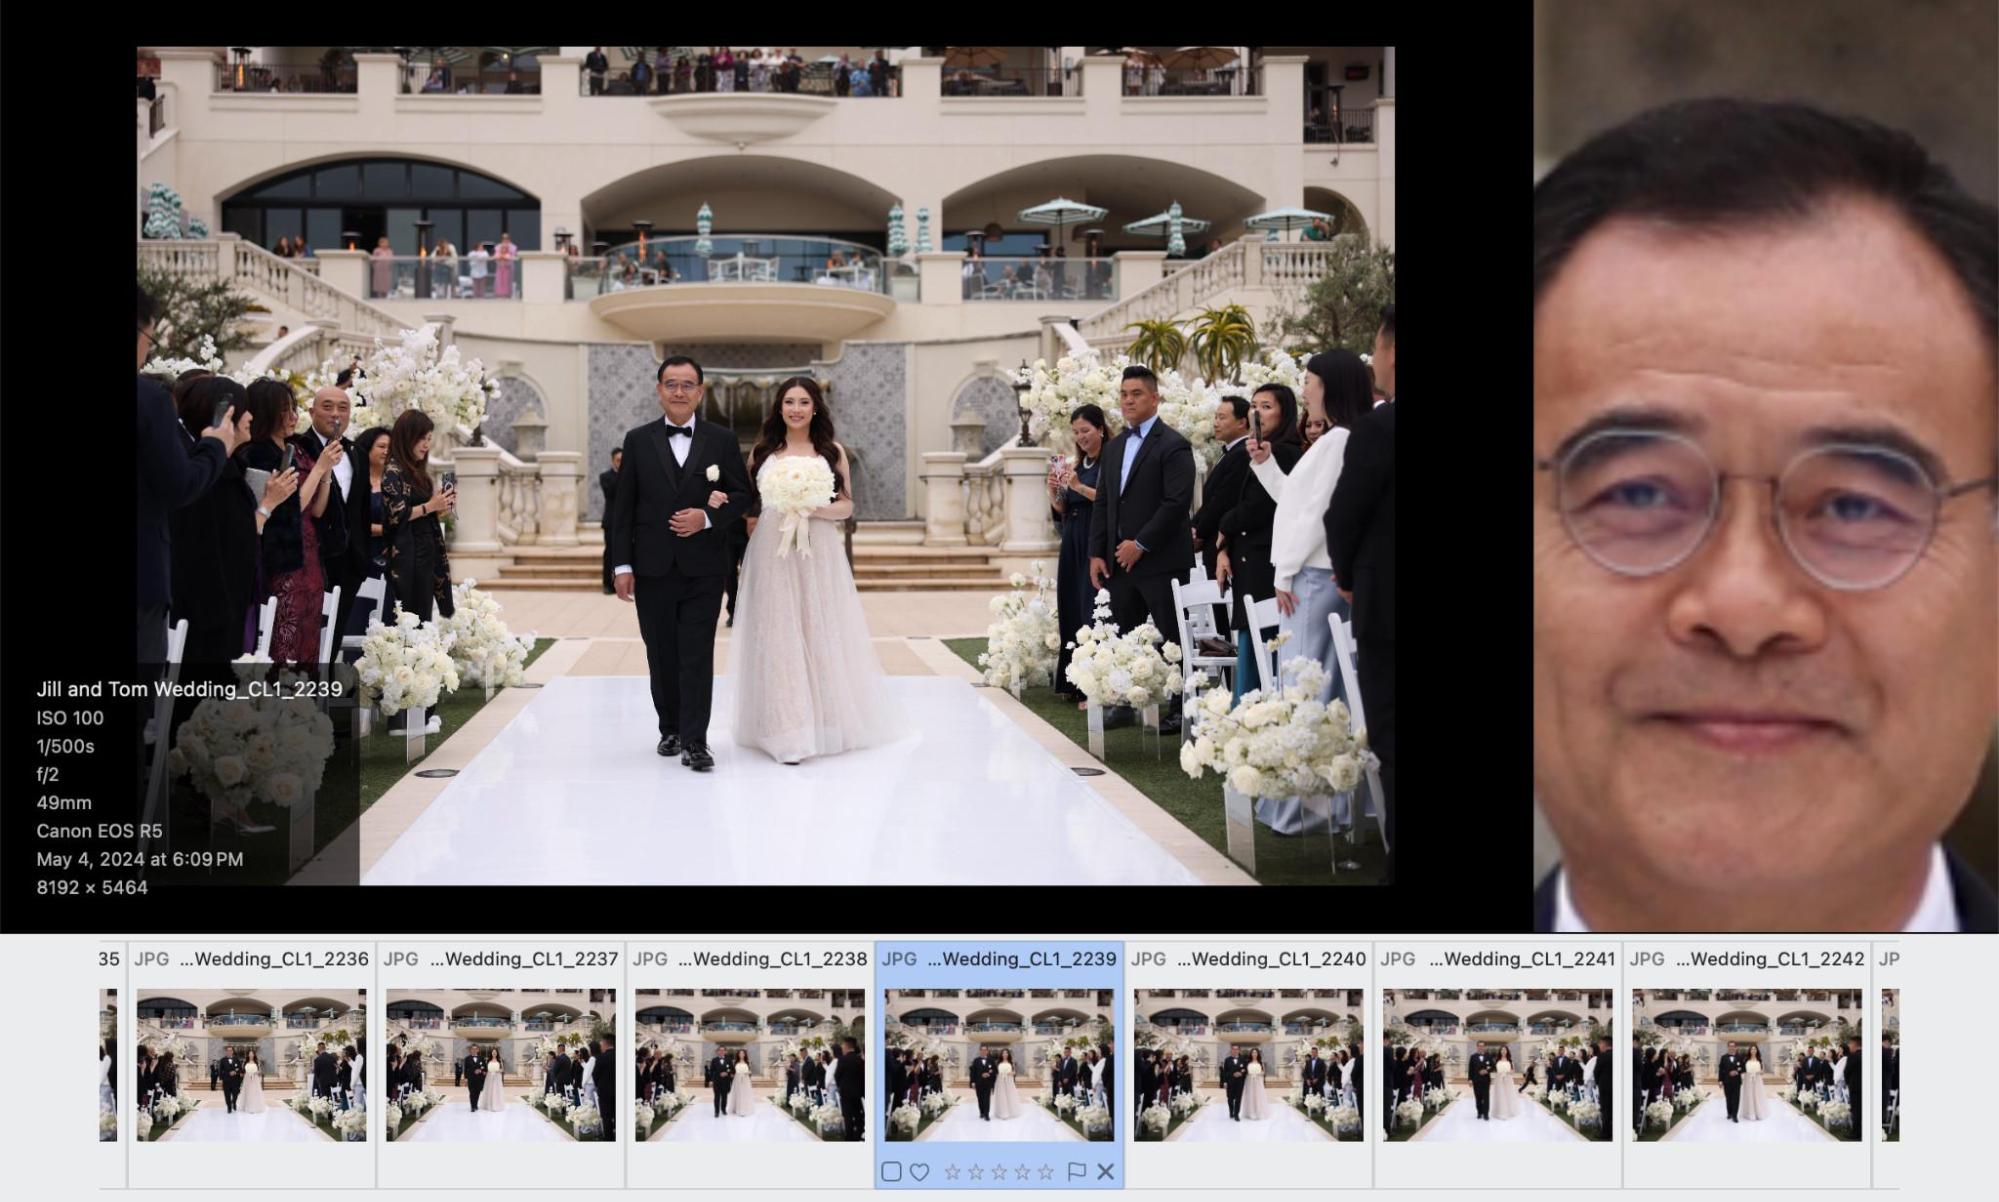
The same tool on a processional frame. With one prominent face in the scene, the panel devotes the full width to it, large enough to check the expression at a glance while the shooting data stays visible at lower left.
One clarification worth making, because the name invites the wrong assumption: the Subject Panel detects faces, it does not judge them. PhotoCuller describes it as detecting faces and letting you “review close-up crops of every detected face in one panel,” and that is exactly what it does. There is no blink detection, no expression scoring, and no automatic ranking or rejecting based on who is smiling. If you’re coming from an AI culling service that promises to pick your keepers for you, this is a different kind of tool.
We’d argue that’s the right call for this product. The time savings here come from eliminated navigation rather than from software making aesthetic decisions on your behalf, and every judgment stays yours. But if you were hoping to hand off the “did anyone blink” question entirely, PhotoCuller isn’t that app, and you should know that going in.
For a wedding photographer working through family formals, where you might have twenty variations of the same eight people, this is the difference between a tedious afternoon and a short one. Considering the load time for a raw preview and the time it takes to zoom in and scroll around, this could result in major time savings.
Additional tools will save even more time and add to the level of quality that you deliver in the final results. While culling, you can toggle on and off a few critical technical tools, including focus peaking and exposure warnings.
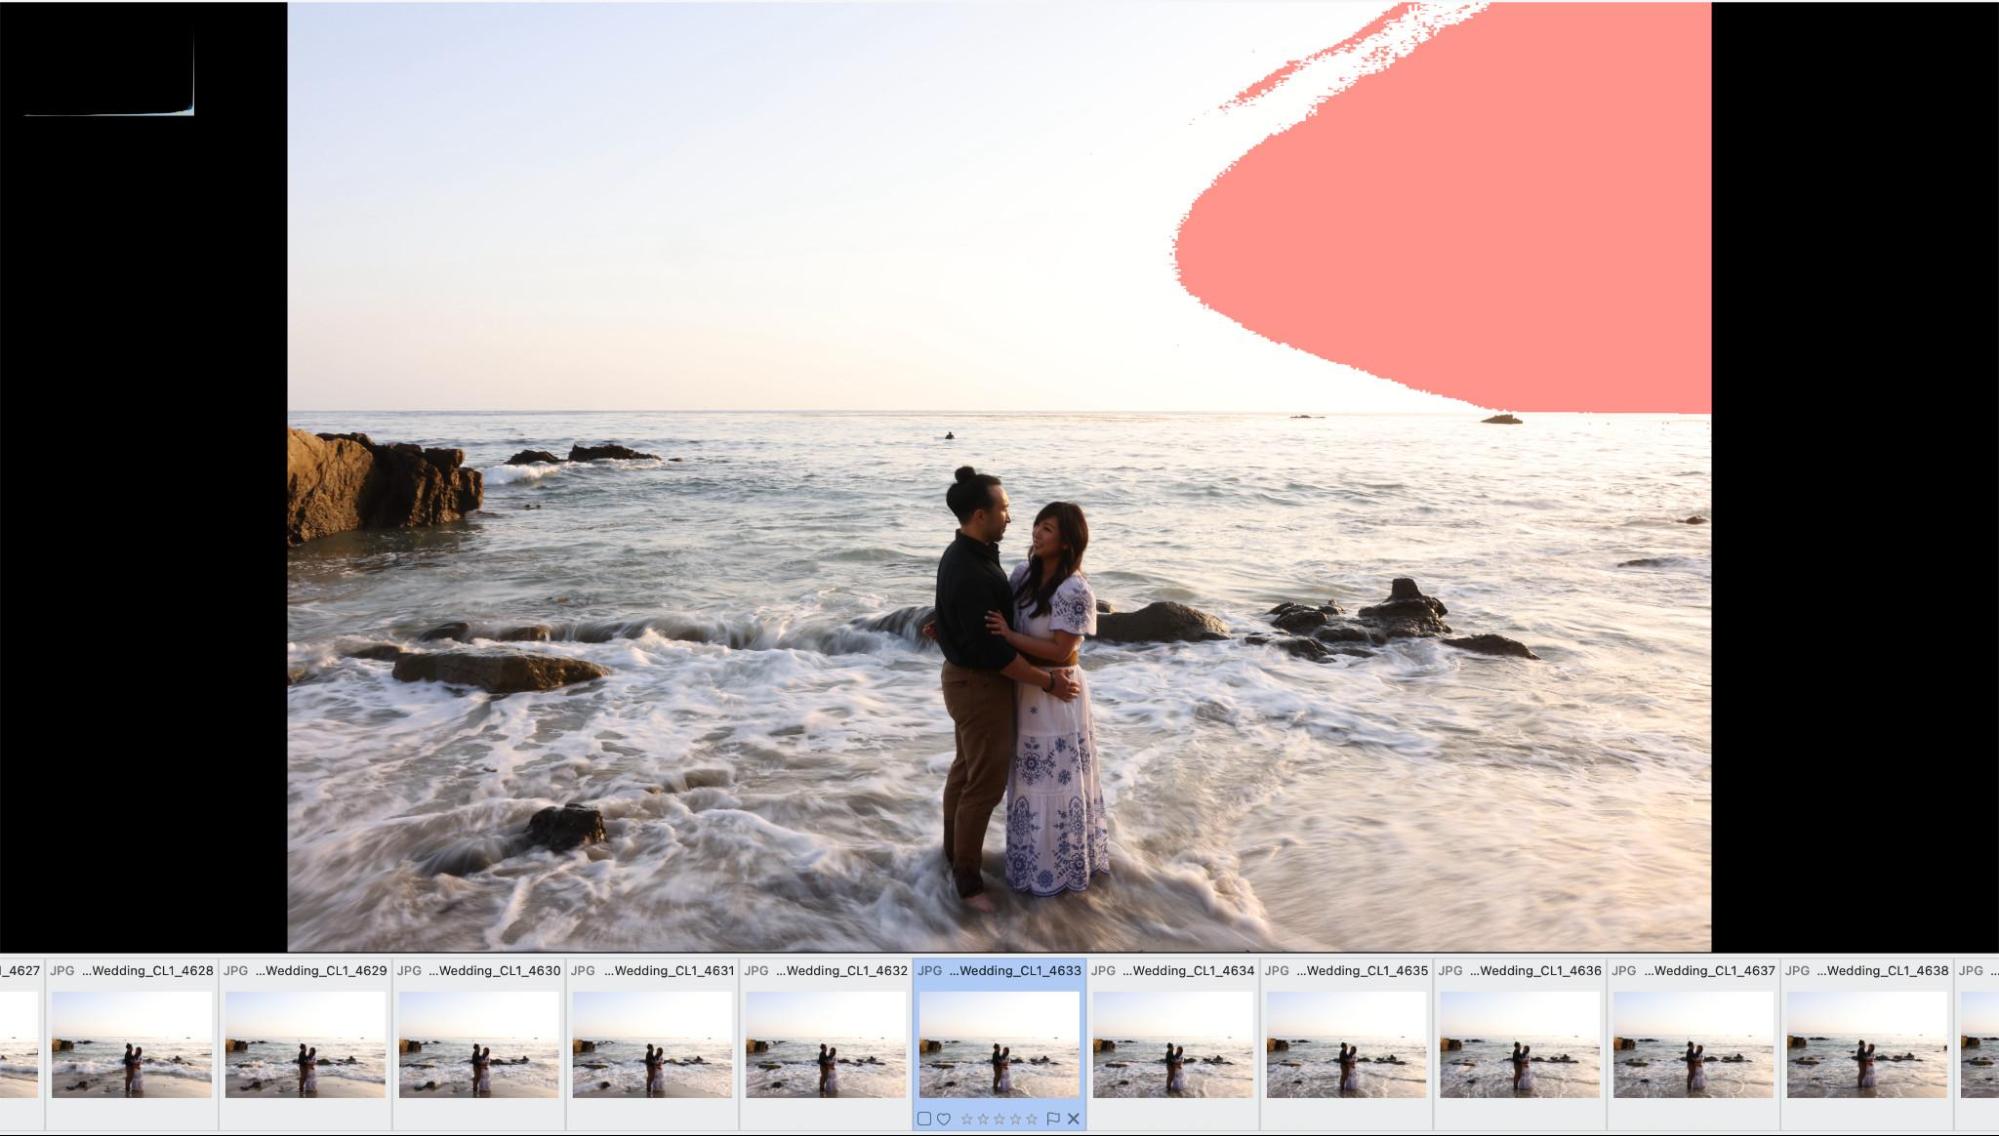
The exposure warning overlay on a backlit beach portrait. Everything shaded red has clipped to pure white and will not come back in post. The sky above the couple is fine; the hot patch to the right of frame is not.
The frame above is exactly the situation this exists for. Shooting into a low sun over water, the histogram alone won’t tell you where the image blew out, only that something did. The red overlay answers the question instantly: the blown area is a patch of sky and water off to the right, well away from the couple. That’s a keeper. Had the red been sitting on the bride’s dress, it would not be.
Focus peaking works the same way on the other half of the technical question, outlining the areas that are genuinely in critical focus so you can confirm a frame is sharp without zooming to 100%. Answering both of those questions used to mean zooming in and then separately checking a histogram. Here it’s two toggles and a single glance, which is the sort of small speed gain that compounds across a thousand frames.

Anyone who shoots bursts, sequences, or simply works a scene knows the specific tedium of comparing twelve nearly-identical frames. PhotoCuller’s Group by Similar Scenes handles this by automatically clustering visually similar images together, so instead of scrolling past twelve versions of the same shot you’re presented with the cluster and asked to pick a winner.
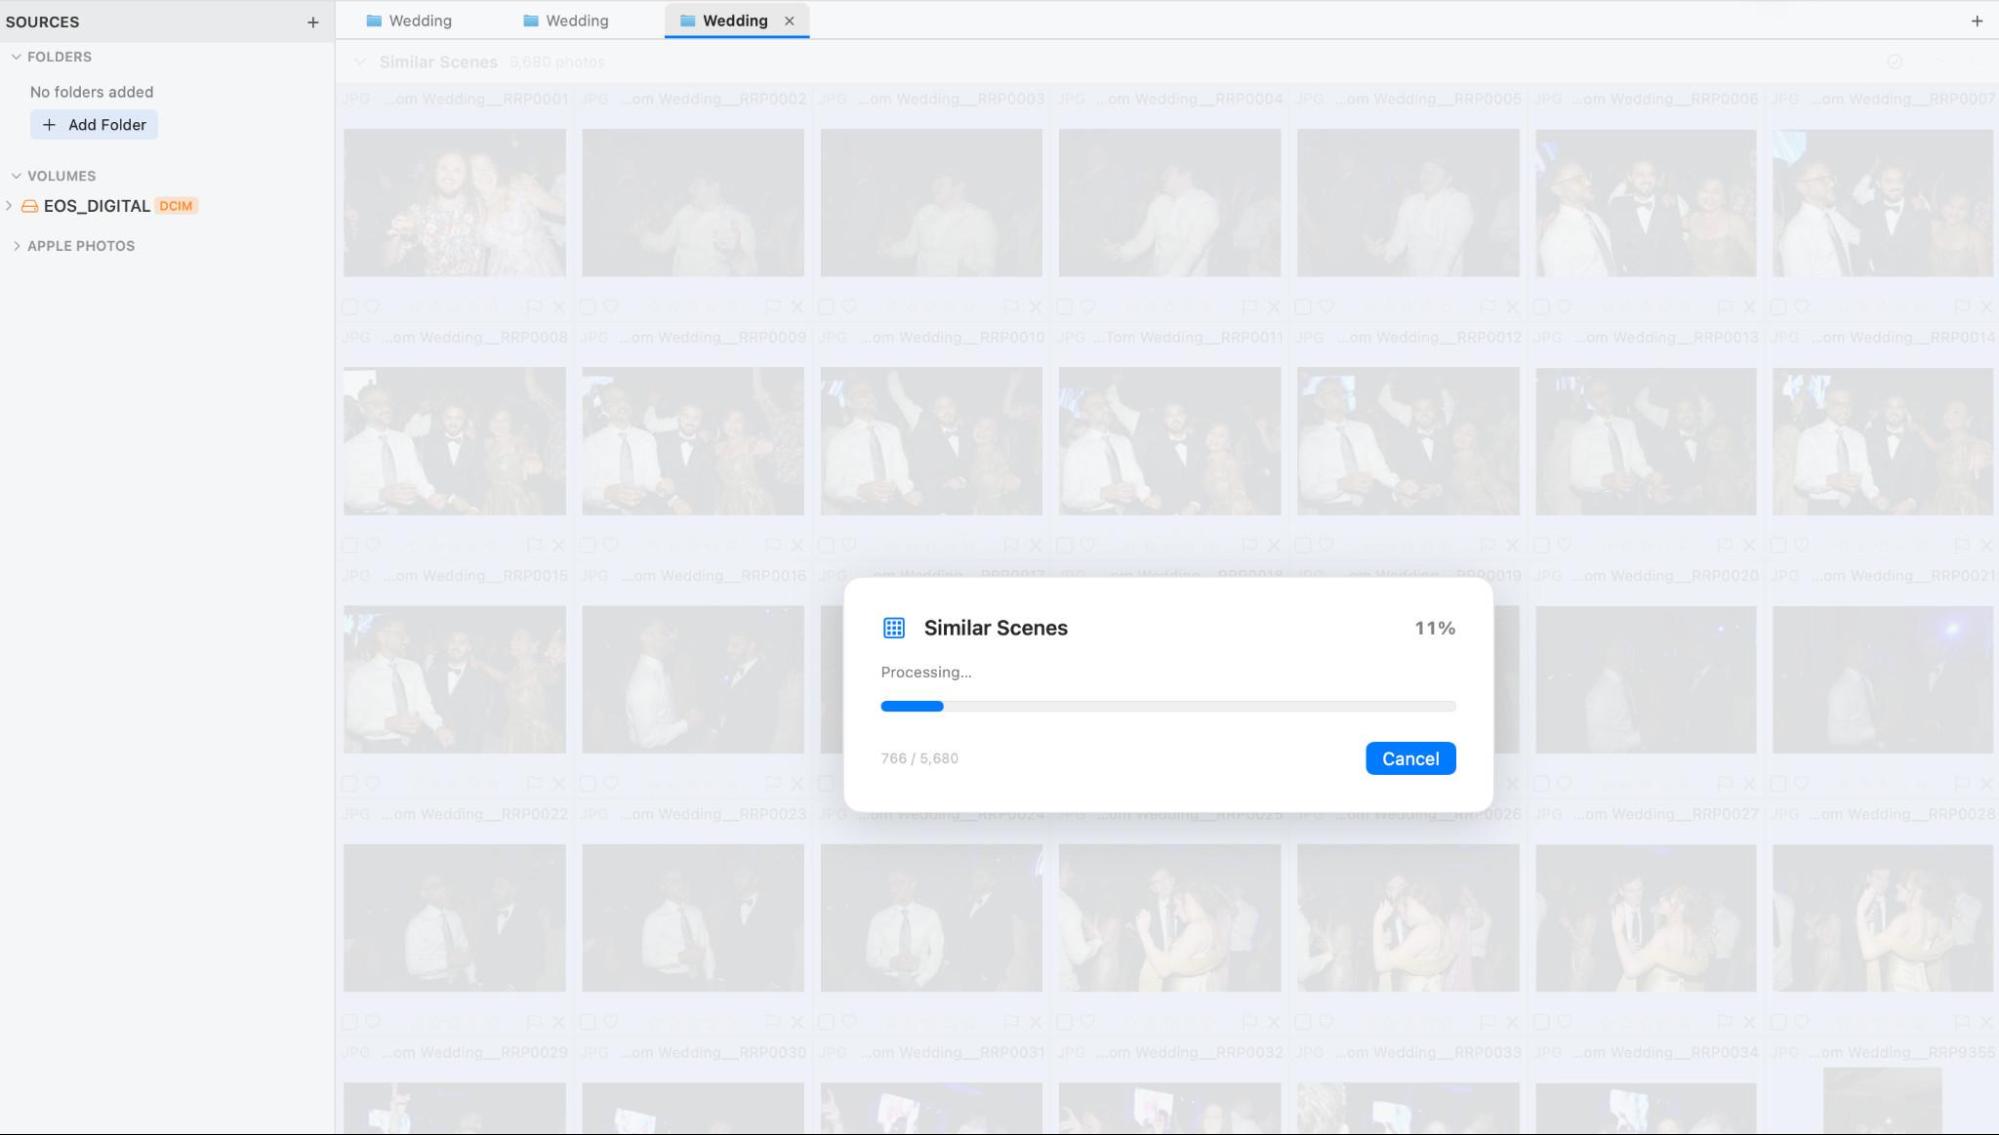
Similar Scenes analyzing a full wedding, 766 of 5,680 photos at 11%. This is a one-time pass over the folder, and on a shoot this size it is not instant.
Be aware that this is a real analysis pass, not an instant sort. On the 5,680-image wedding above it works through the folder at a visible pace, so this is something you start and let run rather than something you toggle and immediately use. On the other hand, you only pay that cost once per folder, and what you get back is worth the wait.
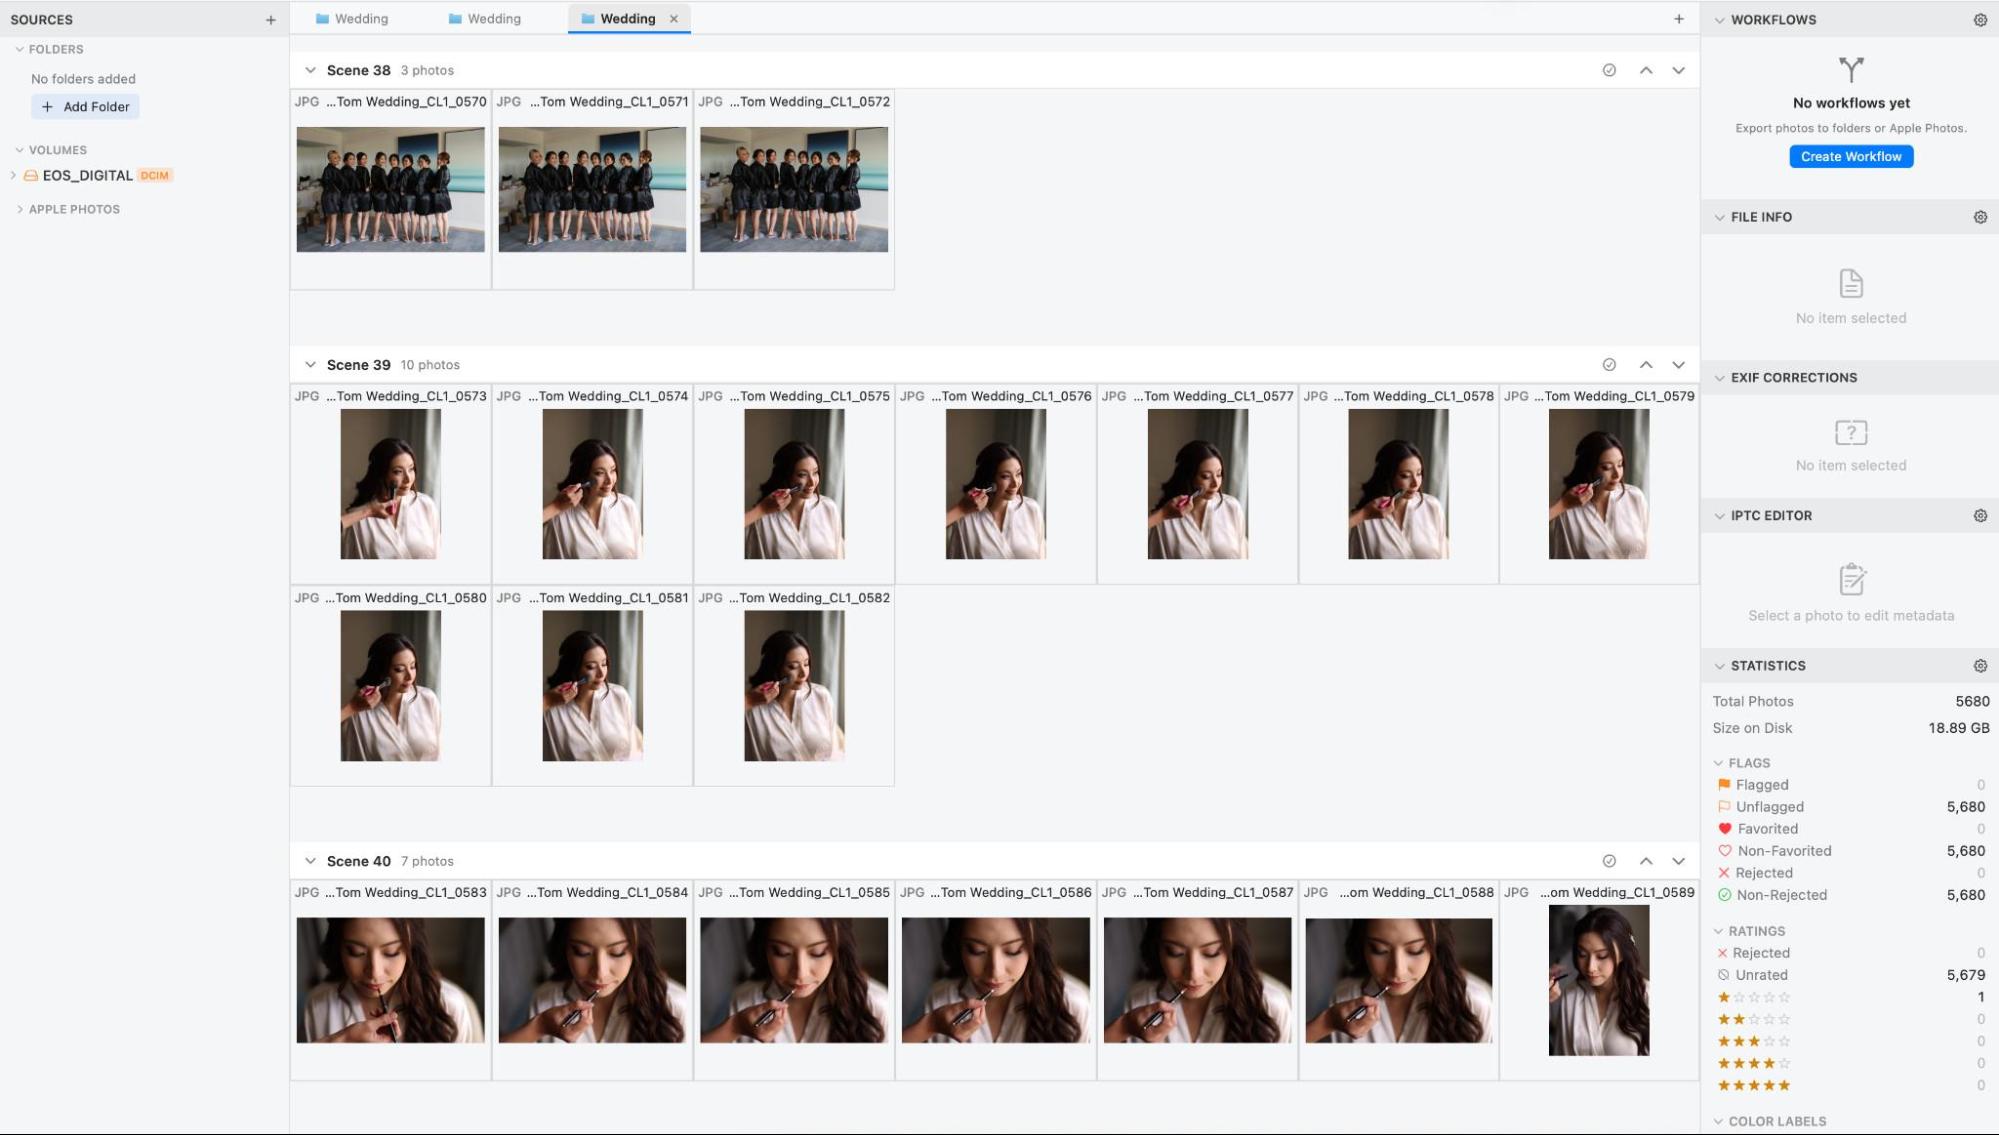
The result. Scene 38 holds 3 photos, Scene 39 holds 10, Scene 40 holds 7, each cluster collapsed under its own header with a count. The Statistics panel at right tracks the whole shoot: 5,680 photos, 18.89 GB, with live tallies for flags, ratings, and color labels as you work.
This is the payoff, and it’s the clearest illustration in this review of what PhotoCuller is for. A 5,680-image wedding has been broken into numbered scenes: three frames of the bridal party lineup, ten of the bride applying lipstick, seven of a closer variation on the same moment. Instead of scrolling through 5,680 thumbnails in capture order, you’re working through a few dozen decisions, each one asking a simple question: which of these ten is the keeper?
Each cluster has a collapse arrow and its own navigation controls, so you can work a scene, close it, and move on without losing your place in the folder. The Statistics panel on the right keeps a running tally of the entire shoot, flags, ratings, and color labels, which is a genuinely useful progress bar when you’re two hours into a cull and want to know how much is left.
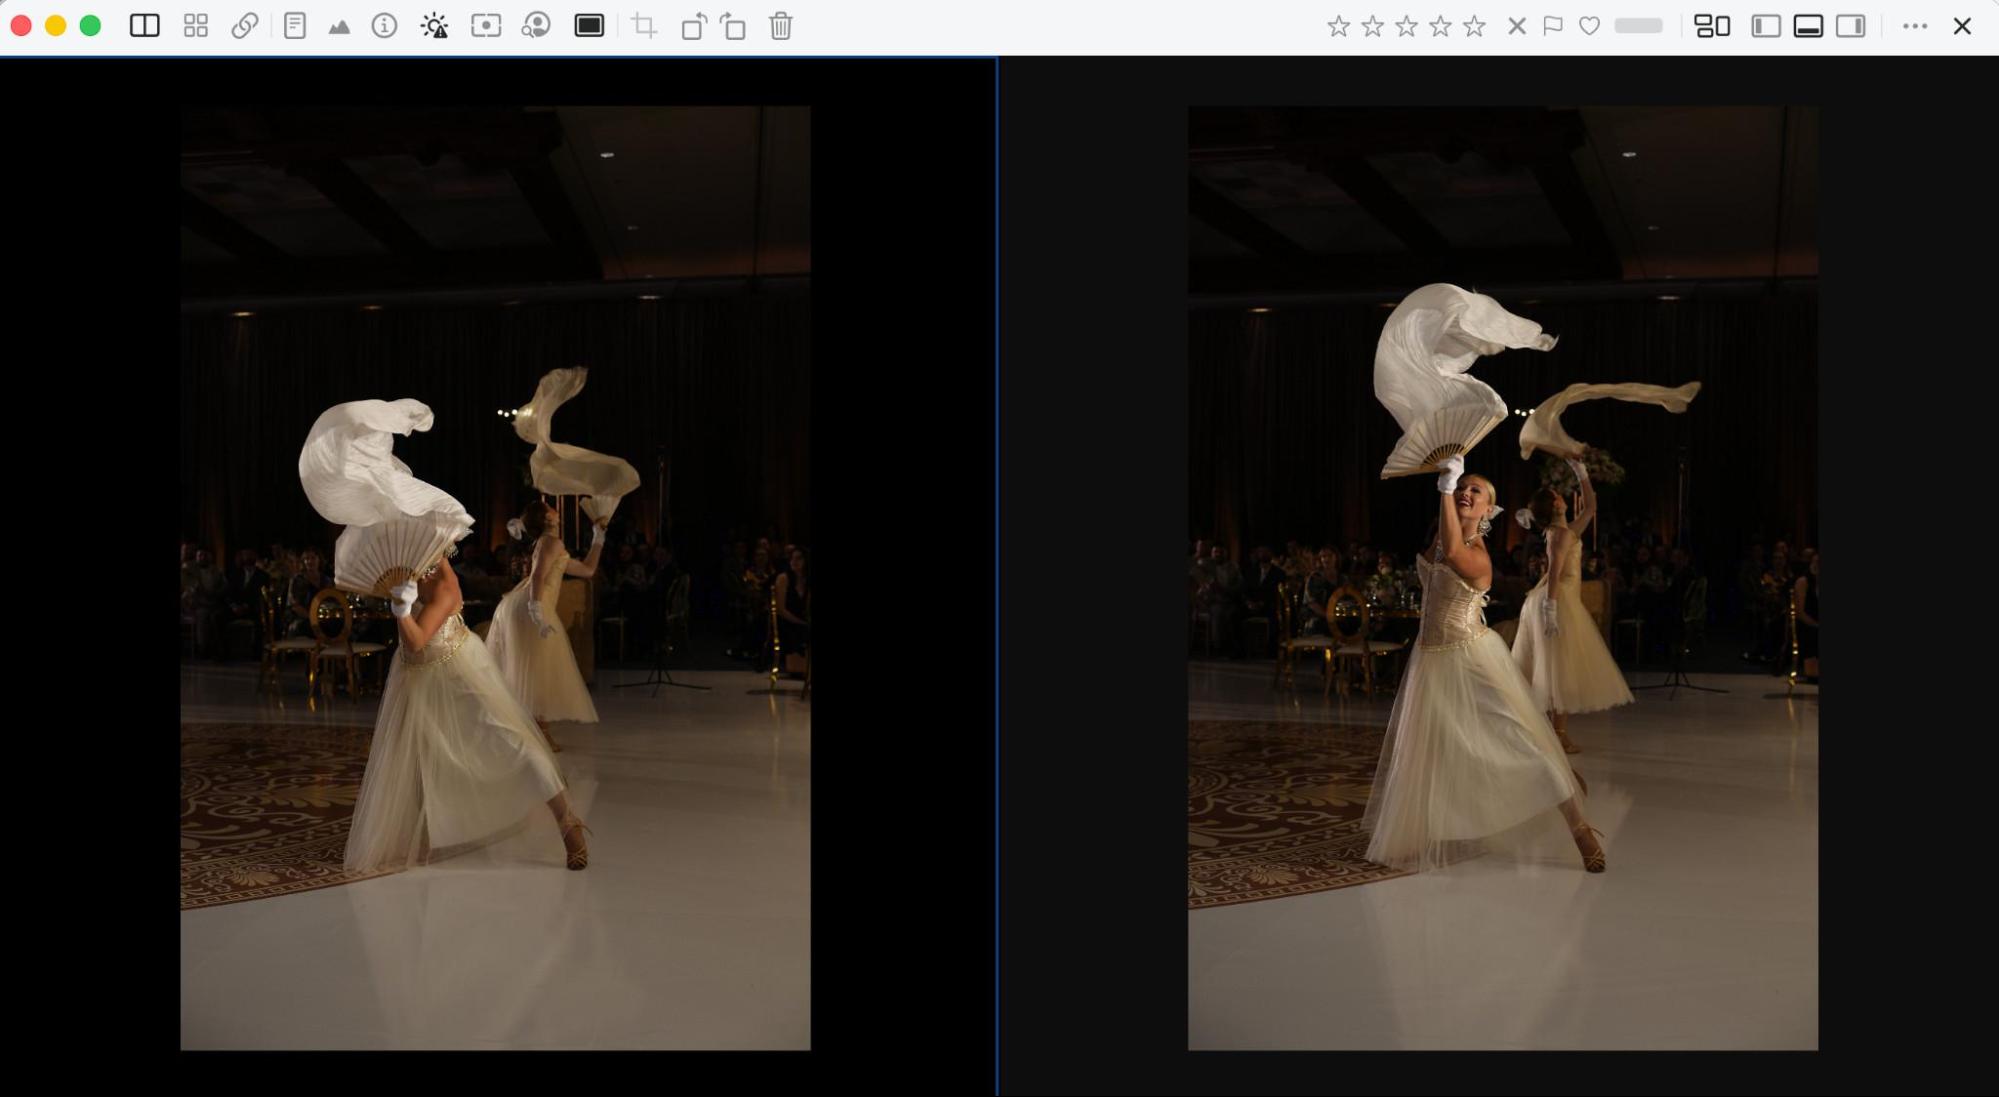
Side-by-side comparison on two frames from the same performance. Both fill the window at once, and the toolbar rating controls at the top let you mark the winner without leaving the view.
Once you’ve narrowed a group down to two or three contenders, the side-by-side view is where you settle it. Both frames come up together at full size, and PhotoCuller supports synchronized zoom, so you can push into both at 100% and compare the same detail in each without lining them up by hand.
The example above is the exact case: two frames of the same dancer, a fraction of a second apart, where the difference is the shape of the fan and where the fabric is caught. Seen sequentially in a grid you’d struggle to call it. Seen together, it takes about a second, and the rating controls sit in the toolbar so you can mark the winner and move on.
This is the feature that separates PhotoCuller from a conventional culling app, and it’s the one we’d point to first if someone asked what they’re actually paying for.
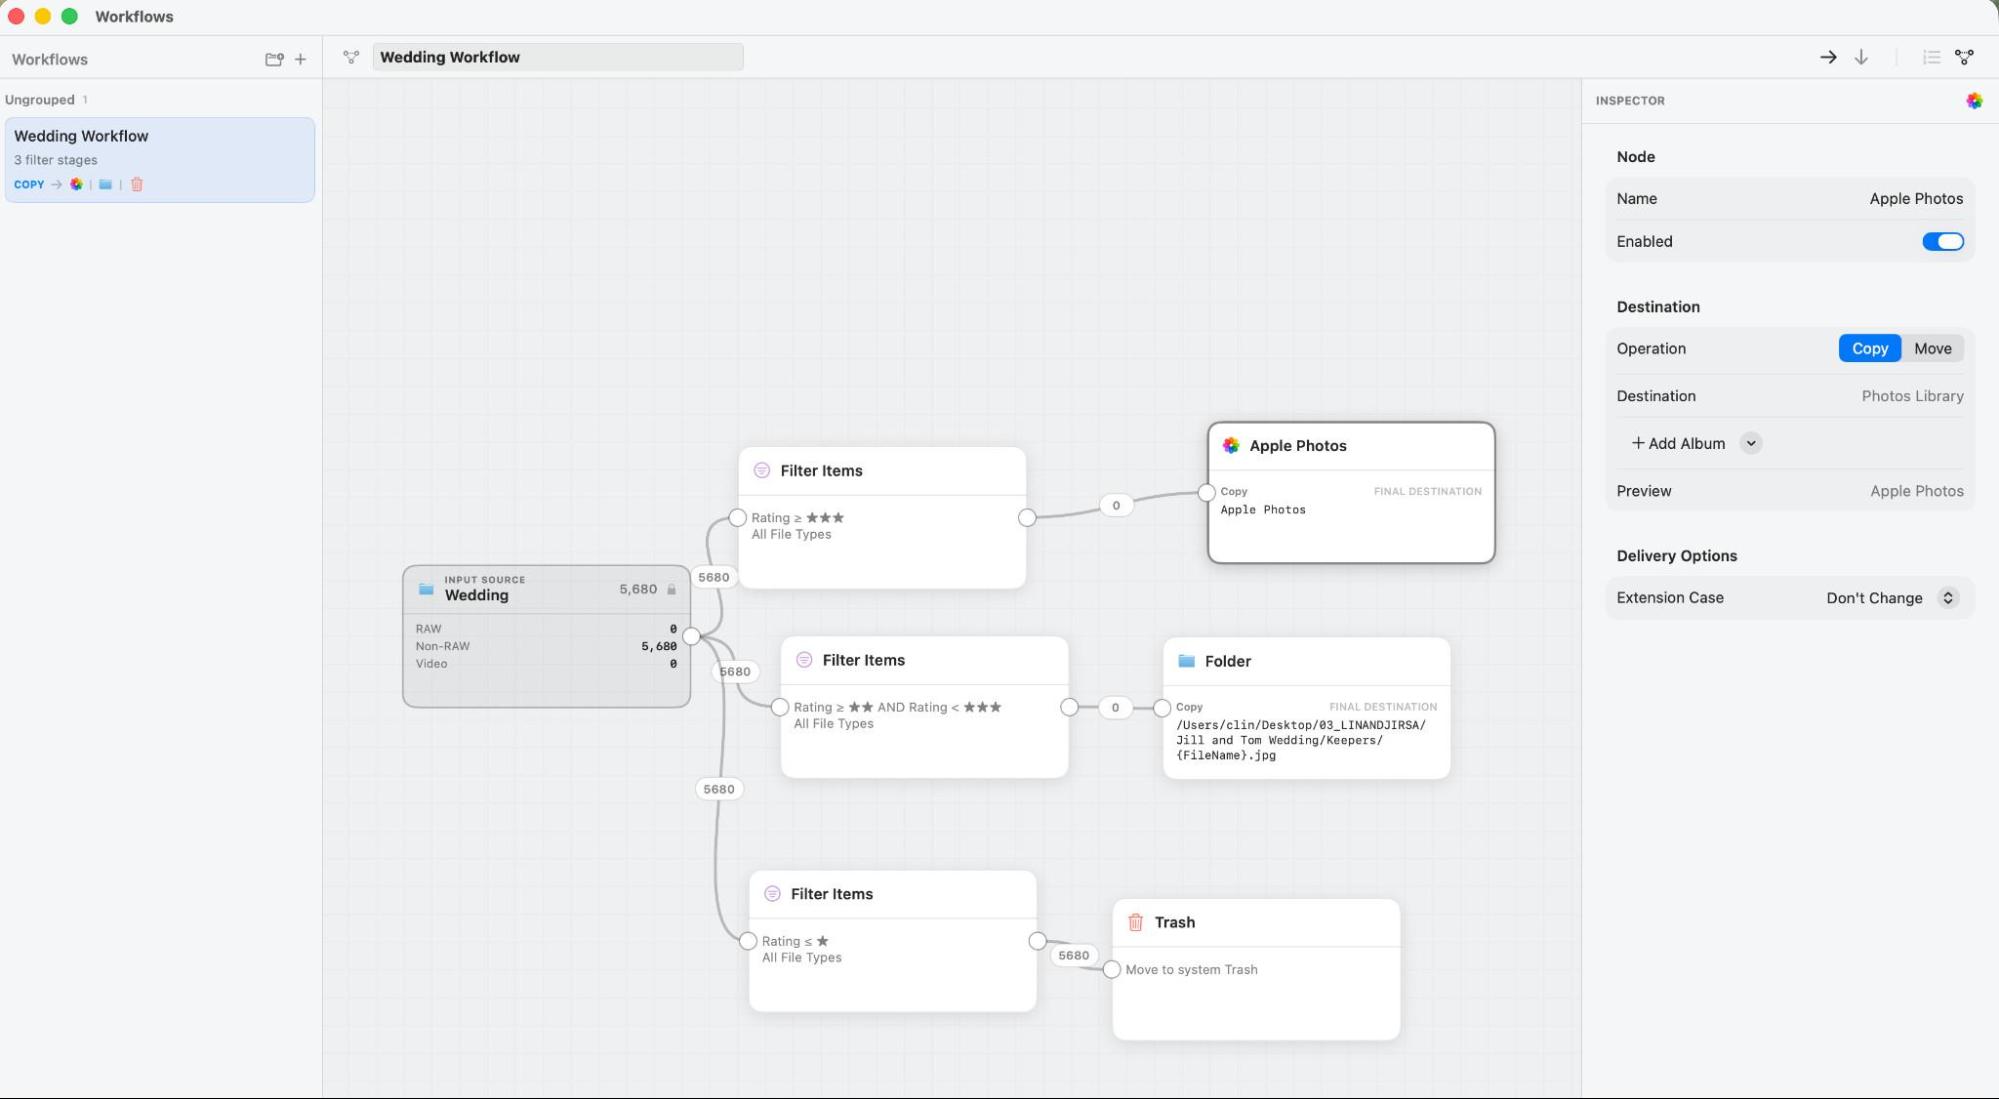
A three-branch Wedding Workflow. The input source of 5,680 photos fans out into three rating-based filters, each with its own destination: Apple Photos, a folder on disk, and the Trash. The Inspector at right is configuring the Apple Photos node, with Operation set to Copy rather than Move.
Here’s what that node graph is doing, reading left to right. The input source is a wedding of 5,680 images. From there it splits three ways, entirely on the basis of the star ratings applied during the cull:
- Rating ≥ 3 stars routes to Apple Photos, copied into the Photos library. Your best frames land somewhere you can show them on a phone tonight.
- Rating ≥ 2 stars AND < 3 stars routes to a Folder on disk, at …/03_LINANDJIRSA/Jill and Tom Wedding/Keepers/{FileName}.jpg. Note the variable in the destination path, the same templating system the ingest uses.
- Rating ≤ 1 star routes to Trash, moved to the system trash rather than silently deleted.
Every one of those branches is built from the marks you applied while culling. You never touch a file manually. You cull once, hit Run Workflow, and PhotoCuller distributes the entire shoot to three different destinations according to rules you defined. For a studio that ends every wedding by hand-sorting files into an archive, a client-preview folder, and a delete pile, that is the whole evening gone in one click.
The Inspector panel on the right is where each node gets configured, and there’s more in it than the graph suggests. The Apple Photos node shown here has an Operation toggle set to Copy rather than Move, which is the correct and safe default for an app operating on your only copy of a wedding. Below that sit the destination library, an Add Album control, and Delivery Options including how file extensions get cased. Each node also carries an Enabled switch, so you can turn a branch off while testing without deleting it.
The filter conditions themselves stack. Each Filter Items node takes a custom filter built from conditions joined with AND, and each condition can take an alternative for OR logic, so a rule like (4 stars OR 5 stars) AND RAW only AND not rejected is entirely constructible. The middle branch above already shows a compound condition in action, using two rating tests to isolate a band rather than a threshold.
Now for the honest part: this is also the feature with the steepest learning curve in the app, and it’s the one where we’d most like to see better documentation. The node editor is powerful, but building a multi-branch workflow from scratch requires you to already understand what the app can do, and there isn’t yet a guided path or a library of starter templates to get you there. The developer has acknowledged this, and says documentation and onboarding for the advanced features are areas of active work. We’d agree, and we’d rank it as the single highest-value improvement PhotoCuller could ship.
One practical note that doubles as a warning. Look at the file counts on each branch in the screenshot: because the photos in that folder hadn’t been rated yet, the first two branches match zero files and the third, “Rating ≤ 1 star,” matches all 5,680. A workflow is only as good as the culling that feeds it, and this is a good argument for building your rules and then reading the match counts before you ever press Run.
Rounding out the metadata side, PhotoCuller supports IPTC templates that can be applied to a selection or built into your ingest, so copyright, creator, contact info, usage terms, and keywords get set once and stamped onto everything that comes off the card.
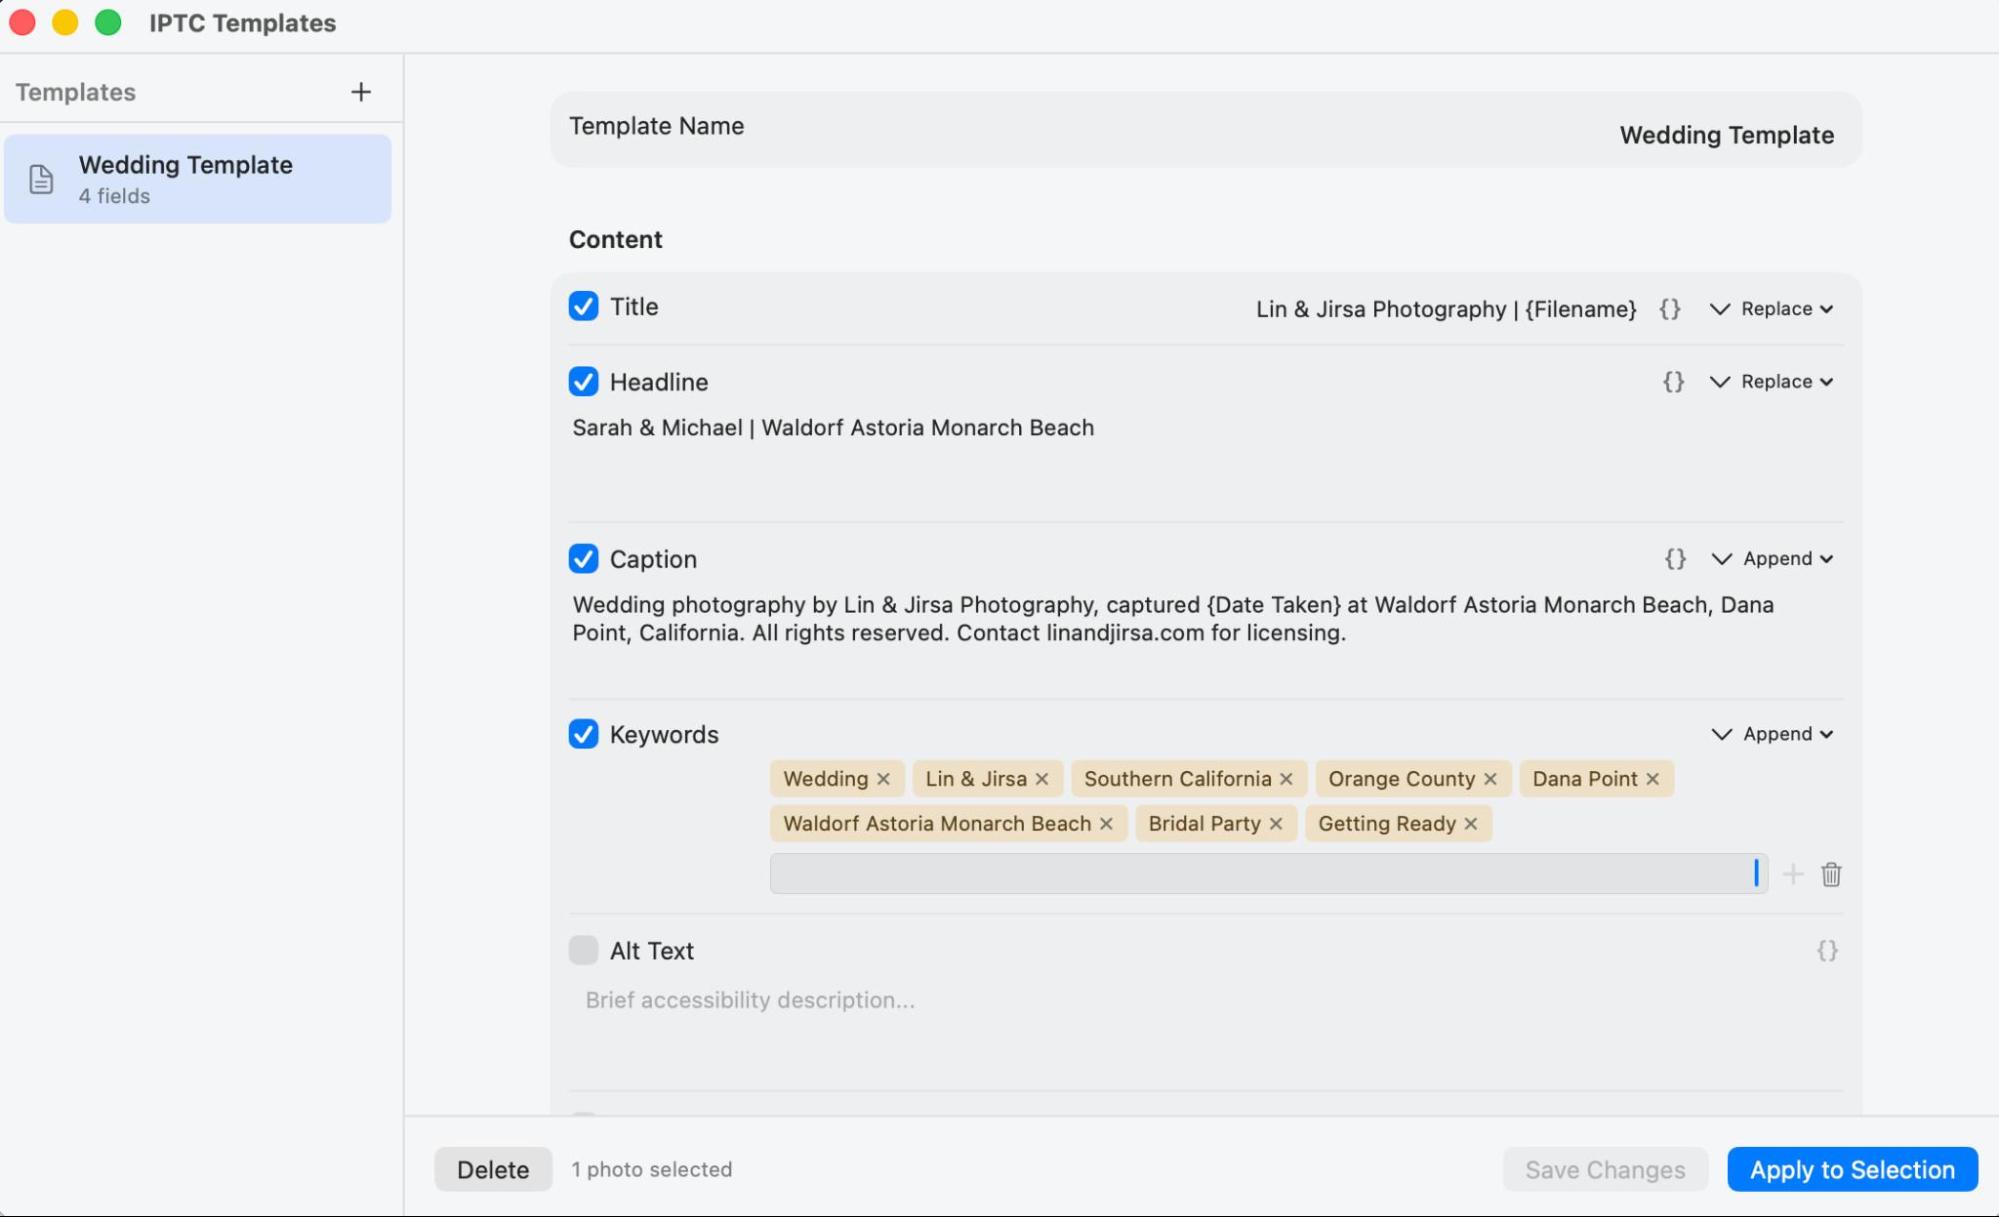
A wedding IPTC template. Title and Headline are set to Replace while Caption and Keywords are set to Append, and the curly-brace tokens in the Title and Caption fields pull in the filename and capture date automatically.
The template above shows the two things that make this more than a copy-paste box. First, the merge modes: Title and Headline are set to Replace while Caption and Keywords are set to Append. That distinction is what lets you layer a per-job template on top of a standing studio template. Your studio copyright and contact details append to whatever is already there, while job-specific fields overwrite cleanly.
Second, the variables. The Title field reads Lin & Jirsa Photography | {Filename} and the Caption pulls in {Date Taken} mid-sentence, so a single template produces per-image metadata rather than one identical block stamped across 5,000 files. Combined with the Session Variables from the ingest panel, you can carry a client name and event type through from card offload all the way into the embedded metadata.
We left Alt Text switched off deliberately. Alt text should describe an individual frame to be worth anything, so it’s a poor fit for a template that applies to a whole shoot. That it’s offered as an option at all is a nice touch for anyone delivering images for the web.
For working professionals, embedded copyright and contact metadata is one of those things you’re glad you set up the day you need it. Automating it means it’s never forgotten.
With its native integration for Apple Silicon Mac computers, in our experience, the performance and stability are professional-grade. We found that operation is smooth, fast, and reliable. Of course, what this also implies is that older Mac machines (those with Intel CPUs) aren’t compatible. Considering how outdated they now are, that is likely a good thing, but it’s worth noting.
We should be straight about the context here, though. PhotoCuller is a young application from a small developer, and performance tuning and bug fixing are ongoing rather than finished. In our testing we didn’t run into anything that disrupted a working session, but this is a product still in active development, not a decade-old release with all the edges sanded down. If you’re evaluating it for a high-volume professional workflow, the 30-day free trial exists for exactly this reason, and we’d recommend running a real shoot through it before you commit.
It’s also fair to say that the heavier operations take real time. The Similar Scenes pass on a 5,680-image wedding is a wait, not a toggle, and ingesting a full card at 25 MB/s is bounded by your card reader as much as by the app. Neither is a complaint, but plan them as steps in your evening rather than instant conveniences.
Smooth performance is a huge time-saver for virtually everyone, not just us as full-time professionals. Whether you’re working with just a few hundred raw photos or thousands of JPGs from your phone camera, either way, pros and hobbyists will benefit from many hours of savings. Equally valuable for our mental health is having a less stressful workflow, too; it helps avoid the gray hairs of anxiety and procrastination!
When going from start to finish with a recent photo shoot, we found the entire workflow to be a breeze. Honestly, due to its familiar appearance compared to other apps that we are all accustomed to (Apple’s Finder, Lightroom, etc.), we found the basic learning curve to be extremely minimal. The advanced Workflows editor is the exception, as noted above, and it’s worth the time investment once you get there.
PhotoCuller is also available as a mobile app for iPhone and iPad, and it carries most of the same functionality rather than being a stripped-down companion. You can import from an SD card or connected storage, work with raw files alongside JPEG, HEIC, PNG, and TIFF, rate, flag, and reject, compare frames side by side with synchronized zoom, and apply metadata through the same kind of customizable templates.
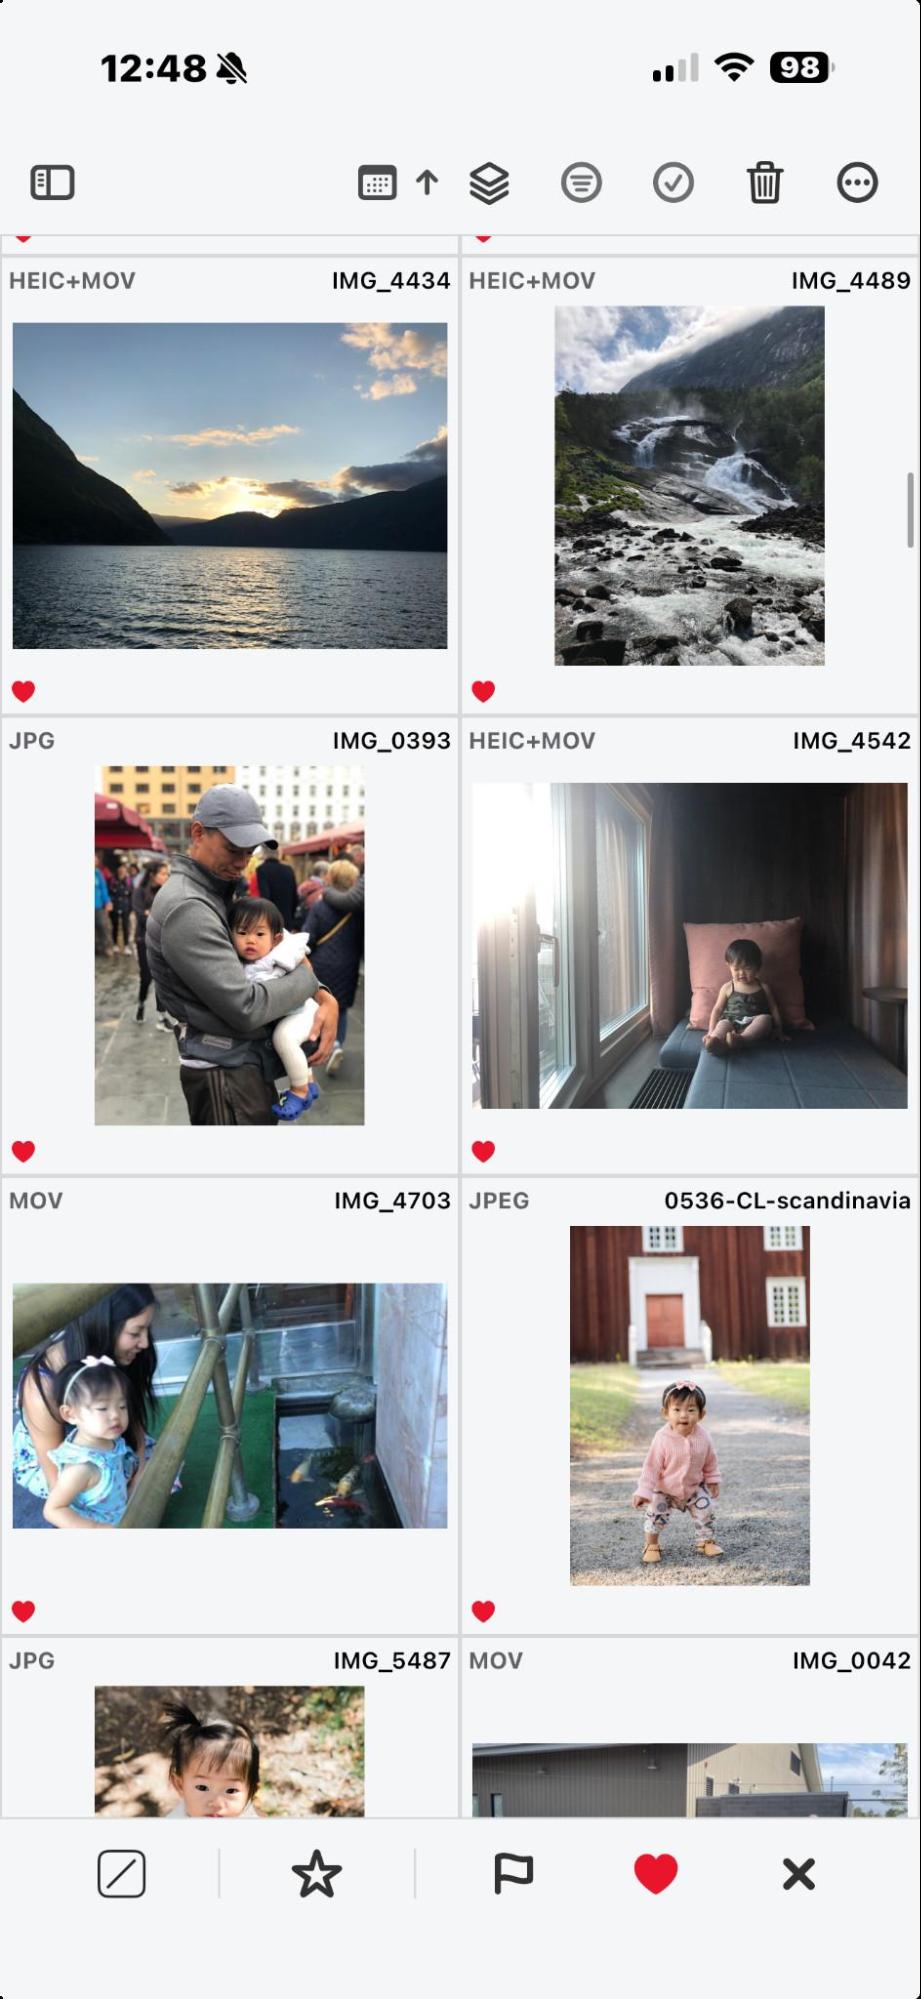
PhotoCuller on iPhone. The same grid, the same file-type labels, and the same marking controls along the bottom bar, sized for a thumb instead of a mouse.
The layout translates better than you’d expect. File types are labeled on each thumbnail exactly as they are on the Mac, favorites show as red hearts, and the marking controls sit in a bottom bar where your thumb already is. It’s the same application logic rather than a viewer with a rating button bolted on.
There are a couple of additions worth knowing about on mobile. Smart stacking helps organize burst sequences, there’s FTP/FTPS support for remote access, and CullSync syncs your culling decisions across devices via iCloud. That last one is the interesting one for a working photographer: cull on the iPad on the flight home, and your ratings are waiting on the Mac when you walk in the door.
The $79 Bundle license covers the mobile apps across up to four devices. If you already know you want PhotoCuller on a tablet, the bundle is the better buy from the start.
For all of these reasons, we think PhotoCuller is worth testing out for literally everyone who clicks more than a few random photos here and there. We’ll get into the price-to-value aspect below, but suffice it to say, at a $49 investment, it’s easy to justify for even a hobbyist or beginner.
There is also a mental aspect of saving time at these early stages of the photo editing workflow. If you’re not careful, you can get carried away, closely inspecting focus on literally every single photo you take. Even as a hobbyist with a phone, suddenly you have thousands of photos to go through!
In my experience, having culled literally 3-4 million photos in my 20+ year career, I want to encourage other photographers: using a smooth-operating workflow system like this, just start chipping away at your most special events, moments, etc. Build the habit of NOT being too obsessed with scrutinizing each image. Instead, use these tools to check sharpness, check faces, and don’t overthink the process as a whole. *You will save yourself hours every week. You will consistently feel proud of being able to share photos regularly. Even if you “miss” a perfect image once or twice, think of it this way: it will only take a few minutes to revisit that one photo with an awkward smile, compared to the hours and hours you’ve already saved.*
Also, keep in mind that newer cameras are truly impressive when it comes to nailing focus, offering exposure latitude, etc. More than ever, if you have a modern mirrorless camera, we can and should trust it! Then, use PhotoCuller to swiftly go through your photos and make quick decisions. You have powerful tools at your fingertips, but it will still benefit from relaxing into a mental “flow state” when tackling higher volumes of images.
Sometimes, the perfect candid moment isn’t always the sharpest one. Don’t worry; go with the perfect moment, the perfect smile, the serendipity of your shutter click that makes us all cherish our real lives. Remember, the whole goal here is to breeze through a tedious process without sacrificing any creative vision, and then get on with your real life instead of “slaving away” at your computer for hours every day…
The workflow is smooth, and it can be simple while still offering advanced tools for automation and technical work. That said, this is a young app from a small developer, and there are real rough edges worth knowing about before you buy.
Pros
- Drastically speeds up almost any workflow
- Handles ingest, backup, culling, and routing in a single application
- Session variables and destination templates build a consistent folder structure and filename convention automatically at ingest
- Can treat RAW+JPEG pairs as a single item, so ratings and routing never desync
- Subject Panel makes checking a group portrait for blinks nearly instant
- Focus peaking and exposure warnings answer both technical questions in one glance
- Group by Similar Scenes turns thousands of frames into a few dozen decisions
- Multi-destination Workflows automate the entire post-cull file routing step
- Copy-rather-than-move destinations make automation safe by default
- Integrates with existing workflows and other editing software, including Apple Photos
- User interface is rapidly familiar (the basic learning curve is minimal)
- One-time purchase rather than a subscription
- 30-day full-feature free trial, no credit card required
Cons
- Documentation and onboarding for advanced features need work. The Workflows editor in particular is powerful but not self-explanatory, and there aren’t yet enough guides or starter templates. The developer acknowledges this and says it’s an active priority.
- Performance tuning and bug fixing are ongoing. This is a product in active development, not a mature release.
- Heavier operations take real time. Similar Scenes analysis on a full wedding is a wait, not a toggle.
- The Subject Panel detects faces but does not evaluate them. No blink detection, expression scoring, or automatic selection. It speeds up your review rather than replacing your judgment, which is worth knowing if you’re comparing it against AI culling services.
- Limited compatibility. Apple Silicon Macs running macOS 15 Sequoia or later only. No Intel Macs, no Windows.
- Updates are included for 2 years, not forever. The license itself never expires and your installed version keeps working, but continued updates run $29 per additional year. Mobile access likewise runs 2 years on the Bundle.
- Use caution with the advanced automation. Features like automatic ingest and automatic card formatting do exactly what you tell them to, which is worth respecting when your only copy of a wedding is on the card.
We have tried virtually all of the alternatives out there. Over the years as a professional wedding & portrait photography studio, we tried all-manual download & backup workflows using Apple’s Finder and Windows’ Explorer. We also extensively used dedicated apps, such as Adobe Bridge, Photo Mechanic, and many more.
All in all, here’s the bottom line from our experience: almost all the other solutions out there are imperfect. Photo Mechanic remains the speed benchmark for pure culling and is the more mature, more documented product, with the advantage of running on Windows and Intel Macs. Adobe Bridge is free and capable but doesn’t approach this kind of automation. What PhotoCuller offers that we haven’t seen assembled in one place is the full span from card to routed archive, with the Workflows engine doing the file distribution at the end.
Could some of the other tools do a slightly better job at one singular task? Almost certainly, and Photo Mechanic’s raw preview speed is the obvious example. But our experience tells us that’s not how massive amounts of time get saved. Time gets saved by not switching apps, and by not hand-sorting a thousand files into four destinations at the end of the night.
The entire workflow process between capture & download to culling, and then smoothly jumping onward to color correction in Lightroom, is handled in one place. The specific tools such as the Subject Panel and the exposure warning overlay are on par with any alternative we have seen.
So, on the one hand, keep in mind that PhotoCuller is not a replacement for Lightroom, Capture One, etc. when it comes to color correction and advanced edits. Also, you could do your culling within Lightroom. However, you probably already know how intimidating and time-consuming that task feels, so that is why we recommend adding PhotoCuller to your workflow.
PhotoCuller comes in two tiers, both one-time purchases with no automatic renewal:
- Desktop, $49. PhotoCuller on up to 2 Macs.
- Bundle, $79. PhotoCuller on up to 4 devices across Mac, iPhone, and iPad.
Both tiers include 2 years of Mac updates, and the Bundle adds 2 years of iPhone and iPad access. After that window, your Mac license never expires and the version you own keeps working; continuing to receive updates costs $29 for an additional year. This is worth understanding clearly, because it sits between a true perpetual license and a subscription. You are not locked out if you stop paying, but you also aren’t getting free updates forever.
For context, that pricing is a fraction of what the equivalent time savings are worth to a working photographer. If PhotoCuller saves you two hours on a single wedding, it has already paid for itself. And there is a 30-day full-feature free trial with no credit card required, which we’d strongly encourage you to use on an actual shoot before buying.
Whether you capture just a few serious photos regularly as a hobby, or you capture thousands of photos every week as a professional photographer, it is absolutely worth trying out PhotoCuller. Even the smallest, simplest workflow stands to eventually save hours of time. A professional workflow that uses PhotoCuller will immediately begin saving hours of time every week, almost every day.
The combination of Similar Scenes and Workflows is the real story here. Plenty of apps will help you cull faster; very few will collapse a 5,680-image wedding into a few dozen scene decisions and then automatically distribute the results to an Apple Photos album, a keepers folder, and the trash in one click. That’s the part of the evening most of us do by hand, and it’s the part PhotoCuller eliminates.
It isn’t a finished product. The documentation needs to catch up to the feature set, and the Workflows editor deserves a guided onboarding path it doesn’t yet have. But the foundation is genuinely good, the safety defaults are thoughtful, and the developer is candid about what still needs work.
You can purchase PhotoCuller as a desktop app for $49 and install it on up to two Macs, or get the $79 Bundle for up to four devices including iPhones and iPads. Either way it’s a one-time purchase with a 30-day free trial, so there’s very little reason not to run a real shoot through it and decide for yourself.
[Try PhotoCuller free for 30 days](https://photoculler.com/?utm_campaign=slr) | [PhotoCuller Mobile on the App Store](https://apps.apple.com/us/app/photoculler-mobile/id6765604609)
[a]Feature is actually called Subject Panel (was previously Face Panel). It actually does more than just faces. It will detect dogs, cats, and the main subjects of a photo if they are objects.