Articles

What is the Optimal Aperture Setting in HDR Photography? – From the HDR Photography Workshop Series
In a previous article, we talked about what the optimal shutter speed is when shooting HDR photography. Now, we are going to discuss the optimal aperture setting in HDR photography. When shooting HDR images, we want to capture as much detail as possible. Each camera lens will have an aperture “sweet spot,” where you can get the most detail and sharpness. However, the lens’s “sweet spot” may not always be the optimal aperture setting when shooting HDR images. In this article, we will discuss what exactly a “sweet spot” is, as well as the general rule of thumb for the optimal aperture setting when shooting HDR photography.
Natural Light Couples Photography DVD | How to Shoot An Engagement Session
We're excited to announce the release of this long-awaited 2 DVD Workshop on couples portraits. When we approached Couples Photography, commonly referred to as Engagement Photography, we wanted to start by helping both beginners and professional develop and enhance a strong overall foundation in couples portraiture. So, the Natural Light Couples Photography Workshop has been designed from the ground up to teach photographers a simple and systematic approach to capturing professional natural light couples photography. In this workshop, we show you that professional results can be achieved with just your camera, a simple reflector and your photographic eye.

Vancouver Moonrise at Sunset – How We Shot It
Today I have a great example of "seeing the forest for the trees"... Sometimes, when something truly breathtaking happens right before your lens, you get caught up in the moment and don't see the big picture. This was one of those moments, and I almost missed it completely...

Panoramic Sunset Portrait – How We Shot It
Every sunset is different. However each year, there are a few of them that you remember forever! This was certainly one of those sunsets! As Galen Rowell once said, "You only get one sunrise and one sunset a day, and you only get so many days on the planet. A good photographer does the math and doesn't waste either."

Thanks, but I’ll PASS
PASS is a new photo sharing service for photographers that has been garnering quite a bit of press lately. I recently got my hands on an invite to the invite-only beta and have had a chance to try it out. I will warn you though, this is not a fanboy post – I have some concerns that I think deserve some thought. So I suggest you read the post before jumping on the PASS bandwagon with all your friends.

How to Create a Standard Black and White Preset to Create a “Soft Portrait” Look in Lightroom 4
In a previous tutorial, we created a Standard Color Preset to create a “soft portrait” look for our portraits. This preset made the portrait more flattering overall because it softened up the highlights in our portraits and also reduced the appearances of blemishes on the skin. We highly recommend that you go through the Standard Color Preset tutorial before going on to this tutorial because we will be applying almost the same exact settings from the Standard Color Preset to the Standard Black and White Preset. In this tutorial, we will demonstrate how to create and save the Standard Black and White Preset in Lightroom 4.This preset will give our portraits that “soft portrait” look again, but our portraits will be in black and white instead of color.

Create a Soft Portrait Lightroom Preset
In this tutorial, we are going to create a Standard Color Preset for portrait images, which is referred to as a “soft portrait” look. This Standard Color Preset will soften up the highlights, reduce the appearances of blemishes and imperfections of the skin and overall, make a portrait more flattering. In portraits, our subjects are the primary focus of the image. However, even if the subjects’ faces are not zoomed in on, the image can still be considered a portrait. In this tutorial, we will also use the Standard Import Preset that we created in a previous tutorial. It is a good idea to read about the Standard Import Preset before creating the Standard Color Preset because you will have a better understanding of this tutorial. These settings are the specific settings we apply to portraits at Lin & Jirsa Photography, so if you do not like a certain setting, feel free to tweak it to fit your personal style. However, hopefully some of these tips will help you create your own unique style for your portraits.

An Interview with Sports Photographer Craig Mitchelldyer
I had the pleasure recently to interview Craig Mitchelldyer, he is a professional photographer in Portland, Oregon specializing in sports, corporate people and weddings. Craig is a great sports photographer and since that is a big area of interest for me I focused the majority of the questions around that.

How to Fix Red Eye with the Red Eye Correction Tool in Lightroom 4
In this video from our Lightroom 4 A to Z Workshop on DVD, we will explain what causes “red eye” in your subjects’ eyes and how we can fix this problem with the Red Eye Correction Tool in Lightroom 4. Although it is important to know how to use this tool, you will rarely use it if you are shooting with DSLR cameras and off camera lighting. Instead, “red eye” normally occurs with point-and-shoot cameras. We will discuss why that is in this article as well.

Nikon Rebates Expire Soon! Last Chance For Up To $550 Off!
Nikon's current rebates have already been "refreshed" once, so it is likely that with Nikon's fiscal year ending at the same time, there will be no extension after the rebates expire in two days on March 30th.
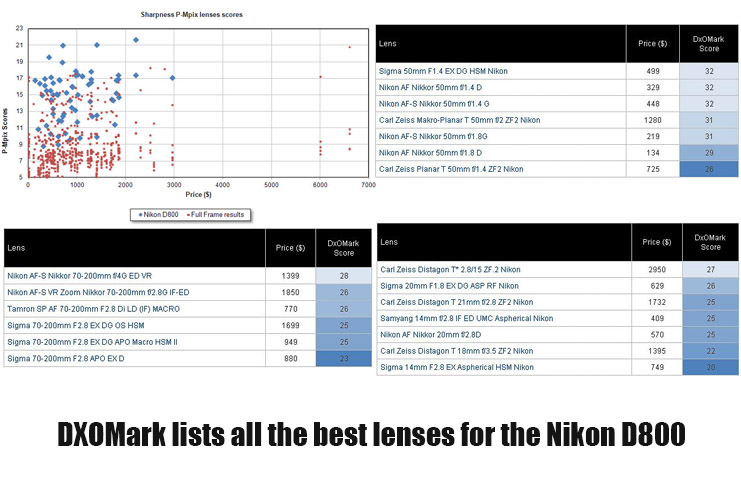
DXOMark Collects The Best Lenses For The Nikon D800
DXOMark is always a great source for camera and lens testing data. Recently, they have been collecting the best lenses for the Nikon D800, and categorizing them into wide, standard, and telephoto ranges.
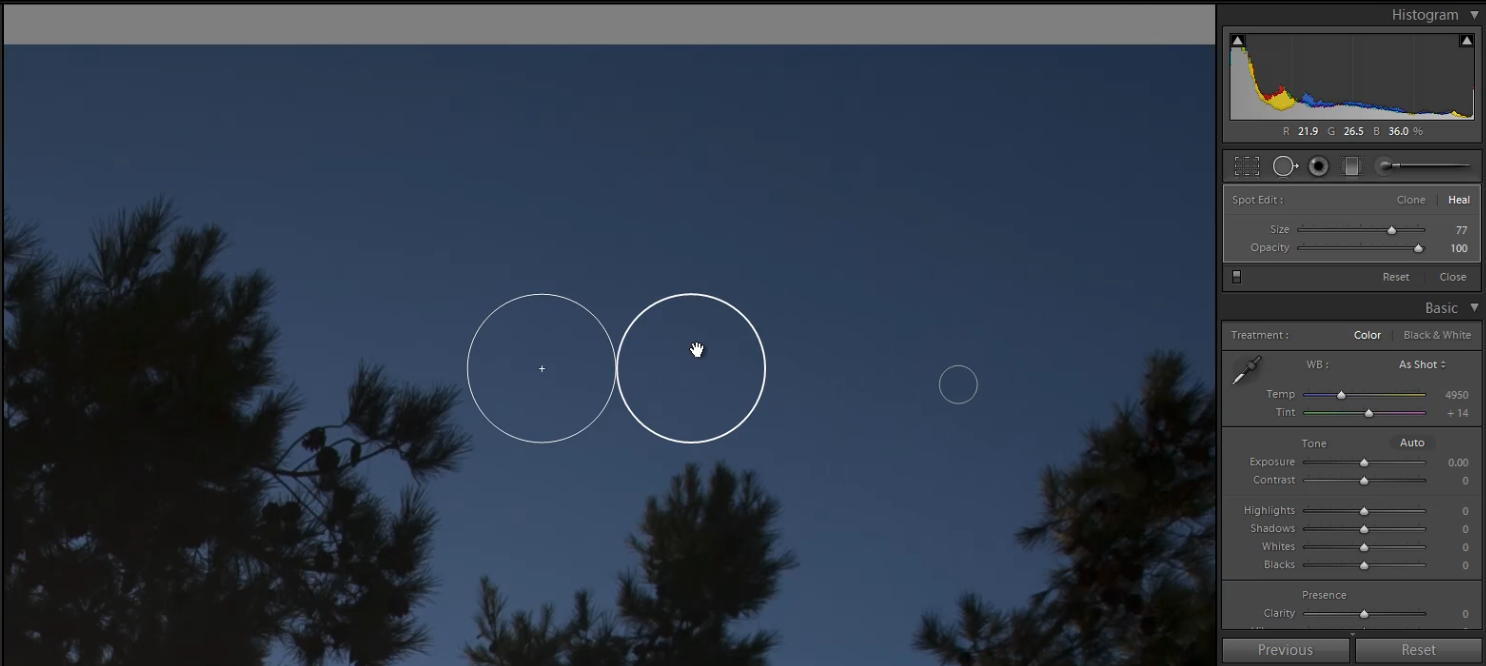
How to Use the Cloning Brush and Healing Brush from the Spot Removal Tool in Lightroom 4
In this video from our Lightroom 4 A to Z Workshop on DVD, we will discuss how to use the Spot Removal Tool in Lightroom 4. The Spot Removal Tool is great for removing blemishes on skin, dust from camera lenses, tiny insects around your subjects, and any other specks in your images. There are two types of Spot Removal Brushes: the Cloning Brush and the Healing Brush. This article will go over what these 2 Spot Removal Brushes are and how to use them.


