
The following is an excerpt from the SLR Lounge Lightroom Workflow System Workshop on DVD, a system designed to increase your post production speed by 5 to 10 times. Click here to view more details.
Introduction
In this tutorial, we are going to create a Standard Color Preset for portrait images, which is referred to as a “soft portrait” look. This Standard Color Preset will soften up the highlights, reduce the appearances of blemishes and imperfections of the skin and overall, make a portrait more flattering. In portraits, our subjects are the primary focus of the image. However, even if the subjects’ faces are not zoomed in, the image can still be considered a portrait. In this tutorial, we will also use the Standard Import Preset that we created in a previous tutorial. It is a good idea to read about the Standard Import Preset before creating the Standard Color Preset because you will have a better understanding of this tutorial. These settings are the specific settings we apply to portraits at Lin & Jirsa Photography, so if you do not like a certain setting, feel free to tweak it to fit your personal style. However, hopefully some of these tips will help you create your own unique style for your portraits.
Watch the Video
Examples of Portrait and Landscape Images
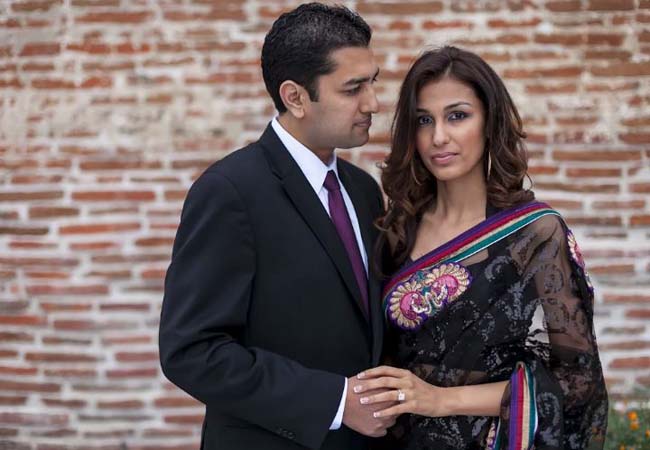
As mentioned earlier, a portrait includes a subject as the primary focus of the image. Below is an example of a standard portrait. Although our subjects’ faces are not zoomed in, this image still qualifies as a portrait because the couple is close enough that we can notice small details on the faces, such as pores and blemishes.
Below is an example of a landscape image. Although there are subjects in our image, they are not the main focus of the image. Instead, we want to focus on the environment around the subjects by bringing out the colors and making them more vivid. In addition, we do not have to worry about enhancing unflattering details on our subjects because our subjects are pulled back further in the image. In a future tutorial, we will also show you how to create a standard color and standard black and white preset for landscape images like the one below.

Creating Our Standard Color Preset
Now that we understand what a portrait is, we can start creating the Standard Color Preset for our portraits. Make sure you are in the Develop Module (hit “D) when creating your preset. First, select a basic portrait to work with throughout this tutorial. This portrait should represent your typical shots and should also be properly exposed with an accurate white balance. We will not be adjusting the white balance or exposure of our images in our preset since these are settings that we want to edit on an image to image basis.
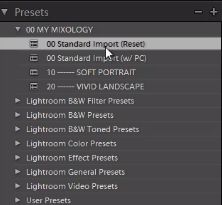
Now, the image you have selected to work with should be imported with the Standard Import Preset already applied (see our previous tutorial on how to create this particular preset). We always recommend that you start your preset with the Standard Import Preset or with a preset that is closest to where you want to go with your new preset. In this tutorial, we are going to start with the Standard Import Preset that we have previously created to help us create the Standard Color Preset. As you can see below, we have selected “00 Standard Import Preset (Reset)” under the Presets Panel on the left of Lightroom.
After we have selected the Standard Import Preset, we are going to start dialing in some adjustments. Once again, these settings are meant for a “soft portrait” look so we need to smooth out some of the highlights on the skin. First, we are going to start with the Basic Panel on the right of Lightroom. To expand or collapse this Basic Panel, simply hit “Ctrl + 1.” To pull down our Highlights to match our Shadows a little more in the image, we are going to reduce the Highlights to -30 and the Shadows to +10. Then we are going to significantly decrease the Whites down to -30 and raise the Blacks to -10. We have now raised the Blacks and Shadows from where the standard was, as well as reduced the Highlights and Whites. By doing so, this will smooth out the tones in the image overall. See below for an example.
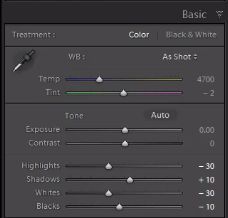
Next, we are going to adjust the Clarity down to -10. Clarity is still within the Basic Panel and can be found underneath the adjustments we just made to Highlights, Shadows, Whites, and Blacks. Reducing Clarity will help reduce midtone contrast in the portrait and will smooth out skin tones by removing any extra detail. However, do not go too low on Clarity as this will soften the image up too much and we will lose too much detail in the image. So, -10 is generally a nice number to stick with. Remember that although this is a standard preset for the “soft portrait” look, we will still probably need to do a little bit of modification on each image. However, we do want this Standard Color Preset to be as general as possible so that it can work on essentially every portrait.
With Vibrance, which is found directly underneath Clarity, you can choose the amount to fit your style. If you have an image that has too much color in the skin, we recommend not adding any additional Vibrance as this will add more colors to the skin, making the portrait look unflattering. For the Standard Color Preset for our “soft portrait” look, we are going to go with +15. However, as mentioned earlier, this is going to be rather stylistic so choose settings that will mimic your style for each of your portraits. As you can see below, we have set the settings for Clarity to be -10 and Vibrance to be +15.

The next thing we need to adjust is our Tone Curve. The Tone Curve Panel is directly under the Basic Panel and can be expanded or collapsed by hitting “Ctrl + 2.” With our Tone Curve, we are going to create a slight S-Curve to boost overall contrast in the image. We want to make only subtle adjustments so that the settings are not too powerful over the majority of our images. Once again, this is our style so make changes to fit your stylistic preferences. To create a slight S-Curve, pull down the Blacks a bit and pull up the Midtone Shadows so that it is a little brighter in the Midtones. Then, pull up the Midtone Highlights a bit and pull the Whites to the right and a little bit down. Look below for an example of our slight S-Curve. Starting from the left, we have our points for Blacks, Midtone Shadows, Midtone Highlights and Whites. We recommend starting your Tone Curves with 4 points so that you can have at least 4 points to control every quadrant, but feel free to add more as necessary.
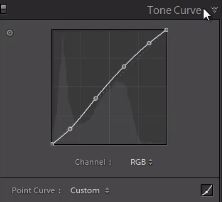
We can also adjust the Contrast in the Basic Panel by using the Contrast slider. However, using the Tone Curve allows us to have a little bit extra control. The Contrast sliders in the Basic Panel are more of an overall adjustment as opposed to the Tone Curve, where we can select exactly what areas we want to have Contrast.
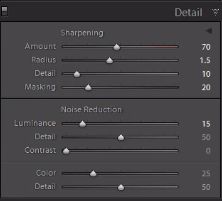
After we have adjusted the Tone Curve, go down to the Detail Panel to check the Sharpening in your image. You can also expand or collapse this panel by hitting “Ctrl + 5.” The Sharpening settings from the Standard Import Preset will already be applied and should be good enough for your portrait. However, always double check and zoom into your subjects’ faces to make sure everything looks okay. If there are any noticeable blemishes, you will need to edit those out with the Spot Removal Tool or by taking the image into Photoshop. After you have checked the Sharpening of your image, adjust the Noise Reduction, which is located just under Sharpening. Adjust the Luminence up a bit, but not too much because that will kill all of the detail in our image. We recommend going up to around 15-20 max because we get a nice softening effect, especially over the pores of the skin, in this range. This is a very minor adjustment but it is great for smoothing out skin tones just a little bit more. As you can see below, our Sharpening settings are from the Standard Import Preset and we have adjusted the Noise Reduction settings.
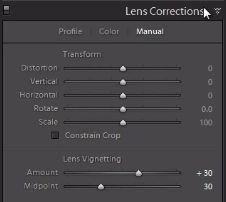
After we have adjusted the Noise Reduction settings, double check the vignette of the image by going to the Lens Corrections Panel, located under the Detail Panel. You can expand and collapse the Lens Correction Panel by hitting “Ctrl + 6.” The vignette of an image refers to the darkness or brightness of the edges of an image. Typically, we want an even amount of color from edge to edge. In our example below, we have left the Lens Vignetting settings from the Standard Import Preset.
Saving Our Standard Color Preset
Now that we have finished making our adjustments, we need to save our Standard Color Preset. Go to the Presets Panel on the left of Lightroom and hit the “+” sign, as shown below.

Next, a dialogue box should appear like the one below.
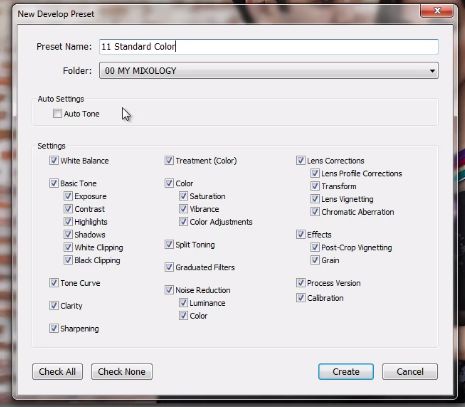
We have renamed our Standard Color Preset as “11 Standard Color.” The reason why we have included the “11” in front is because this preset will go underneath the “10 – SOFT PORTRAIT” Category under the Presets Panel so that our presets will be organized. As you can see below, we have our “10 – SOFT PORTRAIT” Category under the Presets Panel.

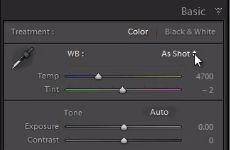
Next, hit “Check All” at the bottom of the New Develop Preset Dialogue Box. Make sure that “Auto Tone” is not checked under “Auto Settings.” We are going to leave “White Balance” and “Exposure” selected because this Standard Color Preset will actually reset the image back to the original settings when the image was first imported. If you double check in the Basic Panel, you will see that White Balance (WB) is set at “As Shot” and the Exposure is set to 0. Now, whenever we select this preset, it will automatically use the import default settings, and the White Balance will be at the camera default. When you select this preset (or any other presets that we will create in our Mixology), it removes previous adjustments and adds these adjustments so that there are no settings left behind from previous presets.
Next, uncheck “Lens Corrections,” “Lens Profile Corrections,” “Transform,” and “Chromatic Aberration,” as shown below. These settings are already built into the Standard Import Preset, so adjustments will be made from that preset. We do not want to synch these particular settings across every single image we have because we might want different settings for different images.
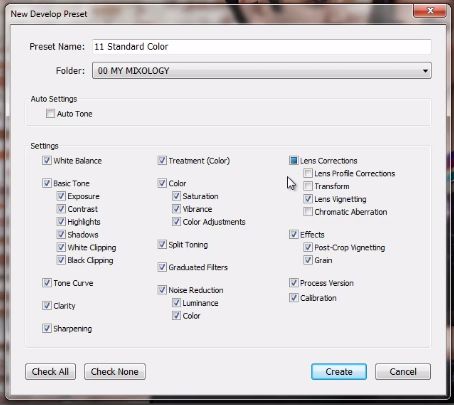
Then, hit “Create” at the bottom of the Dialogue Box to create your Standard Color Preset. You will see that “11 Standard Color” is underneath the “10 – SOFT PORTRAIT” Category.

As a side note, if you want to see the Before/After of your image, hit “\.” The Before image will actually include the settings from the Standard Import Preset since the image was imported with this preset. With the Standard Import Preset, you can see a lot more of the facial details as well as the highlights over skin tones.
Conclusion & Learn More!
We hope you have enjoyed these tips for creating a “soft portrait” look. As mentioned before, change the settings of this Standard Color Preset to fit your own personal style. Stay tuned for our next tutorial that will go over how to create a Standard Black and White Preset for our portrait images. In addition, we will also have tutorials on how to create a Standard Color and Standard Black and White Presets for landscape images.
To learn more about the SLR Lounge Workflow System Workshop on DVD or to purchase it, click on this link.
To purchase the Lightroom 4 Workshop Collection which includes A-Z Tutorials, the Preset System, and Workflow DVD, click here.


Get Connected!