Please report all problems and solutions on our forums.
IMPORTANT UPDATE 7/10/2012: WE’VE UPDATED THE PLUGIN TO BE COMPATIBLE WITH WORDPRESS 3.4 .
WE’VE ALSO ADDED ADDITIONAL FUNCTIONALITY, INCLUDING THE ABILITY TO CONTROL THE WIDTHS OF THE SLIDING TABS, THE FONT INSIDE OF THE SLIDING TABS AND MORE!
TO UPDATE, SIMPLY DOWNLOAD THE LATEST VERSION AND REPLACE THE OLD VERSION VIA FTP OR SIMPLY DOWNLOAD THE LATEST VERSION, DELETE THE PREVIOUS VERSION AND UPLOAD THE UPDATED VERSION.

For an example of the working plugin, visit this website of this Los Angeles Wedding Photographer or check out their Los Angeles Wedding Photography Blog
DOWNLOAD FREE PLUGIN: CLICK HERE
If you’re looking to modify the width of your side tabs, please read this article.
We all know how important the real estate on your screen is. If you add a “Facebook Badge,” a user profile, a contact form, or any other item or section to your site, you run the risk of cluttering your page or introducing inconsistent design elements to your page.
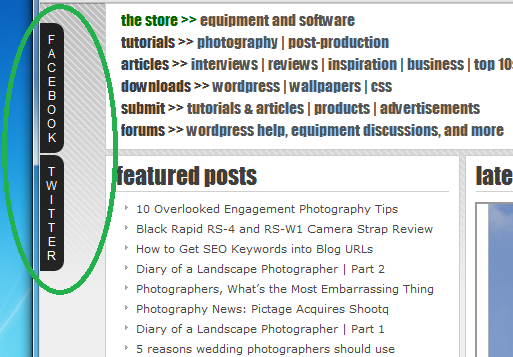
The “Side Tab” WordPress plugin is designed to solve this very problem by inserting up to 3 tabs that are affixed to the left side of your website. These tabs use jQuery to slide open when your user hovers his or her mouse over the tab. You have full control over the content of each tab, as it utilizes WordPress widgets. You also have full control over the color of the tabs as well as the labels (the text) of the tabs.
The best way to illustrate this is by showing an example. This very page (yes, the one you are currently reading) uses this plugin; and so does our photography blog. Notice how the items inside of the tabs contain information that would either not fit on the page or would not look good on the page as a static item. Having a sliding tab gives you the freedom to insert items that would otherwise not fit on the page either because of their size or because of their inconsistent look.
So you want to use the pluggin? Here are the steps to downloading and installing the Side Tab WordPress Plugin
1) Download Plugin
2) Upload Plugin
3) Activate Plugin
4) Edit Plugin Settings (of tabs, text on tabs, color of text)
5) Add Widgets (in Appearance Menu)
6) Enjoy and Share!
1) Download – the pluggin by clicking here(If clicking does not prompt you to save the zip file, please right click on the link and choose “save link as”
2) Upload – now that we have the plugin saved on your computer, the next step is to get the plugin into your /wp-content/plugins directory. There are two methods for doing this:
Method a) Dashboard – This is the easier method of the two.
i. In the WordPress Dashboard (www.yoursite.com/wp-admin) of your site, click on “Plugins” -> “Add New”
Please click the “Add New”

ii. Click the “Upload” button at the top of the page (see image below). Then press the “Choose File” button, find the zipped file on your computer, select the file, and click “Install Now”
IMPORTANT NOTE FOR MAC USERS. YOUR COMPUTER MAY HAVE AUTOMATICALLY UNZIPPED THE FILES. HOWEVER, YOU NEED TO UPLOAD A ZIPPED FILE IN ORDER FOR THIS METHOD TO WORK. PLEASE ZIP UP THE FILES BEFORE UPLOADING OR YOU CAN USE THE SECOND METHOD MENTIONED BELOW.

Method b) FTP program – If you download Filezilla or any other 3rd party FTP software, you can log into your site and navigate to the /wp-content/plugins directory and drag and drop the unzipped plugin folder into the directory.
3) Activate The Plugin – Press “Activate Plugin”

4) Edit the Footer.php document – Go to the Footer.php file in the Editor (Appearance -> Editor -> Footer.php) and enter the following line of code: <?php if(function_exists('get_side_tab'))get_side_tab();?> (code with unnecessary spacing may lead to an error).

insert the code and press “update file”

5) Edit Side Tab Settings – After activating the Plugin and adding in the footer code, go to your dashboard and look under the “Settings” section where you’ll find “Side Tabs.” Click “Side Tab” and select your desired color for the tab, the labels (the text on the tabs), and the color of the labels. Add and remove the tabs from this screen as well. You can add up to three tabs.


6) Add Content to the Tabs – Next click on ‘Widgets’ under ‘Appearance’ and see the “Side Tab1,” “Side Tab2,” and “Side Tab3” (NOTE: There will only be Side Tab2 and Side Tab3 on this screen if you chose to use 3 tabs in the previous step). In these tabs, drag in your Recent Posts Widgets, Archives Widgets, and other widgets. If you’re trying to add third party information, like Facebook Fan Page information, etc, insert a “text” widget and input the necessary code. Make sure you click Save after you’ve entered in your desired information.


Example: If you would like to add a “Facebook Badge,” Go to https://www.facebook.com/badges/, navigate to the following screen, copy the code, and paste it into a text widget like you see above.
![]()