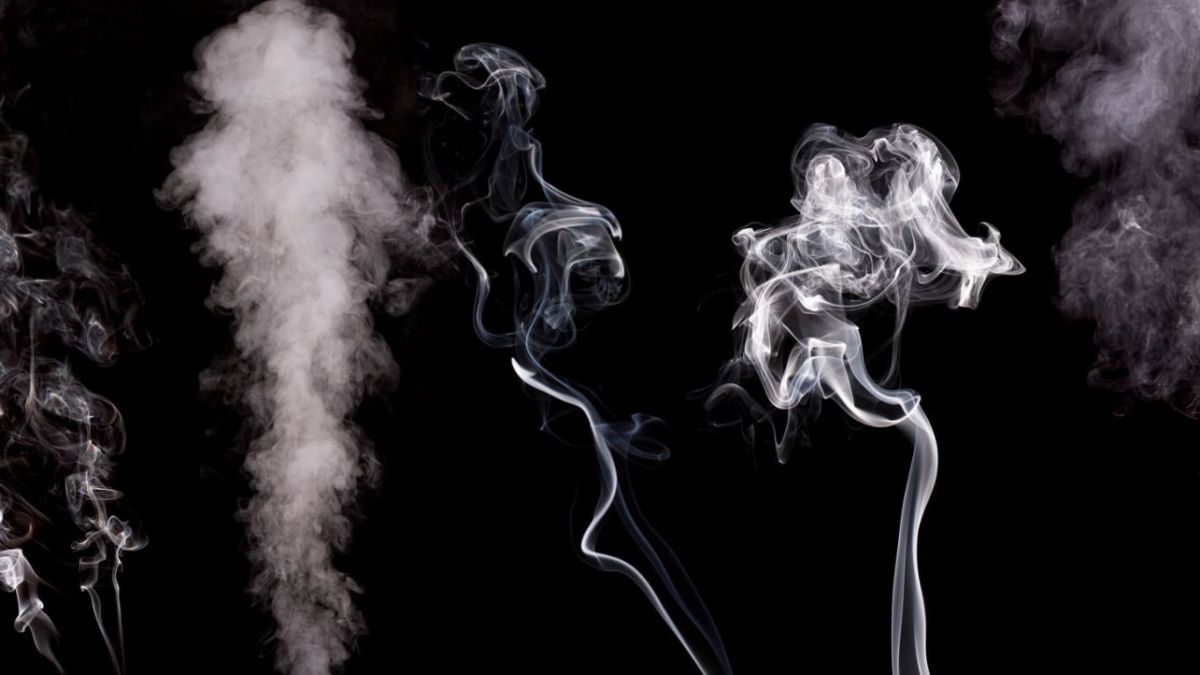
Photographing smoke can be difficult because of its unpredictable nature. However, the same characteristics that make smoke difficult to photograph also make it beautiful and unique. The good news is you can use specific techniques to light and shape smoke for consistent results. Once you realize how easy it is, you’ll probably look for ways to start incorporating it into your photography. To help you learn how to photograph smoke and fog, we’ve put together 10 easy-to-follow smoke photography tips and ideas.
Before We Begin, A Shortcut

SLR Lounge has created the ultimate resource for smoke and fog textures. These full-resolution images are prepped and ready to be blended into your images. With over 400 smoke and fog textures organized and categorized, you can easily find a perfect texture or combination of textures to add to your image. The texture pack includes six video tutorials designed to help you from start to finish, from photographing smoke to creating your own custom smoke brushes in Photoshop. Be sure to check out the Smoke Texture Pack in the SLR Lounge store.
Smoke Photography Tips Overview
Learn how to Photograph Smoke and Fog in these steps.
- Use a Telephoto Lens to Photograph Smoke
- Go with a Pure Black Background
- Light with a Studio Strobe when Photographing Smoke
- Know Your Flash Duration
- Edge Light the Smoke
- Modify the Light with a Strip Box and Grid
- Go Outdoors for Environmental Smoke Effects and Indoors for Fine Smoke Effects
- Use a Variety of Tools to Create Your Smoke and Fog
- Have Plenty of Grip Gear when Photographing Smoke and Fog
- Post-Process Your Images
Tip 1: Use a Telephoto Lens to Photograph Smoke

We recommend using a telephoto zoom lens to help control your composition with the zoom. For the sample shots in this article, we used a Canon 5D Mark IV and a Canon 70-200mm f/2.8 IS II lens. If we wanted to capture the entirety of the smoke, we simply zoomed out. Adversely, if we wanted the details of the smoke, we zoomed in. Of course, you can always physically move to control what stays in the frame, but a quick zoom simplifies the process. As a result, you miss fewer shots of cool smoke shapes.
Tip 2: Use Black Background for Smoke Photography

As you learn Smoke Photography, don’t confuse a pure black background with a not-so-pure black background. Using a pure black background makes blending the smoke into your images exponentially easier. We learned this the hard way through trial and error. With a pure black background, the smoke textures easily be added into images in post. Using anything else will require extra work on the backend. Do yourself a favor and make sure the background is pure black.
Tip 3: Light with a Studio Strobe when Photographing Smoke

The biggest reason why we recommend using a studio strobe over a pocket strobe is to get even lighting. We want the light to be even from top to bottom without getting “hot spots” in the middle of the smoke. With a studio strobe, you’ll get even lighting along the entirety of the smoke. However, you can still get amazing results with pocket strobes, so this is definitely not an absolute requirement.
Tip 4: Know Your Flash Duration
Lighting plays a key role when learning how to photograph smoke and fog. One important element of flash photography you need to learn involves flash duration. A flash duration is the time it takes for a flash to power up, emit a flash, then completely die. When you’re shooting a flash at 1/16 power, the flash is activated for a much shorter duration than a flash shooting at 1/1 power. This is important to note because smoke is a quick moving subject. If your flash duration is too long, then your smoke can look blurry.
Tip 5: Edge Light the Smoke
When you’re doing Smoke Photography, you don’t want to light from the front. Lighting from the front will create a flat look and you’ll kill all of the detail in the smoke. What you want to do is light the smoke from the sides so that you can illuminate the smoke and preserve all the details.
Tip 6: Modify the Light with a Strip Box and Grid

A strip box with a grid is another tool that will help give us even lighting from top to bottom. The grid, in particular, helps minimize light spill. If the light spills out on the sides, it can change the color of the background or even hit your lens, creating unwanted flares.
Tip 7: Go Outdoors for Environmental Smoke Effects and Indoors for Fine Smoke Effects
When shooting environmental smoke, you’re most likely using fog machines or other heavy smoke or mist-creating machines. The reason we shoot these outdoors is because we want the fog to appear, get our shot, then dissipate quickly so we can set up the next shot. If we photograph fog textures indoors, then the fog will settle and affect the next shot.
When shooting smaller and detailed smoke textures, you want to be indoors. This is because smaller smoke effects are easily influenced by wind and movement. As a result, it’s important to be in a place that eliminates those variables.
Tip 8: Use a Variety of Tools to Create Your Smoke and Fog

One thing you’ll discover when learning how to photograph smoke and fog is that smoke, fog, and mist comes in a variety of shapes, forms, and textures. In order to match the specific look you want to blend into your image, consider using different tools to create your smoke. Fog machines, cigarettes, cigars, matches, and incense all create different looks and smoke textures. Be sure to play around (safely) to find what you like.
[Related Reading: Smoke Bombs for Photography and How to Use Them]
Tip 9: Have Plenty of Grip Gear when Photographing Smoke and Fog

The accessories we find most useful on shoots include A Clamps, Matthews Apple Boxes, and Blowers.
A Clamps – The A-Clamps for a studio are a must-have because they’re so versatile. Whether you need to clamp diffusion sheets, backdrops, or even your smoke modifiers, these A-Clamps get the job done.
Matthews Apple Boxes – Matthews Apple Boxes are incredibly useful when you need to prop up the object that’s creating the smoke. We wet the apple box with water so it did not catch on fire if the smoking object fell. Do not use dry or flammable surfaces.
Dust Blowers – When modifying a smoke trail we like to use our blowers, typically used for blowing out dust from lenses and sensors. It gives us incredibly accurate wisps of wind as well as control of where we want our smoke to go.
Tip 10: Post-Process Your Smoke Photography Images
Getting started, we will be working inside Lightroom. These are the three textures we will be creating, and we’ll be doing it from this single source image. You’ll want to create a virtual copy of the image, and reset it, hit ‘D’ to jump into the Develop Module.

This is the RAW file shot at 1/160 at f/7.1 at ISO 100. You’ll notice in this particular image, there’s a lot of wasted space in the shot. Smoke as a subject is very unpredictable. This quickly becomes apparent when you begin to shoot it, so we have to have a larger frame for the area we are shooting because we don’t necessarily know when the smoke is going to ripple, where it will travel, so we shoot a little bit larger, a little more zoomed out, so we have a little more room in the frame for the smoke to do its thing and for us to capture it.
This means that to get a great look you’ll be better off (especially when doing rather drastic cropping), shooting at high resolution. We’re shooting the Canon 5DMK III which has 24MP and we’re shooting in RAW, but if you can go beyond that and you can get even higher, perhaps with something like an A7R, D810 with extremely high resolution will create much more detailed images when you begin cropping in.
Preparing the Image
At this point and for this example, we’ll change our function to crop by hitting the ‘R’ key, and change our crop to 1:1. Using a square crop lends well to fine art photos, but it’s entirely your preference. For the purpose of this tutorial, we’ll use the square crop and make a triptych with each of the smoke pieces having a different color, as you can see a little earlier in the video.
If your crop aspect ratio is locked, you’re fine, but if not, hold ‘Shift’ as you drag the edge of the crop box to constrain the set proportions. The crop we’re looking for, in this example, is one that will have the smoke beginning in the bottom right corner, trailing up to the left.

We’ll be brightening up the exposure and highlights, and I suggest turning on the clipping highlights by hitting ‘J’ because we want to see what the highlights and shadows are all really doing. We do want some pure white in this image so having some blown out bits is alright, and we also want deep dark blacks, and to have a fair amount of contrast.
With the clipping option, you can zoom in to see if there are any black flecks, and those dark areas you can paint over to completely black out your desired areas. To do this we are grabbing a brush using the Burn++ preset from the SLR Lounge Preset System, but if you don’t have it, you can see the settings here and just manually dial it in, and then paint away. To can hit ‘O’ as you paint to turn on ‘Overlay’ to see precisely where the lines of your brush are, enabling you to cover only what you want and with precision. If you notice any overlap that may be ok since you are generally using a feathered brush, but it is to your preference.
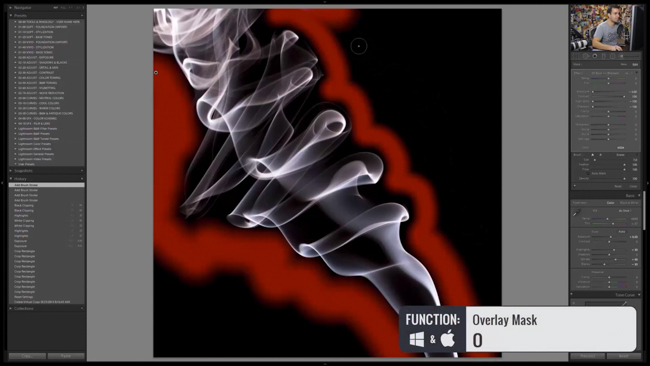
Then hit ‘O’ again to turn off the Overlay and then hit ‘J’ to see the clipping mask in place and ensure there is no detail where you want solid black. When you’re satisfied, turn the clipping mask off and hit ‘I’ to bring up Information, and you’ll notice a significant drop in pixels from the original due to the crop. This is why we stress to shoot at the highest resolution possible since there’s been an almost 80% reduction in this scenario. What you are left with should still be plenty for what you need, especially should you be printing on canvas where resolution tends to be lower anyway.
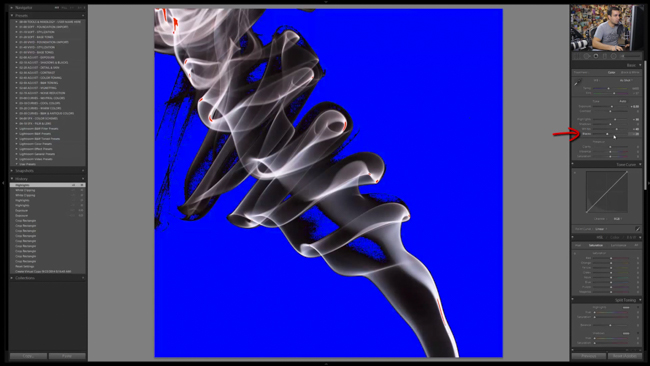
However, if you zoom in, to around 3:1, you will likely notice some un-smooth fine detail which we want to fix. The trick to doing this lies in a few simple steps; head over to the Clarity Slider, which adjusts mid-tone contrast to make it pop a little, then go down to Detail where you’ll adjust Noise Reduction. Atypically, we are pushing noise reduction and color noise reduction to the max because we’re going for a silky smooth look. You could, at this point, do some sharpening, but our suggestion is to get a greater sharpening result by doing it outside of Lightroom, perhaps in Photoshop, where you haven’t used a noise reduction process.
This concludes basic processing. Adjusted out base tones and made the contrast really pop, smoothed it out and cleaned it up. At this point, we’ll be using the flexibility of ‘Curves’ adjustments and Split Toning to get the different looks. Again, if you don’t have the SLR Lounge Presets just hit pause where you need to in the tutorial and dial in the settings, and you’ll be on your way.
Colorizing Your Textures
Our goal now is to match RGB with red, green, and blue smoke. We’ll begin with the Red and go into the Warming Curves (02-20 Curves – Warm) and select 23c. Neutral Punch Crimson. This will add a little contrast kick to it as well as adding the color. Next we’ll go to SFX Color Schemes (04-00 SFX – Color Schemes) and select 02d.Orange/Red which will give us orange in the highlights and red in the shadows. You can always go into Split Toning and make adjustments as you wish. This pretty much completes the red version.

To create the Green version, you’ll need to create a virtual copy, then go up to Cool Curves (02-10 Curves – Cool) and select 13a. Neutral Punch – Teal, then add an SFX Color Scheme to match it, and select 02a. Yellow/Green. You can see the effect each of these presets has on the image in more detail by inspecting the different channels within the curves, and all along the way, keep in mind you can make fine tuning adjustments as you wish.

Now to create the last image of the triptych, the Blue version, create another virtual copy, and go back to the Cool Curves and we’ll be selecting 13b. Neutral Punch – Azure. Then back down to SFX and select 03e. Blue/Blue. The speed at which all these different looks can be tried out really is some of the power of the Preset System, but remember to pause the video at any point to dial in the specific settings should you not be using the Preset system.

Conclusion
We hope you enjoyed these tips on how to photograph smoke and fog. As you can see, it’s fairly easy to capture quality shots for adding cool textures to your photos. If you would like to learn more about SLR Lounge Smoke Textures, be sure to check them out in our store.


Get Connected!