Everybody’s familiar with that iconic Polaroid frame: a bold white border that wraps around memories both posed and candid. The original Polaroids may not have produced the highest quality images on the market, but they made photography fun. For this reason, people have used Polaroid cameras in makeshift photo booths over the years to capture guests getting goofy at all sorts of events, regardless of the photo quality. In this article, we’re going to share a DIY solution that combines the best of both worlds. You will learn a simple set up to make your own Polaroid photo booth using your own camera, resulting in fun, high-quality photos.

Secret Bonus: I’ve noticed over the years that if I gave kids something to hold in a photo booth they are more likely to sit still and smile for me.
Gear and Materials Checklist

The following solution will keep this project as easy and inexpensive as possible. Here are the materials you’ll need to create your own Polaroid photo booth:
- Backdrop stand
- Spring clamps
- Black duck cloth
- 30×40″ foam core board
- Xacto knife
- 24″ metal ruler
- Whatever camera, lens, and light source you have
Building the Polaroid Photo Booth Frame

To create the Polaroid frame, lay out the 30×40″ foam core board. You’ll need to have a pencil, metal ruler, and Xacto knife handy. First, measure 4″ in from the sides and top of the frame. Next, measure 10″ up from the bottom. Use the pencil and ruler to connect the measured dots so that you can get a clear picture of the opening you’ll cut out. Then, go ahead and cut out the opening using an Xacto knife. We recommend using the ruler as well to help guide the cut. Make sure you do this on a surface that you’re ok with damaging. If you don’t have a self-healing cutting mat, you can use another sheet of foam core board or a piece of plywood.
You might consider making more than one frame, anticipating it might get ruined during the course of the evening.
Backdrop for the Polaroid Photo Booth
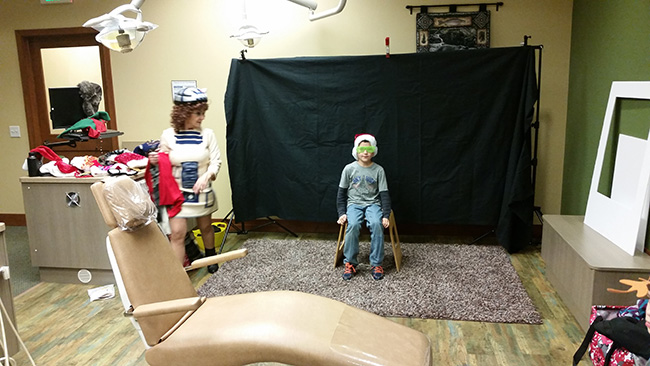
For the backdrop, any large sheet or fabric will do, but there’s an advantage to using darker fabrics. The image above features a 60″ wide duck cloth purchased at a local fabric store. It’s inexpensive and with the right lighting, doesn’t show wrinkles. Simply clamp this to a portable backdrop stand. It should go up easy peasy. Lastly, you might want to supply a small stool for taller kids or parents to sit on when taking the pictures.
Polaroid Photo Booth Lighting
Now, for the lighting set up. One method involves using multiple Speedlites with umbrella modifiers on stands, but you can get it done with a single on-camera flash. A constant light would work as well.
On-Camera Flash Light Bounce
For on-camera flash, you will use a light bouncing technique. Aim the light slightly behind and above you to bounce off the ceiling. This technique typically works very well and creates much less of a tripping hazard without the presence of light stands. Please note, bouncing the light off the ceiling includes a few requirements: 1) the ceiling should be white or neutral in color, 2) your subjects should be relatively close to you. Meet these requirements and you’ll get a flattering flat light that illuminates the entire faces of your subjects.
The camera settings for the images featured in this article are as follows: ISO 500, 70mm, f/4.0, 1/80th of a second shutter speed with the flash set to 1/4 power.

Polaroid Photo Booth Props
Try to include some fun props to use and wear. It doesn’t matter if you’re using the Polaroid photo booth for adults or kids. Regardless, the props will add to the fun feeling of the whole event. The funny 80’s slotted glasses always prove a popular option. Reindeer headbands get a lot of use (and laughs) around Christmas.
If you would like to learn more about bouncing on-camera flash for as easy, inexpensive way to light your subjects, check out the SLR Lounge Flash Photography Training System, which delves into the details of shooting with on-camera and off-camera flash.