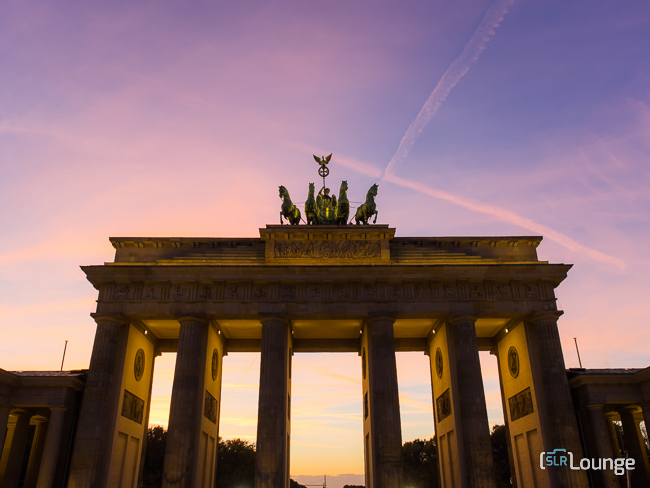
As a professional photographer who typically wields a large, full-frame camera, I’ve always been intrigued by the promise of Micro 4/3rds cameras. They seem almost too good to be true, with great performance in small, lightweight, and (relatively) affordable camera bodies. Last year, I got hooked on Olympus cameras when I took their EP-5 to Colombia. This year, I wanted to explore more of what the Olympus family had to offer, so I took the Olympus OMD E-M1 and a few lenses on a trip to Eastern Europe.
I took out the Olympus OMD E-M1, a feature-packed followup to the EM5, along with two lenses, the Olympus 75mm f/1.8 Lens and the Olympus 12-40mm f/2.8 Lens. Below is the full review, along with some sample pictures from my travels.


The Olympus OMD E-M1 packs great features into a small body and leaves very little to be desired for a wide range of photographers.
For advanced enthusiasts and professionals, Olympus has delivered, with 10 frames per second, great ISO performance, quick auto focus, focus peaking and other great features.
For beginners and hobbyists, Olympus has included features like quick focusing and firing by simply touching the subject on the LCD screen. Additionally, the Wi-Fi capabilities plus the smartphone app allow for immediate syncing with smart phones for uploading to social media. Below are some more relevant and notable features that make it easy to see why we give the Olympus OMD E-M1 a 5 out of 5 in terms of features. For a complete feature set, see the product listing on B&H.
- Micro Four Thirds System
- Megapixels: 16.8
- ISO Range: 100-25600
- Frames Per Second: 10 fps
- Wi-Fi Capable: Yes
- Weight: 1.09 lb
- Time Lapse mode
- Focus peaking
- Dual Phase- & Contrast-Detection AF
- 5-Axis Image Stabilization with IS Auto
- Built-in Electronic Viewfinder

We give the performance of the Olympus OMD E-M1 a solid 5 out of 5 primarily because of its quick and accurate phase-detection auto focusing, its incredible 5-Axis image stabilization, as well as its beautiful color, detail, sharpness and overall image quality. We’ve broken a few of these notable features into sections below with examples.
Fast and Accurate Phase Detection Auto Focus
Even at apertures as low as F/1.8 and low light, the Olympus was able to quickly and accurately focus. At such a low aperture, I found myself taking three or four “safety” shots like I normally do with my other cameras. But as I kept shooting, I noticed that all I was doing was taking exact duplicates, because I was nailing my focus on the first shot. It’s worth noting, however, that focusing through the electronic viewfinder is more accurate than simply tapping the LCD to focus and fire.

Strong ISO Performance
Below are a couple of examples of images at “higher” ISOs. The first one is at ISO 800, while the second one is at 1600. Now you’re probably thinking that 800 and 1600 are not very high, and I completely agree. The camera goes all the way up to 25600, but I always find it silly to show examples at the maximum ISO ranges. It’s obviously not going to look good up there, and my shooting style is to keep my ISOs as low as possible. Even with my Mark III at weddings, I max out at ISO 3200 to preserve image quality, contrast and detail. Anyways, back to the point. At ISO 800 and 1600, the image quality is solid and the amount of noticeable grain is low.


In Camera HDR & Dynamic Range
Despite some of the flack it gets from time to time, we at SLR Lounge still love HDR photography. It’s a great way to shoot against the light source, without any light modification, and still capture all of the shadows and highlights in the scene. So I was ecstatic to see how easy it was to turn it on and off on the Olympus. See the top left buttons on the image below.

The Olympus OMD E-M1 gives you a variety of HDR options, but only two of the modes take the RAW files and process them in-camera, to produce a final JPEG File, HDR1 and HDR2. The other modes simply keep all of the RAW files for you to process later with Photoshop, Photomatix, or some other HDR Software. Below is the original JPEG taken on HDR2 Mode. As you can see, the camera did a pretty good job bringing out the shadows in the building while preserving the highlights in the sky. If I were an amateur without Lightroom or other post processing software, I would be pretty happy with the in-camera HDR JPEG file. However, overall, the colors were still not vibrant enough for my photography style, so I post produced the RAW image in Lightroom (the second image below). Take a look at the differences.
Original SOOC JPEG:

Lightroom Processed with the Dynamic Range Boost SLR Lounge Preset + Temperature and tint shift + clone tool.

Here are a few more RAW Lightroom-processed images (using the v6 Presets) that illustrate the awesome dynamic range of the Olympus OMD-1.


Amazing 5 Axis Image Stabilization
Okay, here is one of my favorite things about this camera. Remember how I said that I don’t like to go too high with my ISOs? The 5 Axis Image Stabilization helps me stay at low ISOs by helping to produce crisp images at very low shutter speeds without the need for a tripod. Because we photographers are always in the dilemma right? Tripods are bulky and get in the way of our exploring, yet we get stuck in situations where we sorely miss having one around. In these situations, I find objects like hand railings to rest part of the camera on. Then, holding really steady, I fire off plenty of shots to ensure that one is crisp, even at full 1 to 2 second shutters. Using this technique, I was able to get the following shots.


Enough Megapixels (16.8)
At 16.8 Megapixels, it’s right in line with competitors like the Fuji X-T1. But you’re looking at fewer megapixels than the Sony a7 as well as DSLRs like the entire Canon lineup, from the Rebel to the Mark III. However, we’ve never been too hung up on megapixels, and 16.8 still gives you enough leeway to crop when necessary. Below is an example of cropping that results in an image that is still naturally printable up to 8×12. If we wanted to create anything larger than that, a little Photoshop would do the trick. So, if you’re deciding between this camera and another with more megapixels, don’t let the megapixel count be the deciding factor.
Original SOOC JPEG:

Cropped RAW Lightroom Preset Processed Final JPEG:

Convenient Touch Screen Focus
As a professional photographer, the ability to focus and fire the shutter with the touch screen isn’t all that appealing since we’re pretty used to using viewfinders. Also, as mentioned, focusing with the touch screen is noticeably less accurate than focusing with the viewfinder. However, on those occasions when you don’t have a professional around and you want a decent picture, it really comes in handy, as shown in the image below.


The design of the camera looks and feels great. It’s lightweight and fits comfortably in your hand. The European November certainly tested the weather sealing, and there were no issues with it. The camera is comfortable to hold and the functions are easy to access.
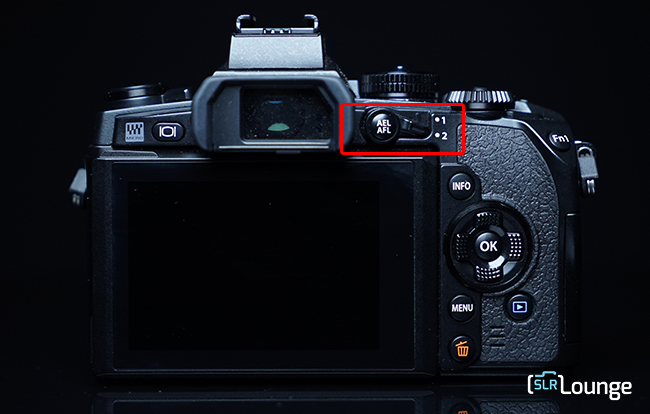
The one issue that I can foresee is that the amount of functions, and the placement of these functions, could confuse some beginners. Even as a professional, it took me a little while to get used to controlling everything quickly. However, once I got used to it, I really enjoyed having everything so accessible. Here’s an example: In the image of the back of the camera below, you see the switch between “1” and “2,” highlighted in a red box. If you’re on “1,” your shutter wheel (around your index finger) controls the shutter and your aperture wheel (around your thumb), controls the aperture. If you switch down to “2,” the wheel that used to control the shutter switches to controlling the ISO and the wheel that used to control the aperture switches to controlling the White Balance.

When I first started using the camera, I found myself bumping up ISO when I was trying to increase my shutter speed, having the opposite intended effect on the exposure. I also found myself turning my scenes odd colors by changing the white balance when I was simply trying to change my aperture. But after I got used to changing these settings quickly, I realized how great it was to have these two functions right at my finger tips.
Another great feature is the articulating screen. This comes in handy when you would rather tilt a screen upwards than get down on dirty streets. It’s also great with street photography, when you’re taking pictures of local people without them noticing. Used in conjunction with the touch focus/shutter, you’re able to be really sneaky.


The quality and build are excellent and consistent with the other Olympus cameras that we’ve tried. It survived bike rides in my backpack without scratches or dings along with light rain. In case you had any doubt, take a look at this video of the Olympus OMD E-M1 taking a bath.

With five stars in each of the categories, the only possible thing that could make the value anything less than 5 stars would be an astronomical price. But it turns out the the OMD is right around the same price as its main competitors. The Fuji X-T1 retails at $1,299.95 (currently $1,199.95 at B&H). The Sony a7 retails at $1,698.00 (currently $1,498.00 at B&H).
The Olympus OMD E-M1 falls right in between those, retailing for $1,399.00, currently priced at $1,299 at B&H. So you’re basically around the same price range, plus or minus a couple hundred bucks. This brings us to a 5 out of 5 Value rating.

Additional Images:
If you’re interested in checking out more sample images from the trip, click left and right on the slider below.
Other Gear Reviews from SLR Lounge
Check out some of our other reviews from our Youtube Channel:


Get Connected!