
Introduction and Vision
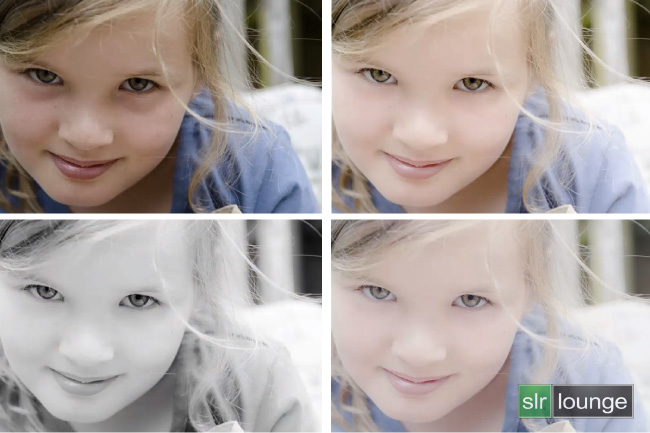
In this tutorial, we are going to work through this nice spontaneous child portrait that was shot and provided by David Hill. We spotted this image in our Constructive Critique section of our forum, and thought it would make for a great Lightroom 4 edit.
In this Lightroom 4 video tutorial, we will be walking through the process of creating 3 different looks for this image. We will first create a standard color version, then black and white, then a vintage version of the image as well. We are going to first work through the image using the Lightroom 4 Preset System, and then as usual we will explain the actual settings for those that may not have the LR4 Preset System.
Processing, retouch and brush techniques are all pulled directly from the Lightroom 4 A to Z Guide.
For the overall vision and direction of the image, I want the image to have a very bright, airy, and overall playful feel to it. So we are going to start by producing a standard color corrected version with that look, then move to creating the black and white and vintage virtual copies.
Thanks for submitting your image David and we hope you all enjoy. Let’s get started!
Watch the Video Tutorial
Lightroom 4 Preset System Mixology
For those that have the Lightroom 4 Preset System, we can achieve this look with 6 simple clicks as follows (starting with Standard Import):
1. BASE ADJUSTMENTS -> 07 Lighten
2. BASE ADJUSTMENTS -> 12 Portrait Flatten
3. BASE ADJUSTMENTS -> 22 Heavy Soften (Skin)
4. BASE ADJUSTMENTS -> 32 Light Fade
5. BASE ADJUSTMENTS -> 45 Medium Darken
6. NEUTRAL CURVES -> 33 Desaturated
We also used some of the LR4 Preset System brushes to do a bit of retouching and enhancing. Please watch the video above to see how we applied them.
Full Written Lightroom 4 Tutorial
For those that don’t have the LR4 Preset System and don’t want to watch the video, here is the full written tutorial below:
Step 1. Basic Adjustments

Because I’m going for a bright and playful feel for this particular shot, I am going to start by increasing the Exposure up to +1.5. Since this is a portrait, smoothing and flattening out the skin tones is important. To do this, bring both the Highlights and Whites down to -30, while increasing both Shadows and blacks to +10. Let’s smooth it out a bit more by decreasing the Clarity down to -25 and setting Contrast at -50. Killing a lot of the contrast will give us that light fade we need for flattening out the skin tones. We are also going to adjust Vibrance down to -15 simply to pull out any strong colors over the skin.
Because toning down the contrast killed a lot of our blacks, bring back the lost contrast by increasing Shadows to -15 and Blacks to -30. Next, I want to punch up the contrast just a bit more, and to do so we will use a subtle S curve as shown below:

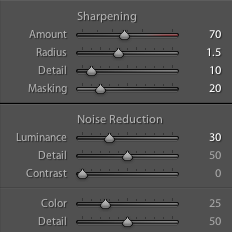
We will be using our standard sharpening values pulled from the 00 Standard Import Preset, which are shown below:

Now, let’s add some noise reduction in the amount of +30 in order to smooth out all the fine pores of the face. This will clean up and smooth out her skin even more, and since this is a close up portrait shot, the increase in noise reduction won’t significantly affect overall detail. Let’s correct a bit for White Balance at this point by increasing Tint to +15, and adjusting the Temperature to 4800. We are done with the basic adjustments at this point, but the image may be slightly too bright, so let’s fine tune the Exposure down to +1.30.
Your final basic settings should look like this:


Our image so far:

Step 2. Cleaning Up Blemishes via Spot Removal Tool
Being careful not to remove features that are a part of our subjects look, I do want to clean up just a bit of the more distracting blemishes or dirt. To do this, choose the Spot Removal Tool at the top of the right panel. Then, click on the spots the remove, making sure not to overdo it. We want to remove the blemishes, but not so much so that she doesn’t look like who she is.

Step 3. Lifting Shadows via Adjustment Brushes
The shadows under the eyes are slightly too dark, so to bring it up, grab the Brush Tool at the top of the right panel. Have the settings for the brush like below.

This brush will very subtly brighten up the areas underneath the eyes without going too far. Brush around and bring up the shadows, but make sure not to do it too much to the point where it looks unnatural.

Step 4. Enhancing Eyes via Adjustment Brushes
Because the girl’s eyes are the main focus points, I want to enhance the irises a bit. Using the settings below, paint over the irises slightly. This will really bring out the color and clarity in her eyes. But, be careful to not go too overboard with any eye enhancements.

Here is our final color image:

Step 5. Black and White Version
Create a Virtual Copy of the first image by pressing CTRL + ‘ (CMD + ‘ on MAC) and convert to black and white with the V key. Black and Whites could usually do with a little boost to contrast, so let’s increase the contrast to -25.
Final black and white image:

Step 6. Cool Faded Version
Create another Virtual Copy of the finished color image. For those with the LR4 Preset System, choose the “12 Azure” preset from “03 COOL CURVES”. For those without the preset system, adjust your settings like the one below. The image is slightly on the cooler side, so warm it up by dragging the Temperature slider to 5000. This will give a nice cooled and faded version of our color image.

Final cooled and faded image:

We hope you all enjoyed this tutorial! For more information on SLR Lounge Lightroom 4 educational products and software, please read below.
For those interested in mastering Lightroom 4, we have developed the Lightroom 4 Workshop Collection which contains all of the education, resources and tools that one would need to operate an entire studio using Lightroom 4. This 3 DVD collection can be purchased together for $249 or separately for $99 per DVD. The Lightroom Workshop Collection is composed of the following:
Lightroom 4 A to Z Tutorials DVD – Photographers around the world have been raving about the Lightroom 4 A to Z Tutorials DVD. With nearly 14 hours of A – Z video instruction, this workshop on DVD is designed to turn anyone at any experience level into a Lightroom 4 expert. (more info)
Lightroom 4 Preset System + DVD – 218 Presets, including 186 Develop Presets, 32 Brush Presets and 30 Mixologies make up the most comprehensive, intuitive and powerful Lightroom 4 Preset System ever created. Color correction, vintage fades, black and white effects, tilt-shift effects, faux HDR, retouching, detail enhancing and virtually any other effect can be created with just a few simple clicks. (more info)
Lightroom 4 Workflow System DVD – For advanced Lightroom 4 users, the Workflow System DVD features 7 hours of HD video tutorials teaching exactly how we can cull and process images at over 1,500 images per hour using just Lightroom 4, your keyboard and mouse. The goal is to help you spend more time shooting and working on other aspects of your business and less time in front of the computer. (more info)


Get Connected!