As photographers, we are constantly searching for opportunities to create unique, impactful images. To achieve our creative vision, we learn and practice techniques in lighting, posing, compositions, photo editing and more. One of these techniques is composite photography. In the following article, we’ll discuss the concept of composite photography and provide you with some basic tips to get you started.
What is Composite Photography?
Composite photography is a genre of photography in which the artist combines two or more images to create a new, final image.
Simple Composite Photography – On one side of the spectrum, composite photography can be as simple and subtle. For example, a photographer might combine images to remove undesired objects in a scene as you see in the example below. (See the full tutorial on simple composite photography for more information).
Digital Art Composite Photography – On the other side of the spectrum is are complex, mutli-layer composites that cross into digital art. Below is an example from an article on Photoshop Composite Photography by Arthur Ward.

My Beginnings in Composite Photography
I began dabbling in composites. I turned to resources such as Phlearn to soak in as much information as I could on the craft. I looked for inspiration from the some of the “greats” – Adrian Sommeling, Robin Chavez, and Joel Robinson. There was something about taking multiple images and blending them into one creative art piece that really fascinated me!
I began doing research on stock images; where to find them, rights of usage (very important), etc. Some of my favorite sites so far are: DeviantArt, MorgueFile, and Shutterstock.
I needed to test the waters, per se. I began posting the images on my Facebook page around Christmas time to see if local potential clients had the same appreciation for them as I did. The response was wonderful! Comments and messages started pouring in. Parents were really interested to know how we could make something like this happen for their children! I chose to get more practice in before offering them to clients, but made note of all who were interested so that I could contact them when the time came.
This particular image is what sparked the interest amongst my Facebook followers:

I also shared the images in several photographer’s groups on Facebook. I quickly realized that some photographers viewed composites as making you less of a photographer, or cheating. I disagree with this opinion, and here is why.
As photographers, whether working with natural light or artificial lighting, we have to know how to see/manipulate the light. We need a deep understanding of depth of field and things like composition. When creating composite photographs, these are a few important things to keep in mind.
What Makes A Composite Believable? .
- Perspective: Whether you are combining two images or ten, the perspective must match throughout the image.
- Depth of Field: Placing just the right amount of blur in just right the right places is crucial to keeping the depth of field accurate when combining multiple stock images.
- Lighting and Highlights/Shadows: The direction of your source light, whether it be the sun, the moon, a lantern, or a combination of light sources, needs to be spot on. It can make or break a composite, and it was something I spent a lot of time trying to master. Highlights and shadows must also match your light source.
- Tones: The tones in a composite should be fluent throughout the image. If the background is warm, your foreground should be as well. I have learned several tips on blending tones that I will share in future articles.
I can honestly say that without my experience as a photographer and an understanding of the basic fundamentals of photography, I would be lost with my composites. Composites are tedious, time consuming, and require skill. Is it digital art? Sure it is. Does that make me less of a photographer? Absolutely not.
Below is my latest composite. And you best believe I will be doing many more, whether for personal use, or for my clients.

How to Do Composite Photography
Now that we’ve discussed the usage and the capabilities of composite photography, let’s walk through a full example to teach you how to do it.
It’s important to remember that we don’t need awe-inspiring backdrops to create amazing images. More often than not, the beauty of our surroundings needs only to be recognized. It’s up to us to visualize what’s possible and then make it happen rather than focus on our surroundings as is and limit our own potential.
Step 1: Scout locations inside & out
We suggest getting to know your location before the shoot begins. Search for the venue online to see how others have captured it before you, and then show up early on the day of the shoot to look for great scenes, both indoors and out (if possible). Even if you’ve already shot at the location, it’s worth exploring the space again to find angles you might’ve previously missed.
Step 2: visualize the final image

Michelangelo once said, “Every block of stone has a statue inside it, and it is the task of the sculptor to discover it.” This concept transcends sculpture, really, and is applicable to other art forms, including photography. The image we see in our mind is there before us. We just have to use the tools available to us to bring it to life.
Step 3: Set up camera angle on tripod

After you’ve chosen your location, set your camera up on a tripod, and use the appropriate lens for your desired focal length. The tripod will provide the stability you need to capture multiple images for the final composite, which you’ll create in post.
Step 4: Dial in ambient exposure

Before adding lights, dial in the ambient exposure on your camera. The overall exposure for silhouette portraits tends to be on the darker side, so set your aperture, lower your ISO, and adjust your shutter speed to taste.
Note: We chose to stop down the ambient light to minimize location details and draw focus to the subjects as silhouettes and the wall art that framed them.
Step 5: Set up lighting

Here is a list of gear you can use to create amazing composite portraits:
LIGHTING GEAR options:
- Profoto B2 250 Air TTL To-Go Kit
- On-Camera Flash with Focus Assist or Speedlite Transmitter
- Off-Camera Flash with Built-In Radios
- Flash Grid/Snoot
- Flash Gels/CTO/CTB
- Flash Stand
Position the flash so that it is concealed behind your subject(s). It should be somewhat low, and the direction you face the flash will vary depending on the background and look you’re going for. For this image, the subjects stood fairly close to an art wall we wanted to highlight, so we directed the light away from the subjects. The spill of light on the wall also helped define our subjects as silhouettes.
Step 6: Pose couple as individuals & as a couple

Begin by posing each subject on his or her respective side. Because you’re photographing the subjects one at a time, be sure they’re facing the correct direction, which should be toward the center of the image. Also, as this particular image involves silhouettes, position the subjects so that their profile and features are clearly defined with separation between the arm and waist for the female subject, and a shoulder-width stance to add depth to the male figure’s pose (see image above). Without clear separation, the subjects will appear wider and less defined.
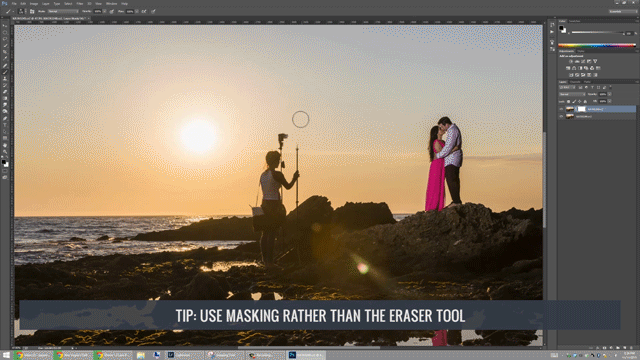
Step 7: Edit as composite in photoshop
From there, take your images into Photoshop and layer them on top of each other. Then, it’s a simple as masking in or out the desired parts of each image. You can find a full tutorial on simple compositing here for more information.
Related Articles to Composite Photography Definition

Simple Compositing Techniques For Awesome Results

5 Beginner Steps to Create a Great Composite in Photoshop

Creating a Mind-Bending Composite Image | How You Shot It

How I Shot It – A Quirky Composite of “The Noble Family” by Paul Monaghan


