Often times when shooting portraits, we run into situations where we are unable to light our subjects properly without getting our lights and assistant in the shot. When we run into these problems, we can solve them by creating a simple composite.
A simple composite is where you take two or more photos of the same frame and then combine them in Photoshop to create an image that would otherwise be impossible with a single shot. In the video below I’ll show you what gear and software we use and how easy it is to create simple composites for beautiful imagery.

Watch The Simple Composite Video Below
The Gear We Used for This Simple Composite
- Canon 5D Mark III
- Canon 24-70mm f/2.8 Mark II
- MeFoto Globetrotter
- Vivitar 285HV
- Vello Shutterboss
Two essential components you need to make simple composites are a good sturdy tripod and Photoshop. Although it is not necessary, we also like to use a remote shutter release to minimize camera shake. For the tripod I love using the fullsized MeFOTO tripods (MeFoto Globetrotter and Mefoto Roadtrip) which offer light, compact, and reliable tripods at an affordable price.

We can only recommend one remote shutter release, and it’s the Vello Shutterboss. It is a wonderful wireless and wired remote shutter release with advanced functionality. The best part of the Vello Shutterboss is its reliability, this one hasn’t broken on us yet!
Why Would I Need To Shoot A Composite?
In the scene below we have our beautiful couple standing over a tide pool. In this photo we want to expose for the beautiful sunset behind the couple, but if we do that the couple becomes very underexposed.

What I usually do in these situations is I expose for the background, then throw a grid or a snoot on my flash so I can focus the light on my couple and not let it spill everywhere in the scene. Then I place the flash just outside of the camera’s frame and point it towards my subjects.
However we are shooting at a very wide angle, and our flashes don’t have enough power to reach the couple when placed outside of the frame. This would be a situation where we have to use a simple compositing technique.
3 Simple Steps to Create Beautiful Composite Images
Step 1: Shooting For Composites
The first thing we do is set up tripod and frame our composition. When we shoot composites like these we almost always place our camera on a tripod, because we need our composition to stay exactly the same in all the images. It is possible to create composites by hand holding your camera, but you will always get the best results using a tripod, and it will save you a lot of time editing the images.  Once we are setup, we dial in the desired exposure. We wanted to go for a dramatic look in the sky and its reflections in the tide pool. We set the camera to 1/200th of a second, at f/16 and ISO 100 with the two flashes at full power to light our couple.

Once we capture the first shot, we are going to shoot the exact same shot, but for the second shot we have the assistant and flashes out of the frame.

We keep the exposure settings on the second shot the same as the first. You may vary the exposures if you want to create different lighting and color effects, but if exposures are different you will need to spend more time matching and blending in Photoshop. For the best results you want to minimize the time in between shots, especially during a sunset because the lighting changes minute by minute.
Step 2: Editing The Photos
Now that we have our photos, we’re going to edit and process them the exact same way so they blend together easily. We’re going to take the photos into Lightroom and use the SLR Lounge Lightroom Presets to edit our images. In the image below we’re making adjustments to the exposure and color so our couple and the sunset both look amazing.

When we’re satisfied with our edit on the first image, we’re going to copy and paste the adjustments from the first image to the second image. Because these 2 images were shot exactly the same, we want to edit them exactly the same so that the images will blend easier.

Step 3: Combining and Masking Out
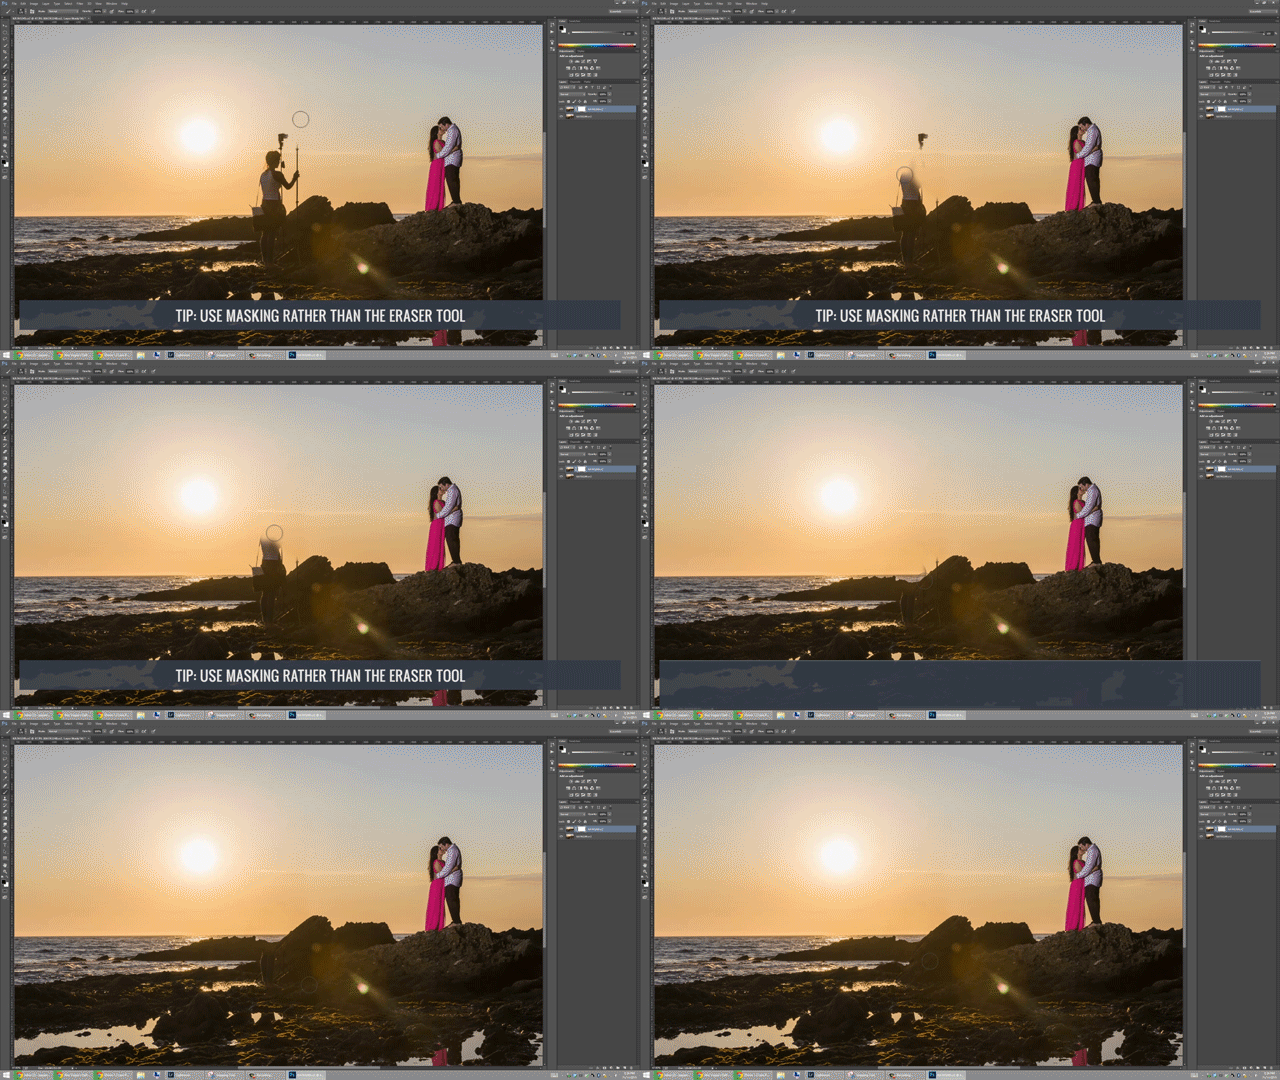
When we’re done editing the images we open the files as layers inside of Photoshop. From Lightroom you can right click on the images you want to open in Photoshop and under “Edit in” you can select “Open as layers in Photoshop.” This will bring the edited photos directly into Photoshop from Lightroom.
To make things easier I’m putting the image with the assistant and flashes on the top layer so that I can see it as I am masking it out. At this point all I need to do is add in a mask and mask out our assistant and flashes using a black brush.

Using a mask instead of an eraser brush allows us to work non-destructively and modify the selection at any point if necessary. Remember to mask out any shadows and reflections that would be caused by the unwanted objects as well. One of the easiest ways to catch bad composites is to find the mistakes in not fixing these small reflection and shadow details.

Conclusion
We created a simple composite, and the entire post production time shouldn’t take you more than 5 minutes when done correctly. While this was a simple example of compositing, you can use the same technique to create more advanced multi-layer composites to create beautiful imagery.
After we make our simple composite in Photoshop we simply save it and it will save the composite in Lightroom. In Lightroom we make some finishing touches with the Lightroom Presets, and then we’re left with our final image.
 Get out there and start playing around and post your creations to the SLR Lounge forums! Hope you all enjoyed this tutorial!


