![Capturing A Rotating Star Trail Photo [How You Shot It]](https://cloudfront.slrlounge.com/wp-content/uploads/2015/05/20150425_RLP_Cape_Leeuwin_Lighthouse_Night_0017-0346_Star_Stax.jpg)
How You Shot It is a series where you show us how you shot an image. Many who use our presets love to share their special processing recipes. You can join the SLR Lounge Community group on Facebook and share your favorite images and recipes as well! Or for a chance to have your shoot featured, click here.
Today’s post is from Hannes Nitzsche. Hannes is a photographer and blogger currently based in the surf and wine region of Margaret River, Western Australia. Mainly shooting landscapes and astro, he’s equally happy to experiment with new techniques and styles. Follow his blog (www.random-lights.

With camera and sensor technology ever evolving, astrophotography is becoming increasingly popular. More and more photographers venture out into the remotest corners of our planet in the middle of the night to capture and showcase scenes that the majority of humans will never see with their own eyes. One reason for that is the also ever increasing light pollution (I remember my dad telling us stories about how magnificent the night sky used to be when he was a kid, before electricity and street lights were so omnipresent). Another reason is the fact that spending several hours by yourself out in the elements and in near total darkness is simply not everyone’s cup of tea.
But for the few people who take it upon themselves to make the journey and witness the night skies at its best, it becomes like an addiction that connects you a little more to this wonderful planet.

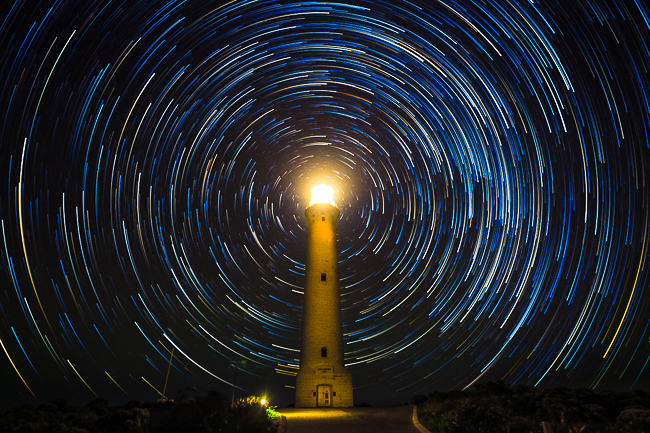
I recently ventured out to a nearby lighthouse with the idea of capturing a star trail photo. The difference this time was that I wanted the stars to “rotate” around the top of the lighthouse so that it looked as if the lighthouse emitted “signals” or “echoes” – hence the name of the final image.
In order to achieve this effect, I needed to “align” the South Pole and the top of the lighthouse (This only applies to images taken in the Southern Hemisphere, of course. If you’re in the Northern Hemisphere, you would need to locate Polaris, the star indicating the location of the North Pole). I used two mobile apps to do this, one is Photopills and the other is SkyView Free. Both worked like a charm.
Once I had my tripod and camera set up, I fired off a few test shots until I had found the settings that gave me best results. I prepared the camera and tripod by taping gaffers tape over the viewfinder (this prevents light leaks) and by suspending a bag of stones off the center column of the tripod to stabilize the whole rig. I then programmed my intervalometer, turned the LCD screen off to preserve battery life and let the camera do its magic.

Shooting the star trail sequence took roughly 3 hours. I had programmed the intervalometer to stop shooting after 330 images and once the intervalometer stopped, I took 10 more dark frames (taking pictures with the lens cap on the lens, to record only hot pixels). Naturally, I then stayed on to capture a few more different angles – after all I had already driven almost an hour to get there so why not make use of it.

Once at home – at 6am – it was time for a nice and hot shower and some sleep. When I got up, I loaded the images into Lightroom, batch-edited the shots from the star trail sequence and exported them as TIFFs onto my desktop. From there, I loaded them into a software called StarStax. StarStax is donationware which means you can download this software for free. I suggest you give it a try and if you like it, give the developer a little donation. StarStax gives you several options for processing and even the possibility to make your trails look like comets and to fill tiny gaps should you have missed a shot or two for whatever reason. It’s a wonderful little application and its user-friendly interface makes it fun to use.
Once StarStax created the time-lapse image, I re-imported the image into Lightroom and experimented with different presets from the SLR Lounge Preset system. I settled for preset 23d Neutral Punch – Warm Cross, which gave me a soft -almost dreamy look- then applied some local dodging and burning and adjusted the color intensity of the blues and yellows/oranges. As a final touch, I zoomed right in to clean up the image and remove the last remaining hot pixels.

You can find more detailed information about this image including tips on planning, shooting, gear and post processing for star trail images here or follow the author on facebook or 500px.
About the “How to Shoot It” Series
This educational series highlights amazing images from our writers as well as our community. The goal is to not only feature inspirational work but to provide valuable education for our photography community. If you would like to submit your work or shoot to be considered, please click here.


Get Connected!