In this article/video, I’m going to walk through seven common mistakes when editing photos. Make sure to download the exercise file for this tutorial to follow along! These mistakes are often simple oversights that can be quickly fixed or avoided in Adobe Lightroom. After all, it’s the little details like make all the difference in the world. Let’s jump straight to it and be sure to check our complete Mastering Lightroom course available on our Premium Channel.
Video: 7 Common Lightroom Photo Editing Mistakes and How to Fix Them
We’ve teamed up with Adorama to bring you a series of photography tutorials called “Master Your Craft” to be featured on their Youtube Channel. Subscribe to see more of our videos on their channel that covers all things photography-related from lighting and posing to Lightroom photo editing to help you hone your skills and master your craft and don’t forget to check out our playlist to watch the entire series!
7 Common Lightroom Photo Editing Mistakes and How to Fix Them
We’ll be editing this image of Renee from our Minimalist One Lens Challenge: 24-70mm Edition and we’ll be stacking each edit on top of each other to come out with a complete image at the end.
Lightroom Photo Editing Mistake #1: White Balance

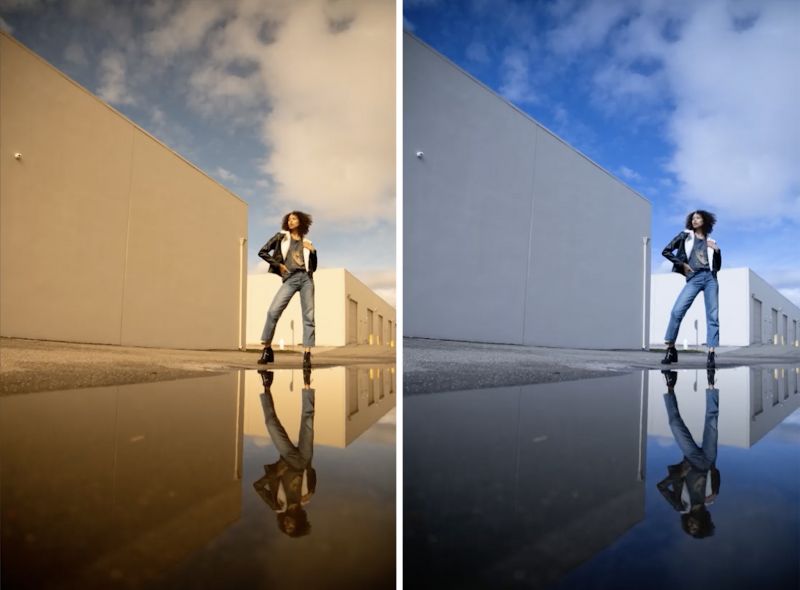
Sometimes, we forget to set the white balance or we set it too cool or too warm by mistake. If you shot in RAW format, it’s no big deal, since that’s an easy fix in Lightroom, though, it’s better to get in the habit of adjusting the white balance on location every time you change scenes. You’ll still be able to adjust the white balance on a JPEG image, however, you won’t get the full control as you would with a RAW image.
As you’ll see in this image, you can easily spot when an image is too warm or too cool. When yellow tones begin to show up where there shouldn’t be, such as the blue sky, it’s time to dial the temperature back. The same goes for cool, when you see blue tones show up in naturally warm spots such as skin tones.
To correct the white balance, hit “W” for the White Balance Selector, and use the eyedropper to select a neutral point in the image. A neutral point can be anything that would naturally be a shade of white, gray, or black, with no colorcast. Be aware, however, that the White Balance Selector won’t work on areas that are blown out or clipped. In this image, I selected the lapel on Renee’s jacket and got these results.

Another tip for identifying and correcting color casts, particularly the Tint, is to pull the color temperature slider all the way to a neutral temperature between green and magenta. By doing this, any shift toward green and magenta will be easily noticeable.

Make your adjustments, then raise the white balance until it appears correct. This is a useful tip for arriving at the correct white balance when it comes to complex scenes.
Lightroom Photo Editing Mistake #2: Straight Lines

Keeping straight lines such as horizon lines or buildings straight is important to give the image a “polished” look. If your image has a horizon line, the easiest way to fix any tilt would be to select “C” for Crop and use the grid overlay to straighten up the horizon.
You can also use the Straighten Tool which is quite simple to use. All you have to do once you select the tool is click and drag it across an edge or line in the image that’s supposed to be straight, and Lightroom will line up the image.
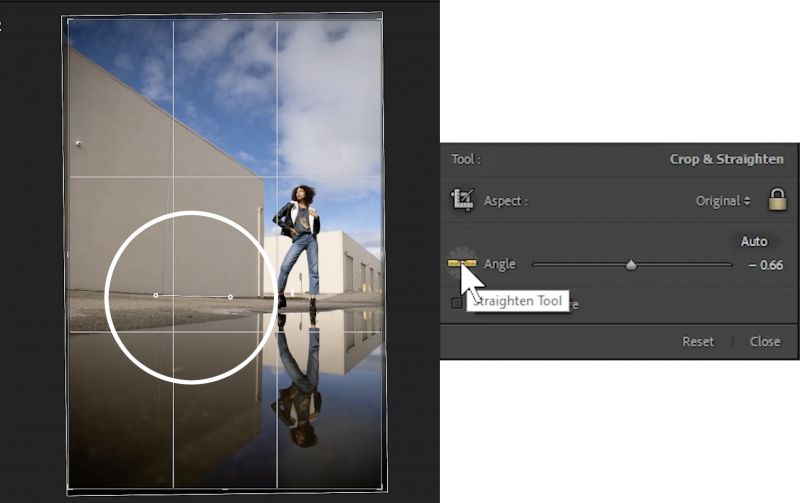
The last method is down in the Transform Menu. Here, you’ll see more specific ways to adjust the image. However, what I like to do is select “Auto” and Lightroom intuitively finds a balance in the image and straightens it out quite nicely.

It’s important to note that “Auto” won’t be perfect. Sometimes, you’ll want to completely eliminate perspective distortion, in which case, you’d select the “Vertical” option. However, for images like this, “Auto” will find a good balance to keep the image looking natural.
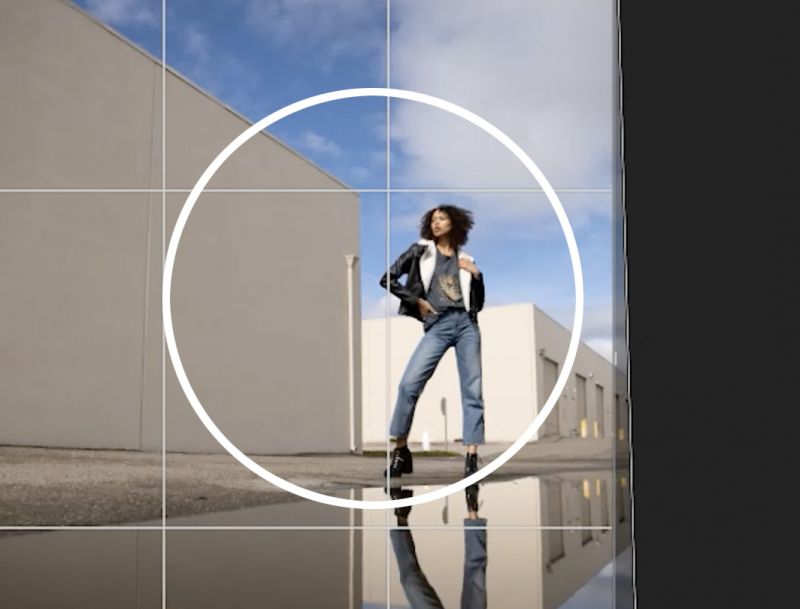
Lightroom Photo Editing Mistake #3: Cropping

Cropping an image can further tighten up the image to get the composition you desire. Select “O” to cycle through the different composition overlays. Use these overlays to precisely adjust your crop. I’m going to use the Rule of Thirds overlay and crop in until Renee is on the upper right third of the image.

A crop can help strengthen an image, but as always, you should always try to capture your desired composition in-camera whenever possible and only crop in post-production when necessary or as a final adjustment.
Lightroom Photo Editing Mistake #4: Contrast

It’s not too uncommon to see images with all the details pushed back in and creating this “HDR” look or for contrast to be exaggerated, losing important detail in the whites and blacks. A good balanced image, however, will have some areas that are pure white and some areas that are pure black or close to it, but it’s important that you don’t go overboard. Your best friend for this will be the “Clipping Alert,” which you can access by pressing “J.” The highlight alert will let you know when you start to clip in either your highlights or shadows.

Tune in your shadows and highlights until you’re just about to clip on either end. You can also tell if you’ve gone too far by looking at the histogram.

I try to avoid the Contrast slider until the very end. The contrast slider applies a very basic adjustment that’s provides little control so it’s best to leave this until the bulk of the changes are made and simply apply a little bit of contrast using this slider to fine tune the image.
Lightroom Photo Editing Mistake #5: Vignettes

A bad vignette is very noticeable. The best way to check if you’ve gone too far with a vignette is to zoom out to the Grid View using “G,” and check how noticeable the vignette is in the thumbnail.

Focus on being subtle with the effect. A good vignette guides the eyes to the focus of the image without making it too obvious. To do this, I’ll add a Radial Burn from our Visual Flow Retouching Toolkit, and I’ll drop the exposure by about 0.5.

My general rule for vignettes is to not use them at all if the image is naturally bright all the way to the edges, and for darker and more dramatic images, to keep the vignette effect subtle.
Lightroom Photo Editing Mistake #6: Background Clutter

Cleaning up background clutter is important to remove any distractions from a shot. While Photoshop provides a greater degree of control and precision, you can use Lightroom as well to remove simple objects. To do this, go ahead and use the Spot Remover tool.

Keep the feather low for better blending and highlight the sign and the fire hydrant. Lightroom does a fairly good job at remove objects like these. Fine tune the image by using the Spot Remover again to clean up little mistakes that remain. Do the same for all other distractions in the image such as dust specks and unwanted distractions, including those that show up in any reflective surfaces.

Simply cleaning up the background of any distractions, however minor, goes a long way in creating a polished and professional image.
Lightroom Photo Editing Mistake #7: De-Hazing
edi
The De-Haze slider was designed to help bring back contrasted in areas where fog or thick atmosphere may have made the image look, as the name suggests, hazy. As you’ll see in the example, moving the slider to the left increases the level of haze by decreasing contrast, and moving the slider to the right decreases the haze by increasing the contrast. I found it extremely useful for adding some subtle contrast into a regular image that wouldn’t normally need it.

A gentle push at 20-30 will add a perfect touch of pop and vibrance to the image. You can also use Clarity to boost some mid-tone contrast. My rule of thumb for clarity is to add it in for wide shots and to reduce the clarity for close up shots. I prefer to keep my adjustments somewhere between -20 and +20. Too much clarity will give the image a “grungy” appearance. I’ll also decrease Saturation over the entire image and I’ll add in Vibrance, which will help pop the blues without affecting the skin tones.
Before and After

Conclusion
I hope you enjoyed this article/video. Editing a photograph can be overwhelming so it’s important to familiarize yourself with these tools and practice, practice, practice. We have an entire course on Mastering Lightroom as a part of our Premium Subscription so be sure to check that out as well as our Visual Flow Presets which includes the Retouching Toolkit that we used in the tutorial.
Don’t miss our next episode of Mastering Your Craft on Adorama’s YouTube channel next week! If you want to catch up on all the episodes, make sure you check out our playlist!


Get Connected!