
Wedding photographers are all too familiar with the grind of going through thousands of images after an event. With multiple cameras and full days of shooting, you can see how the number of photos can easily add up. The entire process can be incredibly time consuming, especially for photographers and editors without a ton of experience. Throughout my career, I’ve made it a point to streamline the editing workflow, and in this video, I’ll show you 10 tips for editing wedding photos in less than 1 hour.
Video: 10 Tips for Editing Wedding Photos in Less Than 1 Hour!
- Shoot Compressed RAW
- Shoot in Manual Mode
- In-Camera Color Temperature
- Use a High Speed Card/Reader
- How You Import Matters!
- Import to a Fast Internal Drive
- Simplify Your Culling
- Use AI-based Editors
- Sync Photos Per Scene
- Final Review & Signature Edit
Step #1: Shoot Compressed RAW

The first step to editing wedding photos begins before you shoot a single photograph. If your camera has the option, shoot medium or compressed RAW. Shooting in RAW is a given for its flexibility in post. However, today’s cameras often come with 50+ megapixels, but for portrait work, you don’t need more than 20-30.
By scaling down, you’ll not only save a ton of storage space, but your editing machine will run faster due to the smaller file sizes without a reduction in quality.
Step #2: Shoot in Manual Mode

Having consistent exposures is critical for batch processing and shooting in manual mode is your best bet for achieving this. Aperture/Shutter priority still rely on some level of auto-exposure that varies depending on what your camera is pointing at. These exposure differences will bog down your editing workflow since you’ll need to individually correct each image that is off.
Adjusting your camera settings on the fly to changing scenes gets easier with time. Once adjusted, you’ll get consistent exposures every time regardless of where you are.
Step #3: Adjust Color Temperature/Tint In-Camera
Once you’re comfortable with manual exposure, start adjusting your color temperature/tint in-camera. Much like having consistent exposures, having your color temperature already set will save a ton of time in post.
On top of that, it’ll help your AI-based editor immediately understand your intentions with your image. More on that later.
Step #4: Use a High Speed Card & Reader
While we’re waiting for direct-to-cloud capture, we’re stuck with memory cards. It’s important to keep in mind that memory cards and card readers are not created equally. Make sure you’re using a high speed memory card as well as a high speed memory card reader. Having a high speed memory card reader can save you 10 minutes just from the import process. Even more so if you’re uploading multiple full cards.
Step #5: How You Import Matters!

Use these settings when importing into Lightroom:
- Build Preview > Minimal
- Check “Build Smart Previews”
- Check “Don’t Import Suspected Duplicates”
- Leave other two options unchecked.
- Select your baseline look or preset if you’re planning on editing manually.
- Select “None” if you plan to edit using an AI-based editor.
Step #6: Import to Your Fastest Internal Drive
Don’t use external hard drives. Sorting through and editing high volumes of high-resolution images requires a ton of data bandwidth. An external hard drive will likely slow down that process (though if you must, make sure it’s an SSD connected to the fastest port available).
Ideally, you’ll want to import your images and keep your catalogs on a local SSD drive.
Step #7: Simplify Your Culling
I’ve seen many photographers assign specific meanings to their star-rating system. I’d advise against this as doing so only complicates your culling process.

Instead of having to spend more time on these complex judgment calls, try out what we call “Culling-In.” This means that you’re going to assume that every image is going to be rejected unless you flag it as a keeper. As you move through each image, you’ll only be thinking one thing: Do I want to deliver this image?

For added efficiency, turn on “Auto Advance” which will automatically move you to the next image after flagging, saving keystrokes.
Step #8: Use AI-Based Editors
Here, I want to introduce Impossible Things, our new AI-based Lightroom native plugin. It’s the only AI editor (that I know of) that can be used with your own presets.

After installing, simply go to Plug-in Extras > Edit Photos. From there, select your preset, select your additional settings such as AI Portrait Retouching, and hit proceed. Impossible things will do the rest and after a brief moment, your work will essentially be done.
If you choose to use an AI-based editor, you can skip to Step #10.
Step #9: Sync Your Photos Per Scene
If you’re editing wedding photos manually, you should have your preset applied on import. From here, I suggest that you work by camera and by scene.

Make your adjustments to the first image of a given scene. Then, select the last image in that scene, and copy all of your adjustments over. Repeat for each new scene until all of your images are edited.
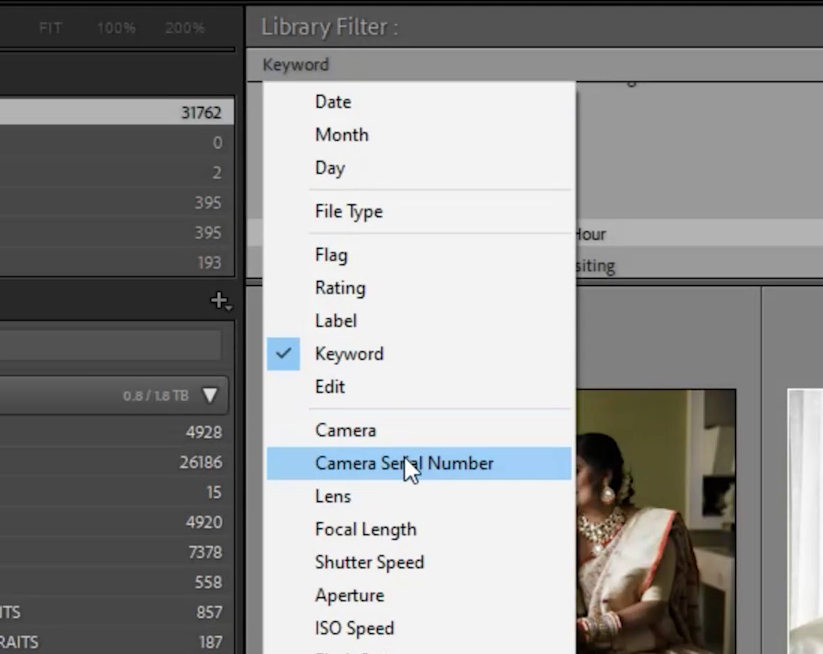
If you’re working with multiple cameras, filter through your cameras by selecting “Camera Serial Number” (In case there are more than one of the same camera). Follow the steps to edit the first scene, then move to the same scene on the next camera(s), ensuring that any differences in camera profiles are corrected. Follow the same steps for each scene.
Note that AI-based editing tools such as Impossible Things will actually sync all of your cameras for you!
Related Reading: 4 Steps for Cohesive Editing in Lightroom
Step #10: Final Review & Signature Edits
Whether you’re editing wedding photos manually or using AI, always review for consistency and make any necessary minor adjustments. As you review, mark your favorites to add in your signature look. These are the images you’ll want to have featured in albums and blog posts so be sure to give them some extra love at the end.
Conclusion
That’s it! From there, export and prepare your images for delivery.
If you enjoyed this tutorial, be sure to check out our complete Mastering Lightroom course on SLR Lounge Premium. You can also visit Visual Flow for our entire library of Lightroom presets and retouching tools. Lastly, check out Impossible Things and how you can integrate them into your own professional workflow.
Don’t miss our next episode of Mastering Your Craft on Adorama’s YouTube channel next week! If you want to catch up on all the episodes, make sure you check out our playlist!


