Wedding ring photography is an important aspect of wedding photography. Besides the fact that clients pay a whole lot of cash for them, they’re important because of their significance as a symbol of their union. Getting incredible wedding ring photos time after time can be a challenge. Finding the right background, lighting, and settings for three wedding rings is just as stressful as planning the perfect shot for your couple. So to give you some inspiration and a new outlook on wedding ring photos, here’s a list of wedding ring photography tips and ideas to help you think outside the ring box.
For more tips on wedding jewelry and details, check out Photographing the Bride in SLR Lounge Premium – your one stop shop for getting consistently incredible imagery of the bride on her wedding day.
Wedding Ring Photography: At a Glance
This guide covers essential techniques and creative ideas for capturing stunning wedding ring photographs.
- Basic Wedding Ring Photography Tips – Essential gear and technique fundamentals
- Creative Wedding Ring Photography Ideas – Innovative approaches to ring shots
- Using Reflections – Creating symmetry with reflective surfaces
- Ring Silhouettes – Highlighting unique ring shapes
- The Putty Technique – Keeping rings standing upright
- Personal Elements – Incorporating meaningful props
- Bouquet Backdrops – Using flowers as backgrounds
- Jewelry and Shoes – Layering bridal accessories
- Wedding Invitations – Personalizing with stationery
- LED String Lights – Creating bokeh effects
- Creative Backgrounds – Finding interesting textures
- Water Effects – Adding dynamic splash elements
- Light Patterns – Working with natural and artificial light
- Frequently Asked Questions – Common wedding ring photography questions
Basic Wedding Ring Photography Tips
Let’s get started with a few basic wedding ring photography tips before jumping into the more detailed creative wedding ring photography ideas.
- Use a Macro Lens – Macro lenses aren’t the cheapest lenses, especially when you take into consideration the fact that you might only be using them for one or two shots throughout the entire day, but it’s very important to pick one up if you’re considering adding good wedding ring pictures to your wedding photography portfolio. A true macro lens gives you 1:1 magnification, meaning you can capture the intricate details of diamond settings, engraving work, and the sparkle of precious stones that would be impossible with a standard lens. If you’re on a Canon, you’re probably looking at the EF 100mm f/2.8 Macro or the EF 100mm f/2.8L IS if you can afford it. All other camera makers should have equivalents, such as the Nikon 105mm f/2.8 VR, Sony 90mm f/2.8 Macro, or Sigma 105mm f/2.8 Art.
- Use Manual Focus and Take Multiple Shots – It’s going to be tough to rely on autofocus in this situation, as it’s just not accurate enough. The depth of field at macro distances is razor thin, sometimes just millimeters, and even slight camera movement can shift your focus plane entirely. Get used to focusing manually, take multiple shots, and make sure you zoom in as you’re checking the images on the LCD to make sure you come away with a sharp, perfect focus. There’s nothing worse than having a great shot set up and not coming away with a usable image. Consider using a tripod or bracing yourself against a stable surface to minimize movement between shots.
- Use Additional Sharpening in Lightroom – Don’t forget to cheat a little bit and touch up your rings in Lightroom or Photoshop to give them that extra pop. Apply selective sharpening to the diamonds and metal edges while being careful not to over-sharpen, which can create unwanted halos or artifacts. The clarity slider can also help bring out texture in the metal bands without affecting the overall look of the image.
Creative Wedding Ring Photography Ideas
Gone are the days of boring wedding ring pictures! The classic shot of the rings on top of the wedding day itinerary is overdone. And getting the candid moment of the ring exchange isn’t quite enough. It’s time to think creatively. It’s time to think of the wedding rings like you think of your bride and groom in that you want to deliver shots of your subjects with creative light, creative compositions, and interesting backgrounds.
Find Reflections for Your Wedding Ring Photos
Find and utilize reflections to create vertical symmetry and add interest to a scene. This can be a glass table, a granite countertop, a piano, or any other reflective surface. Wipe down the surface to ensure there are no marks or specks prior to placing the rings and use your phone to make sure they are in the same focal plane. If you don’t find a reflective surface, use your cell phone screen!

All of the photos used in this article are taken with a Canon EF 100mm f/2.8L Macro IS in order to get a precise picture of the details of the rings and to achieve a greater compression than you would with a 35mm or 50mm. If you don’t have a backdrop available, Google an image of ‘bokeh’ or ‘Christmas lights’ on your phone and place it behind the rings so that it reflects onto the glass. Trust us, it works.
Try Creating a Wedding Ring Silhouette
Often times, wedding rings have intricate details carved into them or create unique silhouettes. While most of the time we focus on lighting them up to showcase the jewels or design, a silhouette brings the viewer’s attention to the shape of the ring which brings a unique perspective to the traditional ring shot. This technique works especially well with vintage rings, Celtic knot designs, or rings with distinctive profiles that tell a story through their outline alone.
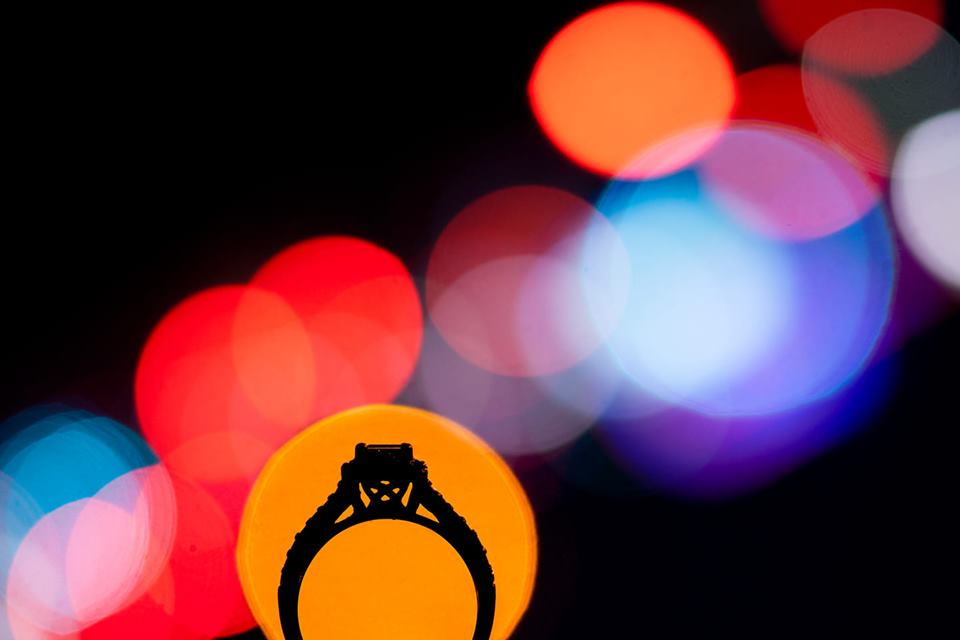
Image by Jason Vinson – Website
Use Putty When You Need the Ring to Stand
In these shots, the groom’s ring is lying flat on the surface and the bride’s ring is standing up and pointing up to the heavens, showing off its glorious detail. So how do we keep the ring from falling over? The answer is simple. The secret behind our wedding detail shot is actually Elmer’s Putty. It is simple, effective, readily available in craft stores, and best of all, really inexpensive.

To use it, all you need to do is take a small piece of putty and make a little ball with it. You place the groom’s ring horizontally on a flat surface and the putty ball in the middle of that ring. Then, you place the bride’s ring standing up on the putty. The putty will hold up the ring and as long as you have a small enough piece, you won’t see it in your shots. You can buy the putty on Amazon for $5.

See Our Wedding Ring Putty Video Tutorial
Incorporate Personal Elements in Your Wedding Ring Photography
Find objects that are pertinent to your couples’ love story or relationship that can be incorporated into your wedding ring photos. This can even be something that you discuss with your clients beforehand to ensure that they bring something with them that is meaningful. Consider asking during your consultation what hobbies they share, how they met, or what items hold sentimental value. Here are some examples of wedding ring photos incorporating props:
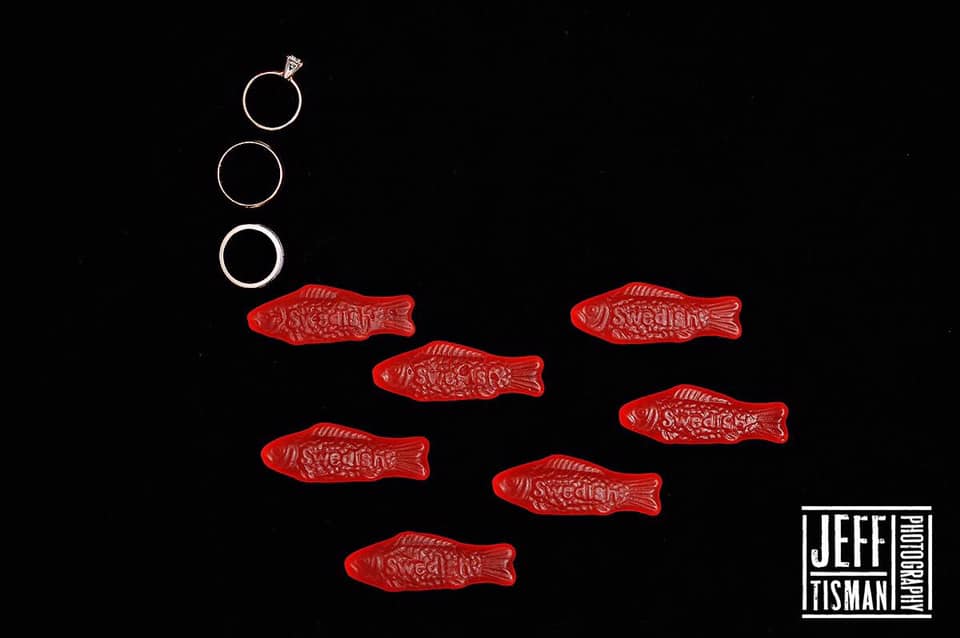
“The couple loves Swedish Fish and they had it out as the treat on the table settings so I tried thinking of something that would be meaningful to them and arranged the fish in a school and made the rings the air bubbles.”

Photographers Lissette & Orlando “definitely try to personalize wedding ring pictures for each client according to their interests.” After they get the traditional macro closeup ring shot, they “get a second ring shot catered just to the couple’s favorite things or to match the theme of their wedding.” In this case, the couple was a big fan of DC Comics.
Use the Bouquet as a Backdrop for Wedding Ring Photos

Brides love incorporating other elements of their wedding day in their photographs, whether it be portraits or detail shots. Use the bouquet as a backdrop for wedding ring photos or place the ring inside one of the flowers. This technique works particularly well with roses and peonies that have layered petals, as you can nestle the ring between the petals for a romantic, organic look. Pay attention to color coordination as well; a yellow gold ring might pop beautifully against deep red roses, while a platinum or white gold setting could complement softer blush tones.
Incorporate the Other Jewelry and Shoes

The more separation there is from the background, the more compression you will have. You can see three different examples of how we used other jewelry as a background to create great compression and beautiful bokeh balls. Earrings, necklaces, and bracelets with crystals or diamonds make excellent backgrounds because their facets catch and scatter light in interesting ways.

Similarly to how we used the jewelry above, we chose to show off the bride’s shoes by placing the wedding rings on the heels. Double check before placing rings onto the bottoms of shoes because in some cultures this is frowned upon. It’s always a good practice to ask your couple about any cultural or religious considerations before setting up detail shots.
Incorporate the Invitation in Your Wedding Ring Photography

For a more personalized wedding ring picture, try utilizing your couple’s wedding invitation. This is when Glue Dots come in handy to keep the rings in place without you having to spend 30 minutes trying to make them balance. The invitation also adds context to the image and gives clients a detail shot that tells the story of their specific wedding. Look for interesting typography, monograms, or design elements on the invitation that can frame the rings or create visual interest.
Use LED String Lights and/or LED Pen Lights

We’ve discussed using LED string lights in portraiture to emulate sun flare or golden hour, but just as we discussed earlier, the more compression when photographing wedding rings, the better. Place the spread apart lights behind close to a foot behind the rings to get the best bokeh. The distance matters because it affects both the size and softness of the bokeh balls. Closer lights create smaller, sharper circles, while lights placed further back produce larger, softer, more dreamy effects.

For just a bit of rim light or even a little drama, we use LED pen lights to highlight our rings. By placing them on either side of the wedding rings you can change your in-camera color temperature to balance out your scene, or try a temperature throw by making the rings cooler and your background warmer.
Find or Create Interesting Wedding Ring Photography Backgrounds

Don’t have any cool lights or pens handy? Find a wallpaper or texture background to use as the backdrop of your wedding ring picture in order to create interest. Here, we added an off-camera flash to illuminate our background rather than use the ambient light in the room. Hotel rooms and venues often have interesting wallpapers, textured walls, or decorative elements that can serve as ready-made backgrounds. Think of the venue itself as your studio and scout for potential backdrops during your walk-through.
Use Water/Liquid to Add Interest

This setup requires a bit more time and patience but yields some pretty spectacular results. In the image below, Nik used a bottle of water to create this splashing effect and paired it with an off-camera flash to freeze the motion of the water. The key to getting the right type of action is to take multiple shots to get a variety of options and then choose the best version in post. A fast flash duration (1/4000 sec or faster) is essential for freezing the water droplets crisply.

Find Creative Compositions with Objects Around You
While you are on the hunt to find that perfect stream of light, take a look at what objects you have around you that give context to the wedding. Sometimes this means grabbing a magazine or coffee table book and browsing to see what you can use that can aid in your composition. Wedding venues are full of potential props including menus, favors, decor items, and personal effects that can help tell the couple’s story.
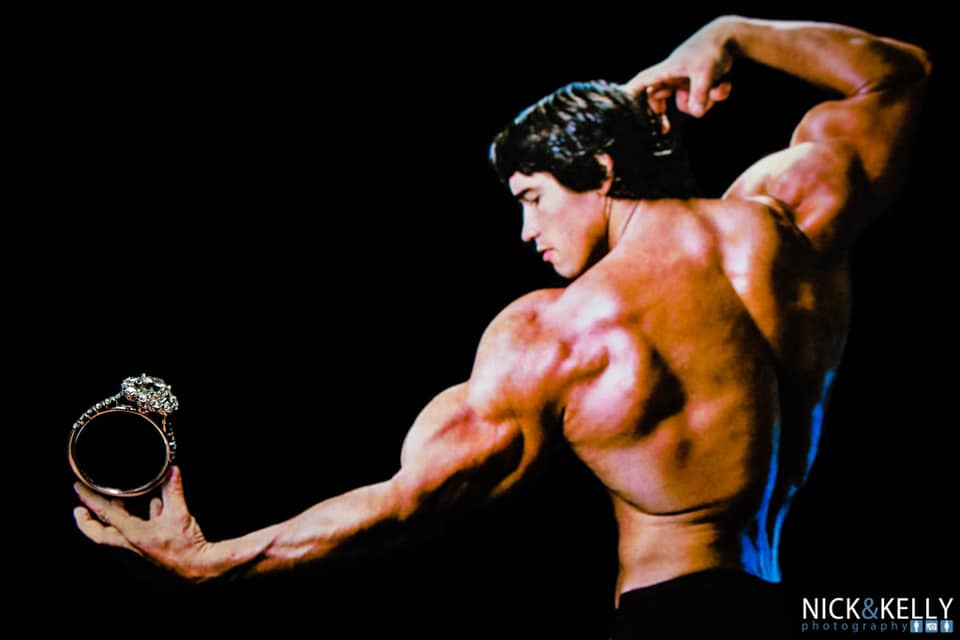
“We try to integrate something important or relevant to the client in detail shots. In this case, they were total fitness nuts.”
Find Balanced Backgrounds
Symmetry and balance are the key to certain types of wedding ring pictures. Since you’re dealing with such intricate detail, the slightest shift can throw your whole image off. For example, if the image has a focus directly down the center, make sure everything is aligned. If your image has perfect symmetry, adjust it so that it’s as close to perfect as your lighting and time will allow. Use your camera’s grid overlay feature to help align elements, and don’t be afraid to spend a few extra minutes nudging items into precise position.

Create Light Patterns with Natural Light or OCF
Photography is simply the study and understanding of light. We are constantly in search of perfect light to help shape, define, and highlight our subjects, and it’s no different when it comes to the objects we shoot. Get creative by finding a small sliver of light that creates a leading line or create a complex light pattern with off-camera flashes. Window blinds, lace curtains, and architectural elements can all cast interesting shadows that add dimension to your ring shots.

“In between two walls, I saw the angle of the light and the thought just came to me,” says Michael Ramos. It’s images like this that make you want to pause and study the light around you to see if you can make something ordinary into extraordinary!
Find Colorful or Interesting Backgrounds and Textures
Interesting colors and textures are things we as photographers are trained to always be on the lookout for. But on a normal, non-macro photography basis, we’re usually thinking of walls, sunsets, or other large backdrops. Keep in mind that, with your wedding ring pictures, you now have the luxury of taking almost anything and making it a background, from a piece of cloth to a purse to a party favor to a bouquet. Velvet fabric works particularly well for adding a luxurious feel, while rustic wood or leather can complement more vintage or bohemian wedding styles.

Frequently Asked Questions About Wedding Ring Photography
What camera settings should I use for wedding ring photography?
For sharp wedding ring photos, use an aperture between f/5.6 and f/11 to ensure adequate depth of field at macro distances. Set your ISO as low as possible (100-400) to minimize noise and maximize detail in the metal and gemstones. Use a shutter speed of at least 1/125 sec when hand-holding, or go slower with a tripod. Always shoot in manual focus since autofocus struggles with small reflective subjects at close range.
How do I avoid reflections and fingerprints on wedding rings?
Handle rings only by the band using a microfiber cloth or cotton gloves. Wipe them down with a jewelry cleaning cloth before shooting. To minimize unwanted reflections, use a diffused light source rather than harsh direct flash, and position yourself so that bright objects (including your own camera and clothing) don’t reflect in the metal. A piece of black foam core with a hole cut for your lens can help block reflections.
How much time should I allow for wedding ring detail shots?
Plan for 10 to 15 minutes dedicated to ring and detail photography. This gives you enough time to set up two or three different compositions without rushing. Ideally, photograph the rings during the getting-ready portion of the day when you have access to all the details in one location. Scout potential backgrounds and props ahead of time so you can work efficiently when the moment arrives.
What is the best lens for wedding ring photography?
A dedicated macro lens in the 90mm to 105mm range is ideal because it provides true 1:1 magnification and comfortable working distance. Popular options include the Canon EF 100mm f/2.8L IS Macro, Nikon 105mm f/2.8 VR Macro, and Sony 90mm f/2.8 Macro. If you’re on a budget, extension tubes paired with a 50mm or 85mm prime can work as an alternative, though with some limitations in magnification and image quality.
How do I make diamonds sparkle in ring photos?
Diamonds sparkle when light hits their facets at varying angles. Use a small, hard light source positioned slightly off-axis to create bright specular highlights on the stone. Alternatively, shoot near a window and have an assistant slowly rotate the ring while you fire off multiple frames, catching different sparkle patterns. In post-processing, you can selectively increase clarity and highlights on the diamond to enhance its brilliance without over-processing the entire image.
More Information
Which wedding ring photo technique was your favorite? Let us know in the comments down below! We hope this article helped to inspire you to create outstanding wedding ring photos and maybe push you outside the box to start thinking of creative ways to compose and photograph a very important detail at your next wedding! Start streaming Photographing the Bride in SLR Lounge Premium.
For more helpful tips to boost your wedding ring photography, check out this list of 10 tips and creative ideas for better wedding ring photos that we put together for our friends at Adorama. You can check out more of our work on our wedding photography blog and our wedding photography portfolio.