Welcome to the IGTV series we’re doing every two weeks on Profoto’s Instagram called “Slice of Pye”. We’ll be covering a myriad of topics, discussing lighting principles, and showcasing a ton of Profoto gear in action over the course of the next year so please join us over on IG Live!
Tune in to our next episode: December 30th at 11AM PST!
In this video, we’re talking about lighting, specifically fill versus negative fill. We’re also going to check out a new modifier, the Profoto OCF Adapter, to create our final image. Basically, this modifier allows you to adapt any Profoto studio modifier onto any of their smaller flashes, like the A10 or the A1. As an added challenge, I’m going to use the new adapter on my primary light and put it through its paces as I use it for the very first time. Normally, I’d advise you to test your gear before going into a shoot, but what better way to see in real-time just how easy it is to figure out and use.
Gear Used in Tutorial
- Canon EOS R6
- Rokinon 85mm RF
- Profoto A10
- Profoto OCF Adapter
- Profoto Octagonal OCF Softbox
- C-Stand
- V-Flats from V-Flat World
- Reflective Table from Home Depot or Amazon
C.A.M.P Framework
Before you pick up your camera or reach for your flashes, check out our C.A.M.P. framework and simplify your lighting process.
- Composition: What do we want our scene to look like? Where do we want the camera to be? What’s the angle? What do we want our subjects to be doing?
- Ambient Light Exposure: Choose the intention of the scene. Do we want a dramatic image (darkening the ambient light and using more flash) or do we want a softer image (brightening the ambient light and using a more natural power of flash)?
- Modify/Add Light: Are your subjects visible in the frame or do they need to be chiseled out? Do you need to add an additional light source?
- Pose & Photograph: Take your shot!
Okay. Let’s dive in!
What Is Fill or Negative Fill?
As you may or may not know, fill light is the light that bounces off a surface and then comes back to fill in the shadows, adding light to your subject or scene. Negative fill, on the other hand, does the opposite in terms of removing light rather than adding it. Using fill or negative fill light can make a dramatic difference, even in a simple scene.
If you’d like to learn more about how to use lighting to create more dynamic photos, you can dive deeper into lighting techniques in our Flash Photography Training System, which is also a part of our Premium subscriptions.
[Related Reading: Faking OCF with an On-Camera Speedlight & Silver Reflector]
1. Compose the Shot
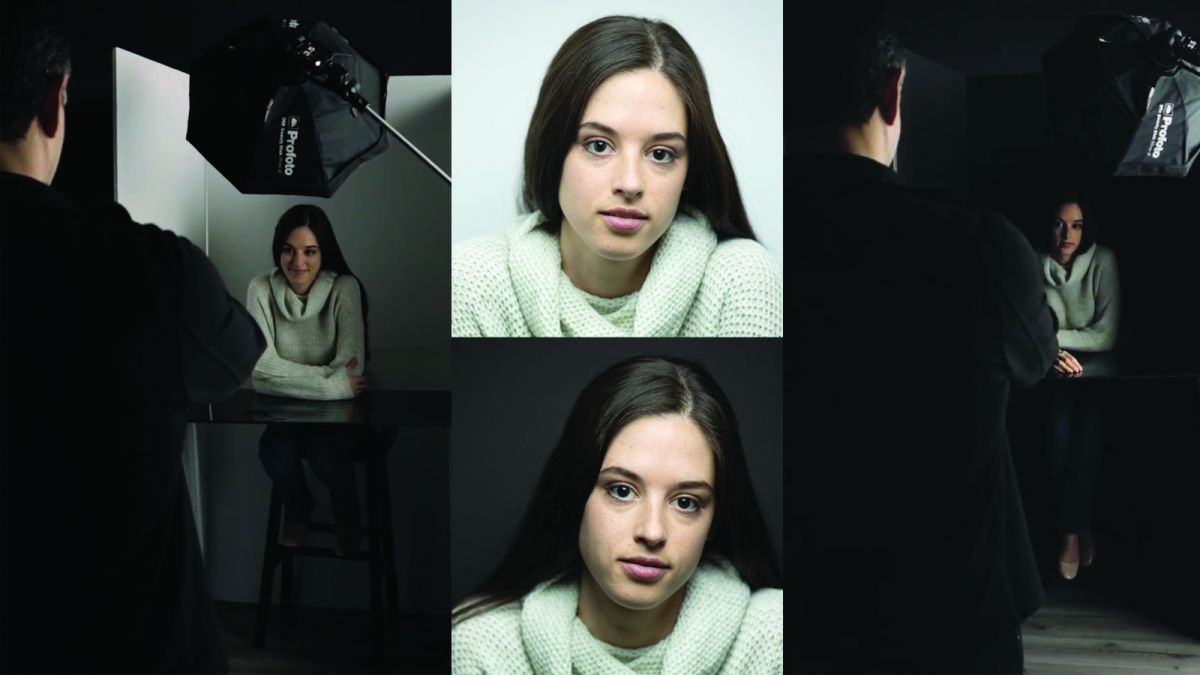
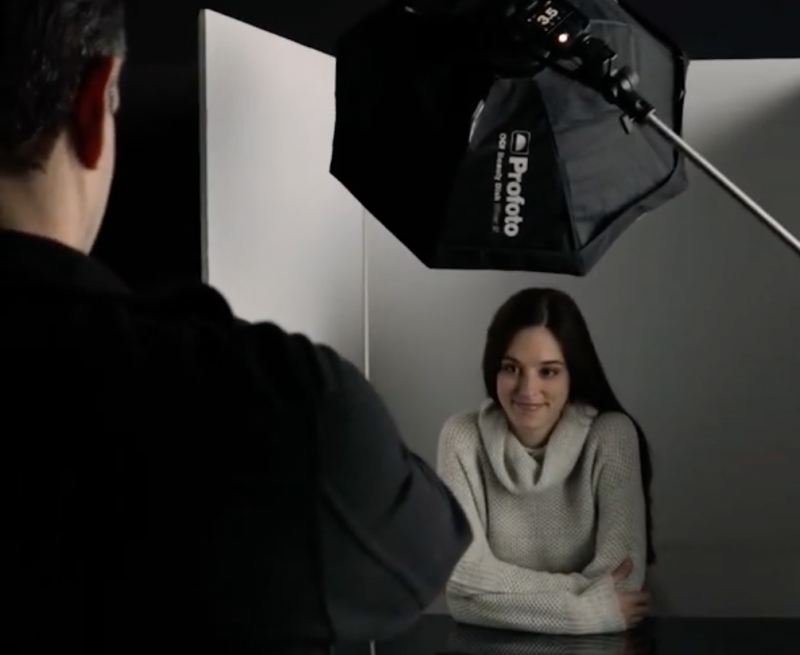
To focus on the effects of fill vs. negative fill, I didn’t need to worry too much about composing the shot. I opted for a basic sitting shot at a small table, limiting the frame to a medium close-up of my subject, Chelsea. The point, really, was to be able to position the v-flats around her to test the effects of fill vs. negative fill.
2. Dial in Ambient Exposure

We already added v-flats when we set up the shot around the table, but the ambient light in the room is dark enough that the v-flats don’t bounce much light back onto our subject. My ambient settings for the shot are as follows: 1/200, f/2, ISO 200.
3. Add/Modify the Light
We have a couple of steps to work through for modifying or adding light to our shot. Because we’re looking at fill and negative fill, we’re going to set up v-flats (which we’ve already done in step 1 because of how we composed the shot) and then add a flash with a softbox.
3A. Set Up V-Flats
I’m using v-flats from V-Flat World to add and/or remove light, but you can always make your own if necessary. Like I always say, do whatever fits your budget. Of course, having access to pre-made v-flats like this makes my job simple.

For our first shot, I surrounded my subject, Chelsea, with two white v-flats. The light from the flash will bounce off of these v-flats and fall back onto Chelsea.
3B. Add a Modifier and Position the Flash

Next, let’s set up the flash, which in this case is a Profoto A10. I’m placing the flash into the Profoto OFC Adapter and then placing that onto a C-stand, but you can use any stand that you like or have on hand. We’re not going to put much weight on the stand, so any light stand would do.
To make life easier, I recommend putting the modifier on the light before lifting the light up and putting it into position. Again, you can use any modifier you like. I like using the Profoto modifier because it only takes me roughly 30 seconds to set up and it breaks down into a tiny case that can go anywhere, even a backpack. Other modifiers might be quicker to set up, but they’re also less portable, overall. I appreciate the portability of the Profoto softbox, and being able to get out to a location is far more important than something that sets up in 10 seconds.

Once the modifier is on, I want to move the light around to see how the light is going to bounce off of the v-flats. For this shot, I’m going to use a Paramount light pattern, which means the light needs to be centered directly in front of the subject, just overhead. I placed the softbox roughly two feet away from Chelsea’s face.
4. Direct Your Subject into a Pose and Capture Photos
I simply asked Chelsea to hold a pose I could use to capture multiple portraits for comparing lighting setups.
4A. Photos with the White V-Flat
If you look at our test shot using only natural light next to our shots with flash, you’ll see that most of the light in this scene came mostly from the flash (see example in step 2 above). After firing another test shot, this time with flash, I can see all the light is bouncing around the white side, especially on the sides of the face where we fill in the cheekbone, jaws, and so on.
Now, if we flip the v-flat to reveal a black surface, you’ll be able to see how it transforms the image.
4B. Photos with the Black V-Flat

The camera and the light are the same; all we’ve done is just flip the background. Between the two shots above, notice the change in definition, especially in the jaw and the cheekbone. We get so much more from the negative fill, making it a fantastic way to use shadows to shape the face. We get very interesting looks from it.
If I push the flash a little bit towards the side (at about the same distance from Chelsea), I can add a slight angle and affect how the shadows fall. While trying different poses, I noticed whenever Chelsea’s chin would go down a bit, I wouldn’t get a lot of fill light. Now, I could’ve used a reflector, but it would’ve lifted and killed all of those shadows that I wanted to have in the shot. So, instead, I just directed Chelsea to use poses where her chin would be up a little bit, which minimized the shadows.
Final Images
Images edited with Visual Flow Presets.
Conclusion
Hopefully, you found our tips on fill vs. negative fill helpful. Follow the C.A.M.P Framework to set up & execute your shot and the rest should be easy. If you’re able to make or purchase v-flats like those featured in this article/video, they certainly make it easy to add fill or negative fill to your portraits. Again, if you’d like to learn more about how to better control light, be sure to check out our Flash Photography Training System (or our Premium subscriptions if you’d like streaming access to our entire catalog of course.
For more Profoto lighting tutorials, be sure to check out our Slice of Pye Series on their IGTV!


Get Connected!