
How I Shot and Edited an Engagement Photo in Downtown LA
In this video we’re going to be discussing the idea behind the image, how it was shot, the camera settings, and how it was edited. Watch the video or read the article below to see exactly how it was done.
This image was shot on a Canon 5D Mark III with the Canon EF 24-70mm f/2.8 II. You can see from the EXIF Data that this shot was taken at .5 sec at f/7.1 and ISO 100.

We shot this photo in broad daylight, and for those of you who know your exposures well, you know that it’s impossible to get a .5 second shutter speed without blowing out your image completely.

We used a Singh-Ray ND Filter to cut down the amount of light that entered our lens, and that’s how we were able to achieve a .5 sec shutter speed. We have 3, 5, and 10 stop filters, and for this image we used a 5-stop. There’s a lot of techniques and effects you can achieve when you’re able to slow down your shutter in broad daylight.
How I Shot It
The Concept
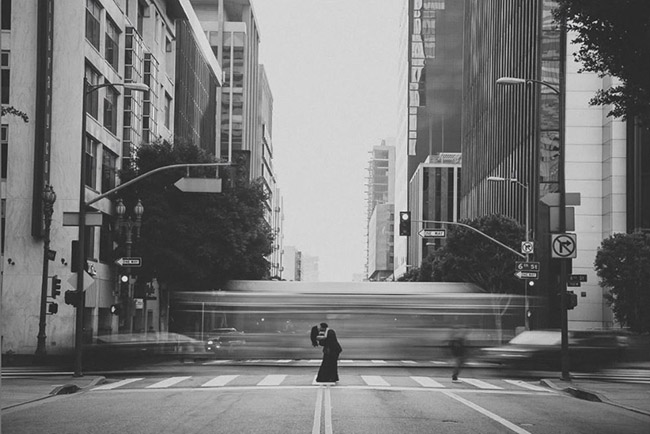
We wanted to get our shutter speed slow enough so that the cars and people behind our couple are blurred out. This is a strong composition technique because it turns the potential distracting elements in the photo into aesthetically pleasing ones.
The Technique
We have our Canon 5D Mark III set up on a Mefoto Globetrotter Tripod. We have the camera set to a 2 second timer (because I didn’t have my shutter release) in order to reduce camera shake.
Once I saw a cool car or vehicles driving by I would hit the shutter. At one point I had to take the 2 second timer off because I wanted to really nail the timing of the vehicles going past our couple.

When it was safe for the couple to cross, I told them to go to the middle of the street and get into the Close Pose with a dip and a kiss, and I told them they have to hold perfectly still. I purposely waited for a bright orange bus with a white advertisement on top because I knew the couple would stand out more in their dark clothes with a bright background behind them. It was difficult, and I had to be patient, but it was worth it.
How I Edited The Image
I feel like this image would look great as a timeless black and white image, and I also think it would look great with a vintage fade, so I’m going to do both! I’m going to hit
ctrl + ‘ (cmd + ‘ on mac) to make a virtual copy of my image so I can edit the two different styles.
Black and White Film Edit
My Mixology
- 01-40 BASE – VIVID STYLIZED: 42d. Punchy Fade – B&W Filmic
- 03-00 ADJUST – EXPOSURE: 07. Brighten +1.0 (adjusted to +1.3)
Local Area Adjustments
- Graduated Filter: 03 Burn (Darken) -0.5 Stop
- Radial Filter: 03 Burn (Darken) -0.5 Stop (adjusted to -0.2)
We can convert any photo in Lightroom to black and white by pressing “V”. Our Brighten preset adjusted our Exposure by +1.0 to compensate for the B&W preset which is darkening the Curve. The B&W preset is also dropping Highlights, Whites, and Blacks while raising Shadows and Contrast, giving the image the punchy fade look.

In the Tone Curve we’re lifting the Shadow clipping point and dropping the Highlight clipping point. This makes anything below the Shadow clipping or above the Highlight clipping point grey out. Then we have our standard contrast boosting “S” curve in between, and we end up with a high contrast vintage looking image.
We also have our standard Sharpening settings applied to this image. We call this our “standard” because we tested this with many different camera brands and models as well as with a wide variety of images, and it always worked. Our preset also added Lens Vignetting and Grain to our image to compliment the black and white film look.
Local Area Adjustments
Now we’re going to make local area adjustments to our black and white image, and eventually sync it over to our color version. The first thing we’re going to do is press “R” and change our crop to 16×9 to give our image more of a panoramic composition.

What I want (and what I had in mind while shooting this image) is for this image to have 1/3 our couple and 2/3 the downtown area.
Now I’m applying a Graduated Filter with the “03 Burn (Darken) -0.5 Stop” and pulling it down from the center of the image to the bottom of the blurry bus.

I’m going to add one more Graduated Filter with the same preset (Exposure adjusted to -.70), but this time pulling it up from the bottom of the image to our couple’s feet.

The last adjustment we’re going to make to this image is add a Radial Filter with the “03 Burn (Darken) -0.5 Stops” preset. This image already has some natural and post vignetting so the Radial Filter will be strong, so we adjust the settings to make the effect subtle.

Vintage Film Edit
My Mixology
- 01-40 BASE – VIVID STYLIZED: 42b. Color Filmic
- 03-00 ADJUST – EXPOSURE: 07. Brighten +1.0 (adjusted to +1.3)
- 02-10 CURVES – COOL: 14b. Vintage Punch – Azure
- 04-00 SFX – COLOR SCHEMES: 01b. Orange/Blue
The color vintage film fade image will have identical Develop settings, with minor differences. The biggest difference is that it’s not in Black and White, and there are Vibrance and Saturation adjustments applied.

Copying Adjustments From Black and White Film Edit to This One
Now we’re going to select the Black and White film edit we just did in Lightroom’s Film Strip, and holding “shift” on our keyboard we’re going to select the Vintage Film edit we’re working on. The Key image (the image we’re getting the settings from) should be highlighted in a brighter grey.

Then we hit Ctrl + Shift + S (Cmd + Shift + S on Mac) and that will bring up our Synchonize Settings dialogue box. From this box we’re selecting “Local Adjustments” and “Crop” because those are the settings from the Black and White film edit that we want applied to the Vintage Film edit. After we check what we want from this box, we simply press “Synchronize” and the settings are carried over.

Adjusting Curve
After we’ve synchronized our Local Adjustments and Crop we’re going to add some Curve adjustments finish our post processing on this image. We select the “02-10 CURVES – COOL: 14b. Vintage Punch – Azure” preset to compliment the initial Color Filmic preset we applied, and to add some nice blue tones to the image.

After the Azure curve we’re going to add the “04-00 SFX – COLOR SCHEMES: 01b. Orange/Blue” preset to compliment the colors. In the Split Toning we see that the Orange is added to the Highlights and the Blue in the Shadows, giving us a great complimentary color look to finish this edit.

Finished Images
Original Image
Black and White Film Fade

Vintage Color Film Fade

Conclusion and Learn More
We hope you all enjoyed this tutorial. If you are interested in learning more or purchasing the SLR Lounge Lightroom Presets v5, please click any of the links in this article.
Stay tuned for more SLR Lounge Weekly Edits!


Get Connected!