In this video, we’re talking about how to level up your photography with a simple step to better understand angles and composition that will yield amazing results. We’ll walk you through the creative process of one of our recent images from conceptualization all the way to post-processing to get a clear understanding of how to take better photos.
Let’s take a look at the scene before we jump into our tutorial. This is what I like to call the walk-up shot, an image that the average person sees when they approach a scene because it’s eye level and straight forward. While there are ways to make this work, there is always a more interesting, or compelling shot to be made in a scene if you just take the time to look for it and compose something unique. I saw some interesting light and this grated fence and decided to take a test shot of Derek to show what that walk-up shot would look like.
 So what is this one simple adjustment that will make your photos THAT much better? It all stems from the idea that we need to start shifting our perspective to create more visual interest and I am going to help you to do that by walking you through the process. Here are some of the things to look out for while shooting that will yield more interesting and creative results:
Avoid Flat Light
 The light in the walk-up shot is flat, it’s coming from directly behind the camera. We’re not getting a lot of interesting light patterns or a strong direction that gives us a good highlight to shadow transition. Once we change the camera’s position, we’re shooting from the left side and it gives us great depth in our highlights and shadows. This is a much more dramatic and cinematic image simply because of the angle change.
Use Leading Lines
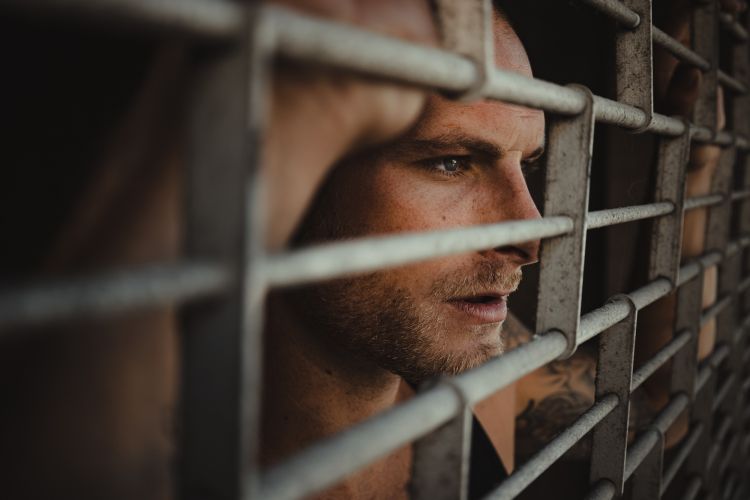 As soon as we position ourselves next to the fencing, we can use it as a line that guides us visually through the image and into our subject. This is what creates a sense of depth, rather than shooting straight on with the fence and subject far from the lens, we are stacking objects to create more depth perception in the image.


You can watch the rest of the tutorial to see how we arrived at the final edit using the upcoming Visual Flow Preset Pack and how that helped us arrive at a more dramatic image that our walk-up shot. It’s simple changes like this that allow us to transform an image and create something memorable with just a couple of tweaks and techniques.


Get Connected!