Capture One is known as an industry standard capture software and raw processor and has been for some time, and with each iteration, they edge closer to squeezing Adobe programs out of the rotation for essential photo work. For instance, with the introduction of layers, a trip to Photoshop became unnecessary for more types of work.
In recent versions, sharpening has also seen improvements. Sharpening, of course, is a vital part of a digital photography workflow, and there are several times throughout the process that it can be used.
AT CAPTURE
Tethered shooters can make adjustments to their raw file as it is captured and loaded into Capture One, and the first line of defense against soft sharpening when shooting at narrower apertures is Diffraction Correction. 
Diffraction correction is found the Lens Corrections tab. It is toggled on or off via a checkbox. It is calibrated for your specific lens, as long as it is one of the ones Capture One has analyzed (most commonly used lenses are included.) Ticking this checkbox will apply a level of sharpening that will most benefit photos that were captured when the lens’s aperture was set to a narrow enough aperture for diffraction to cause softening.
DURING POST-PROCESSING
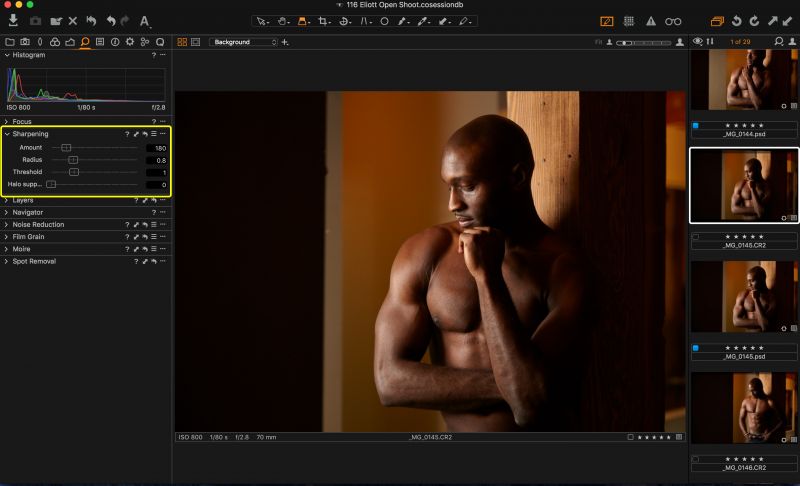
When you are actively processing your images, the best way to go in Capture One is the set of sliders for sharpening found in the Details tab. Capture One has default sharpening settings that are camera-dependent, so the level you see when you look there will vary depending on gear used.
The sliders are for: amount, radius, threshold, and halo suppression. “Amount,” as you may guess, is for controlling the amount of sharpening applied. The default for a Canon 5D Mark II is 180. The “radius” slider controls the width of the sharpened edges, and the default for the camera used for this writing is 0.8.
The “threshold” slider tells the program how much sharpening to apply to same-color pixels. When the threshold is set high, less sharpening is applied and vice versa.
[Rewind:] Capture One Tips | How To Edit A Cityscape In Capture One
“Halo suppression” is an important and useful slider for images that came out a bit softer than desired and can stand a bit more sharpening. The halo suppression slider does exactly what it sounds like – when the slider is dragged right, it surpasses halo artifacts that can appear when applying heavy-handed sharpening. This allows for more aggressive sharpening without the appearance of over-sharpening.
You can also apply selective sharpening via layers. When making a new sharpening layer, you will have all the same options available to you which can be used entirely independently from the base sharpening levels. You simply create a new empty layer, set your desired selective sharpening settings, and paint a mask over the areas where you want to apply additional sharpening.
AT EXPORT
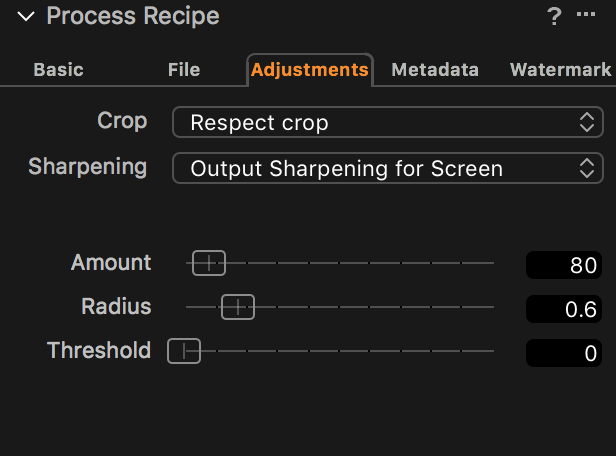
There are various types of sharpening that can be applied via “process recipes” at export. To find these settings, navigate to the Output tab and look in the section called Process Recipe where tabs called Basic, File, Adjustments, Metadata, and Watermark can be found. Choose the Adjustments tab and you will find the following.
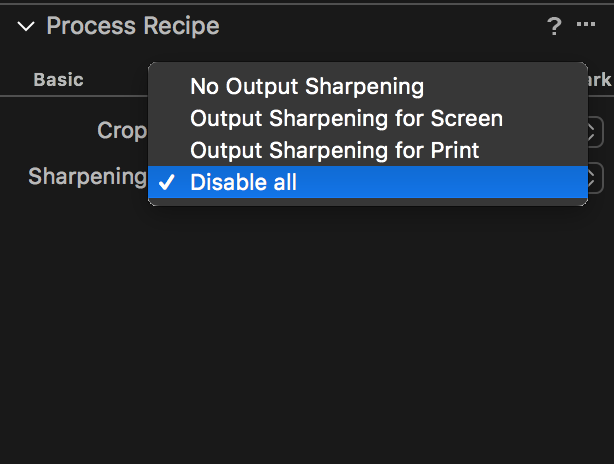
An important option in this setting is actually an absence of sharpening. Often, retouchers will want unsharpened files and will apply their own sharpening after retouching. Exporting unsharpened files is easy to accomplish by simply selecting “Disable all” from the sharpening settings. Your image will appear much less crisp, but your retoucher will handle it from there and should send the images back as sharp as ever.
If you choose Output Sharpening for Screen, you will be presented three sliders much like the main sharpening options in the Details tab – Amount, Radius, and Threshold. These will be set to a default but can be adjusted if needed. 
Finally, if you choose Output Sharpening for Print, you will find an adjustment for viewing distance sandwiched between the requisite Amount and Threshold sliders. You type a number into the box there and choose the from a dropdown whether that number will represent a percent of the diagonal of the image or the distance from the viewer’s eyes in either inches or centimeters. After applying the sharpening and any other settings you would choose for your export, you can process the image, and it will be ready for use.
One of the lovely things about Capture One is that there is such a wealth of content that Phase One has provided online, including their frequently updated one-hour webinars. This content and more is available in the webinar below, narrated by David Grover. Have a watch if you’d like to see the process in action.


Get Connected!