
One of the issues we’ll run into now in a digital age is that computers are generally going to render things like color differently from the human eye, though we are always trying to capture and render a scene as we see it. The information that follows is yawn inducing to some, but may just be incredibly useful, and MinutePhyics tries to explain it for us.
When you put colors adjacent in Photoshop and blend/put them out of focus, there is the appearance of a weird dark area. This phenomenon doesn’t occur in natural life with your eyes, where the colors would blend smoothly.
This color blending issue isn’t limited to digital photo blurring either, as on most occasions when a computer blurs an image or tries to facilitate transparent edges, the same thing will occur. The solution, thankfully, is a rather simple one, though it takes a little explanation about how our eye perceives things to understand why.

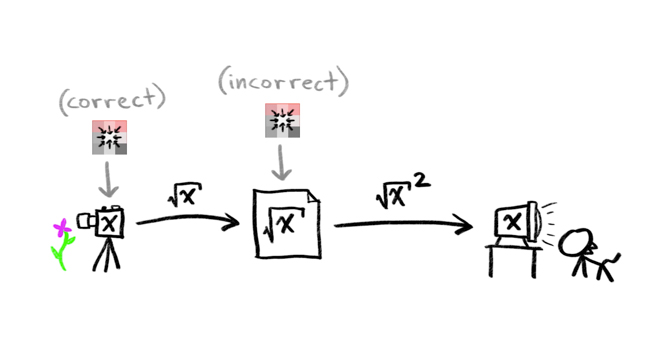
Human vision, like our hearing, works on a relatively logarithmic scale, and in terms of vision, we perceive small changes in dark scenes better than small changes in bright scenes. Digital camera sensors detect brightness solely on the number of photons hitting the photo detector, so an increase in photons register the same increase in brightness regardless of the surrounding scene. When your computer stores the image, it just records a different brightness value for each color (RGB) at each point of the image. Total darkness recorded as 0 and brightness at 1. So a halfway mark may be 0.5.
This is where things get a little interesting, because while the initial math may indicate that 0.5 is half brightness, it’s actually only 1/5th of the photons. Basically, the images are designed to be darker than the numbers suggest and that is done deliberately because of what was stated earlier; that the human eye perceives small changes in darkness better than small changes in brightness. Simply put, digital cameras store the square roots of the brightness values and not the actual values, and the gradients of dark colors with more data points and bright ones with fewer – all because of how our eyes sense the difference between darkness vs lightness. Once it needs to be shown on a monitor, the number is just squared back.

So why would there be a problem? Well there wouldn’t be if the file would be left as is, but if we begin to adjust the file, the trouble generally starts. When we blur, each pixel is replaced by an average of the surrounding pixels, but if you take the average before or after, the square rooting will have a large effect. Most software does it after, which is not necessarily preferable. This is because the average, if taken after the square rooting, and the average of two square roots is less than the square root of the average.
Hopefully, you’ve lasted this long where I can say what this means and how you can better this in Photoshop. You can go into Photoshop’s settings and have it regard colors in the proper way by going to Edit>Color Settings>More Options and ensure Blend RGB Colors Using Gamma is selected and set to 1.00.
Although photographers use light in some way at every stage of the process of producing their images, they tend to think about the dyes or pigments that produce the final result on paper when they think about the final product. For that reason, when editing an image they tend to think of colours blending with each other as if they were ink on paper. By default, Photoshop blends colours with a result that matches what you would expect when mixing inks.
The Blend RGB Colors Using Gamma option allows you to change this behavior so that colors blend as if they were light rather than ink […] Based on the way most photographers tend to think about the blending of colors in their images, I recommend leaving this option turned off.

In practical use, you’ll see this quickly if you ever use the Airbursh tool and notice it looks a bit muddled. This will also apply to black and white images since the science, the physics of it, remains the same where the photon number is square rooted by the camera sensor. However, as someone who likes to shoot in black and white, I would caution you to be careful with this if you are going for very contrasty hard images, as the blurring will soften the image making for less sharp lines.
Note: To see this work, you should switch your color profile mode from 8-bit to 32-bit.
Source: MinutePhysics