In the photo editing realm, Photoshop and Evoto AI are two heavyweights. Specifically when it comes to portrait retouching, we have seen a rise of apps that are specifically dedicated to just this purpose, and Evoto has been a front-runner in this realm.
Adobe Photoshop offers extensive tools for in-depth work, and these tools go far beyond the scope of just portrait retouching. This can lead to an overwhelming user experience, for anyone who is mainly interested in portrait retouching.
Evoto AI has AI-powered features for quick edits to your photos, with an emphasis on portrait retouching. This enables the app to be more user-friendly, yet still incredibly powerful.
In this article, we are going to explore what each of these powerful editors brings to the table, and then we will review their specific capabilities when it comes to skin retouching. Let’s dive in!
What Is Evoto AI?
Evoto AI is a leading AI photo editor that has been changing the game for quite a few years. It’s an AI-powered image editor developed by an American team using a de-layer concept. This cross-platform software works on Windows, macOS, and iPadOS.
One of its flagship tools is AI-based skin retouching. With features like one-click blemish removal, it can detect and erase acne, spots, etc., making skin appear smooth, without the innumerable hours of manually selecting, masking, and retouching.
Another great function is batch editing. You can apply the same retouching edits to multiple photos at once, which is super handy when you’ve got a lot of similar pictures to work on, within, say, a headshot portrait session.
Plus, Evoto’s other popular features include AI color grading and quick background replacement, allowing you to easily change the mood of your photos with just a few clicks. Again, no tedious selections, mask feathering, etc. You have the ability to just get straight to the artistic aspects of the creative process!
In summary, here are the main useful photo editing tools of Evoto AI:
- Frequency Separation & Dodge and Burn: Automatically retouches skin texture, lightness and tone in images for easy retouching of portraits etc.
- Stretch Mark & Wrinkle Reduction: Softens stretch marks and smooths skin wrinkles for a cleaner look.
- Glasses Glare Removal: Removes glasses glare with one click, enhancing portrait quality.
- Artistic Makeup Filters: Adds various makeup styles like brows, eyeshadow, and lipstick to portrait photos.
- Exclusive Presets: Comes with designer-made presets and allows custom preset loading, saving and sharing.
Tips: For those looking to explore these tools further, there’s a straightforward way to access them. Visit https://evoto.ai/c/slr-lounge to sign up and start using the features mentioned. Additionally, a 15% discount is available for first plans using the Coupon Code: SLRL5, which applies to both new users and those expanding their editing setup.
What Is Photoshop?
Photoshop, a long-standing giant in the photo-editing world, offers a vast array of tools. This can be a good thing, or it can be a bad thing; it all depends on what you’re trying to do with your images. Photoshop is available for both Windows and Mac, plus there are various modified versions available for most mobile platforms.
The layer-based editing is its standout feature. You can stack multiple layers, filters, and masks, each with different elements of your image. This means you can make changes to one part of the image without affecting the others, which is a winner for non-destructive editing.
Another great set of tools are the selection tools, like the Magic Wand and Quick Selection. They make it easy to isolate specific areas of an image for targeted editing. And with newer features like Generative Fill and Generative Expand, you can add or extend content in your photos in a realistic way. It also has a vast range of brushes for detailed retouching and drawing.
And the behemoth photo editor comes with other useful tools, too:
- 3D Layer Support: Creates and manipulates 3D objects, useful for graphic design.
- Custom Brush Creation: Designs brushes with customizable shape, size, hardness, and color flow.
- Advanced Masking: Selectively shows or hides parts of any layer, for blending and precise, targeted adjustments.
- Action & Batch Processing: Records and applies a series of steps to single or multiple images.
- Text Manipulation: Adds text, changes text attributes, warps text, and creates other effects for graphic design needs.
Portrait Retouching Features | Photoshop VS Evoto Review
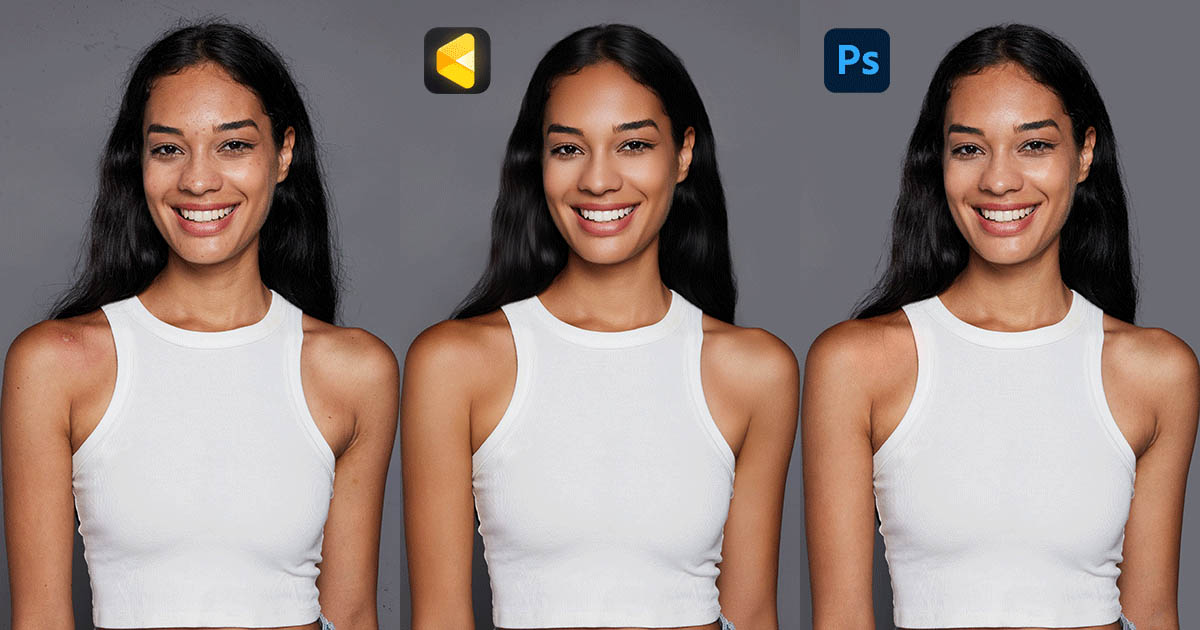
Now, in this review, let’s compare the two top photo editing platforms side by side. We’ll focus on three retouching metrics: blemish healing efficiency, dodge/burn tonal precision, and background masking accuracy.
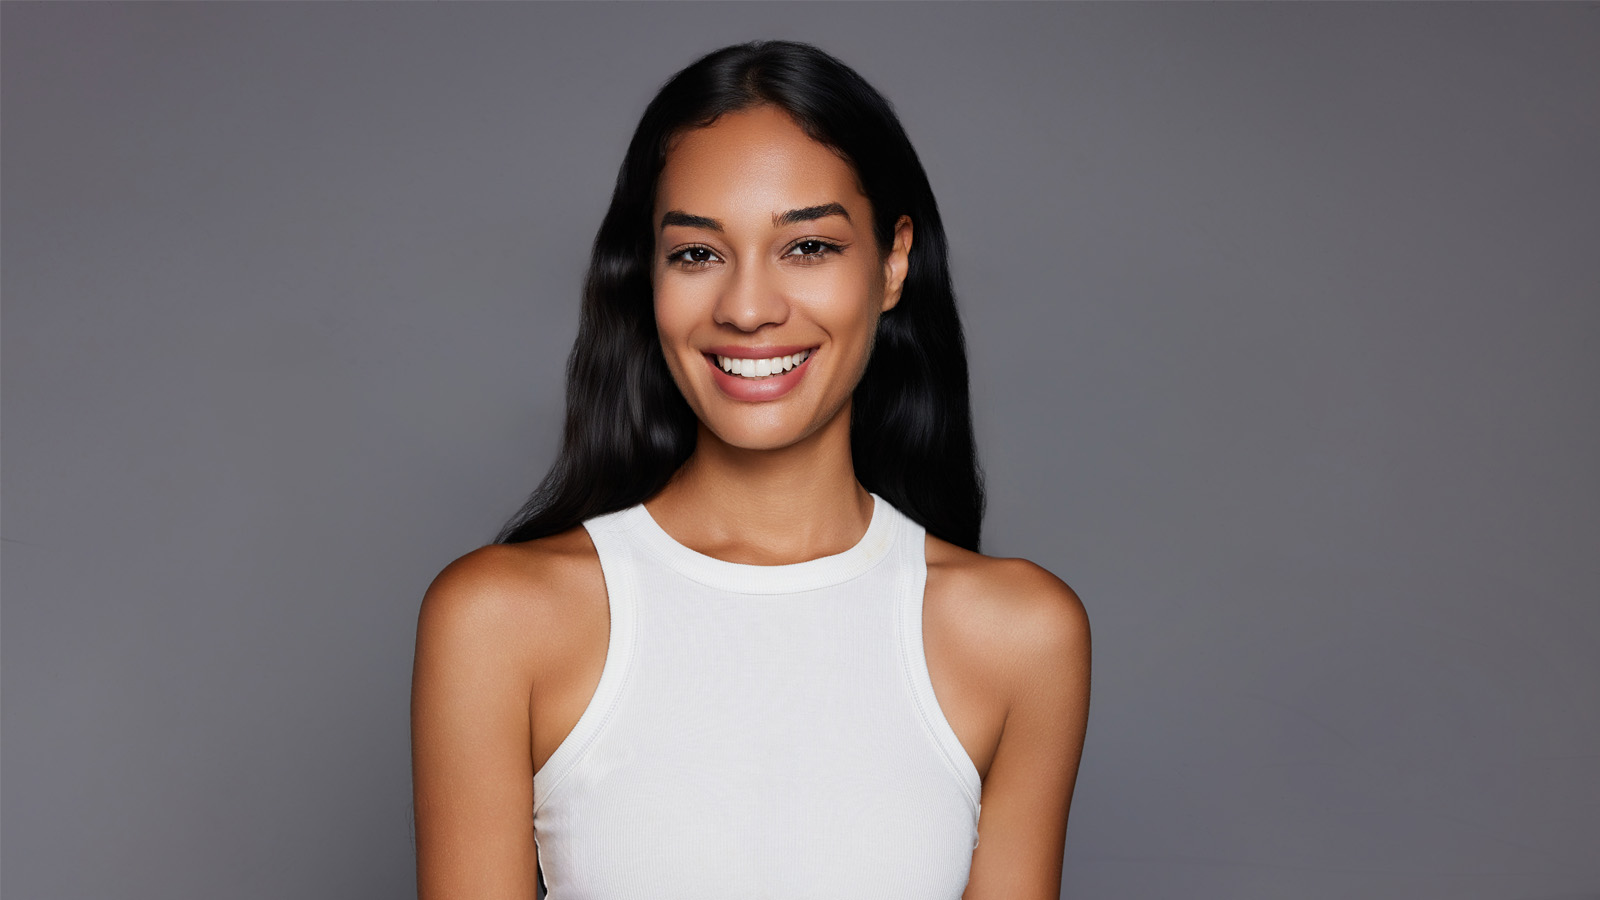
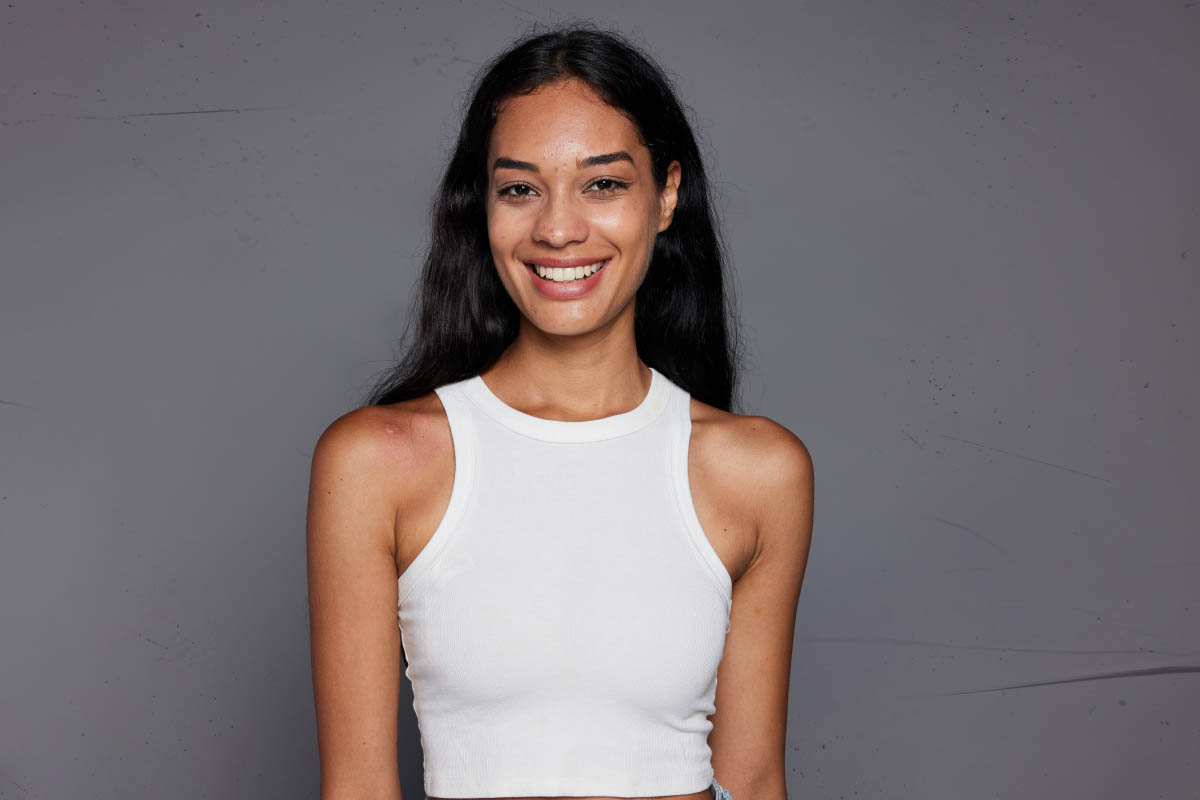
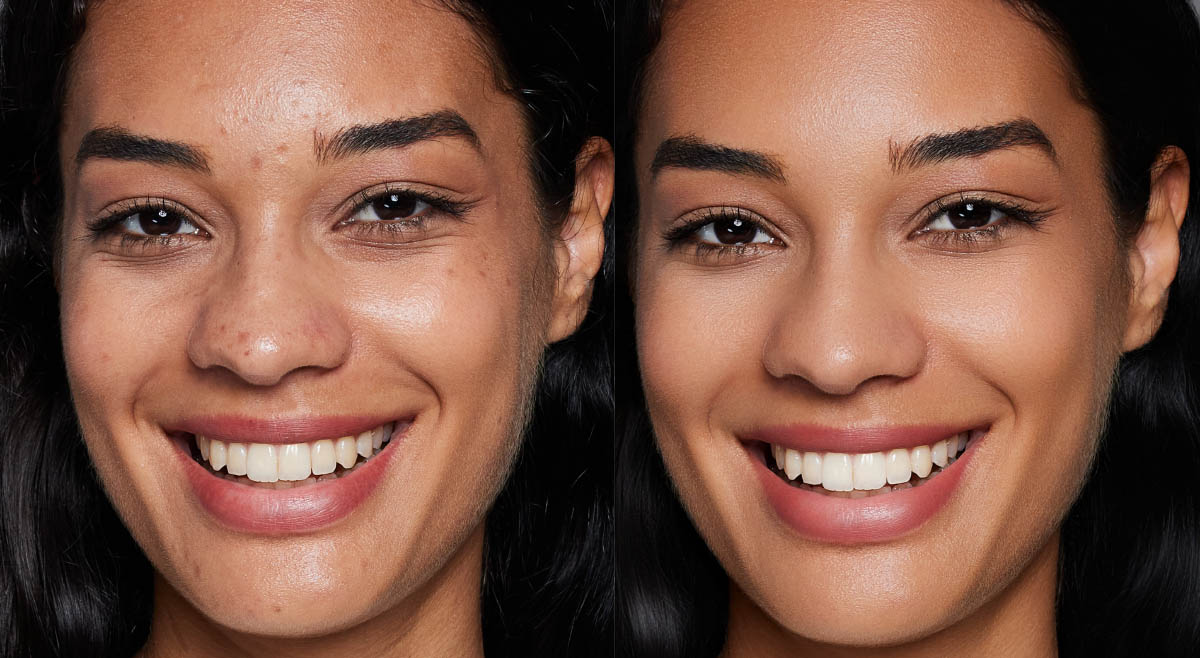
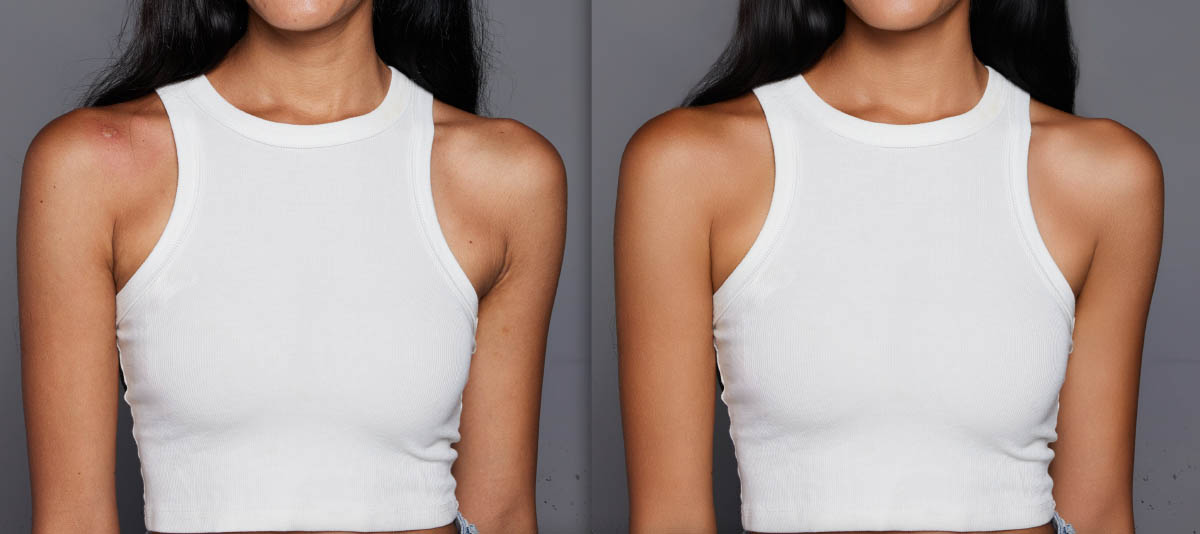
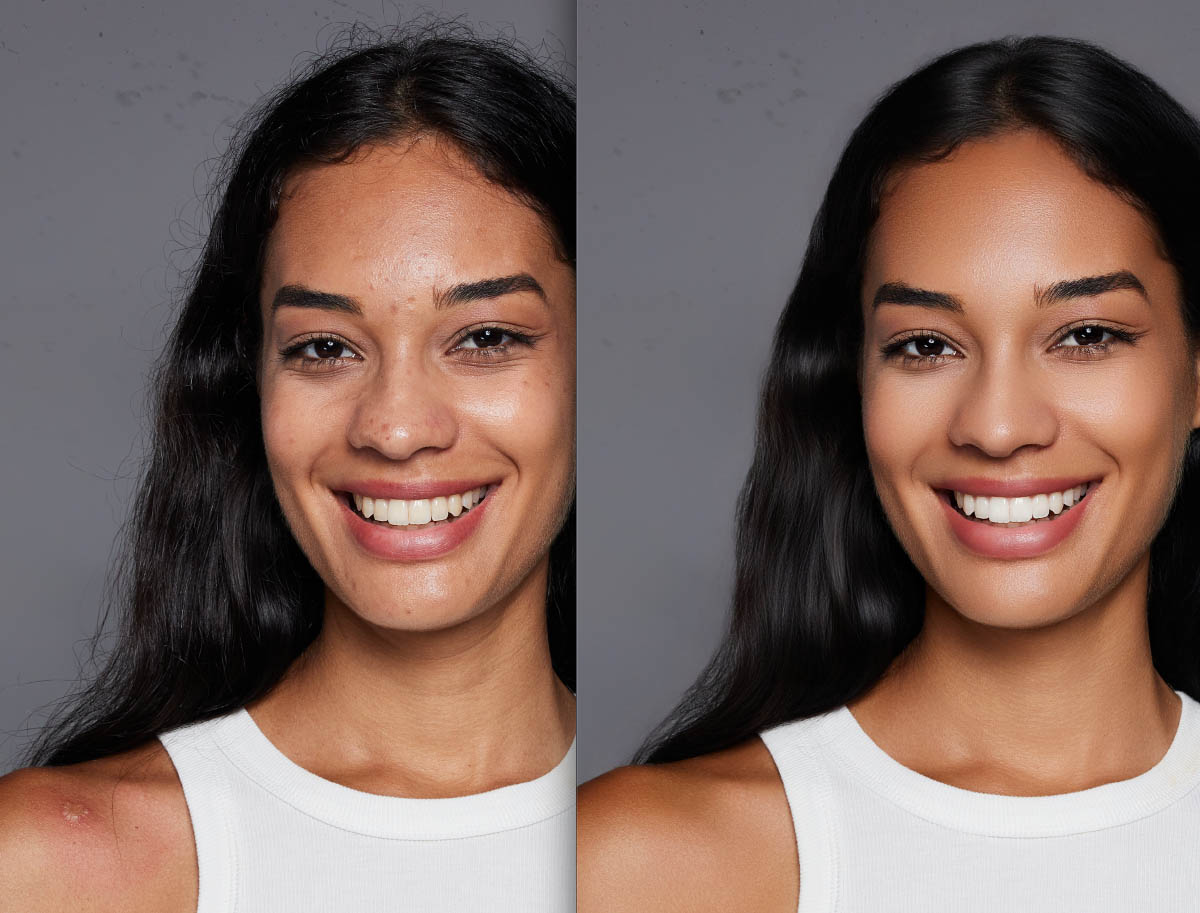
To ensure a fair test, we’re using a controlled portrait sample. The original photo contains common pain points: Flyaway hairs, facial acne, body skin blemishes, and background scratches – issues pros face daily. (Just ask anyone who has been a portrait photographer for a few years; they’ll tell you how they lost count of how many hours they’ve spent working to eliminate or fix these types of things!)
Indeed, these obstacles demand precise, reliable performance from a retouching tool. So, how do the platforms stack up? Let’s break down their retouching workflows and evaluate the results step by step:
Evoto AI Blemish Remover and Dodge & Burn
Evoto AI’s Blemish Remover is a technological marvel. Powered by portrait image AI algorithms, it can quickly and accurately detect a wide range of skin blemishes from photos. Whether it’s pesky acne, stubborn dark spots, or fine wrinkles, this tool has got all covered.
What sets it apart is its ability to preserve the natural texture of the skin, without the user having to manually select, mask, and match or replicate that texture.
So, instead of leaving behind a plastic-looking finish, it ensures that the retouched skin looks real and smooth. It’s like having a professional makeup artist touch up your subject’s skin in seconds.
Another useful tool in Evoto AI is the Dodge and Burn tool. Portrait photographers will love this classic technique, made easier with AI. It helps in creating even skin tones, and enhancing facial contours. You can highlight the cheekbones, define the jawline, and add depth to the portrait without the need for complex manual adjustments.
It’s a precise tool to control the light and shadow on the skin, giving portraits a professional and polished look. Best of all, you don’t need to be a photo editing wizard to use it effectively, nor do you have to invest countless hours in the process itself.
Here are the simple steps to use Evoto Blemishes Remover:
Step 1: Launch And Import Photos Into The Editor
Open Evoto AI on your preferred device (Windows, macOS, or iPadOS). It’s a cross-platform solution, so you can work wherever you are. Start a new project and import the portrait photos you want to edit.
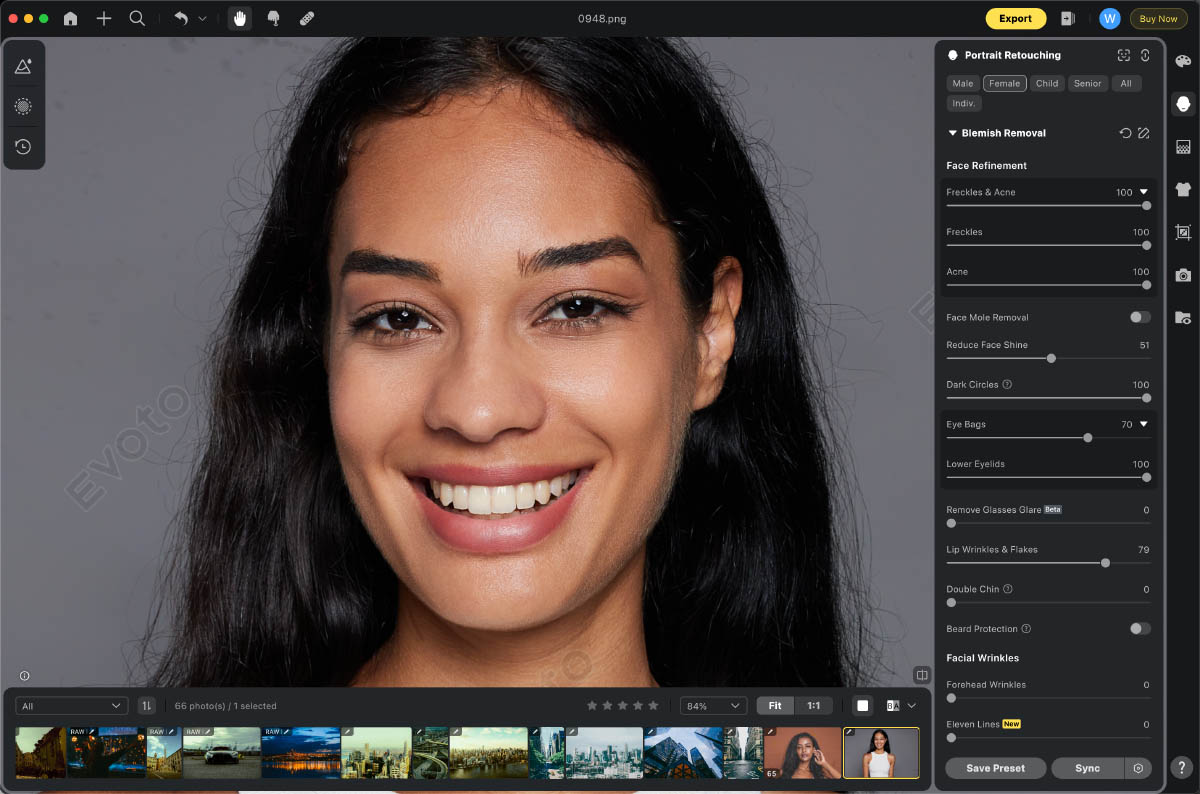
Step 2: Blemish Removal
Navigate to the “Portrait Retouching” panel and find the “Blemish Removal” section. Here, you can choose from various tools to remove blemishes such as freckles and acne, face moles, dark circles, eye bags, double chins, wrinkles, and even eyeglass glare. Simply use the sliders to make the portrait a clean look.
Step 3: Skin Retouching with Dodge & Burn
Move on to the “Skin Retouching” section. Activate the facial or body “Dodge & Burn” sliders to smooth the skin and enhance the facial structure. Adjust the settings to achieve the desired level of contrast and tone.
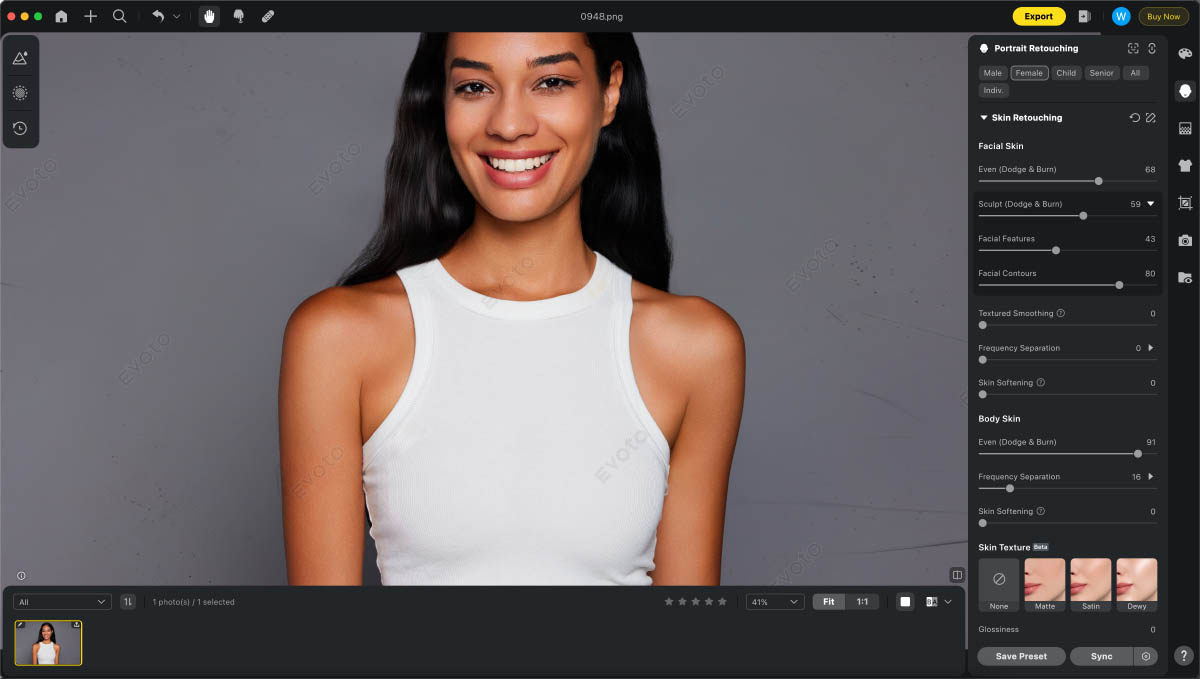
Step 4: Enhance Facial or Body Features
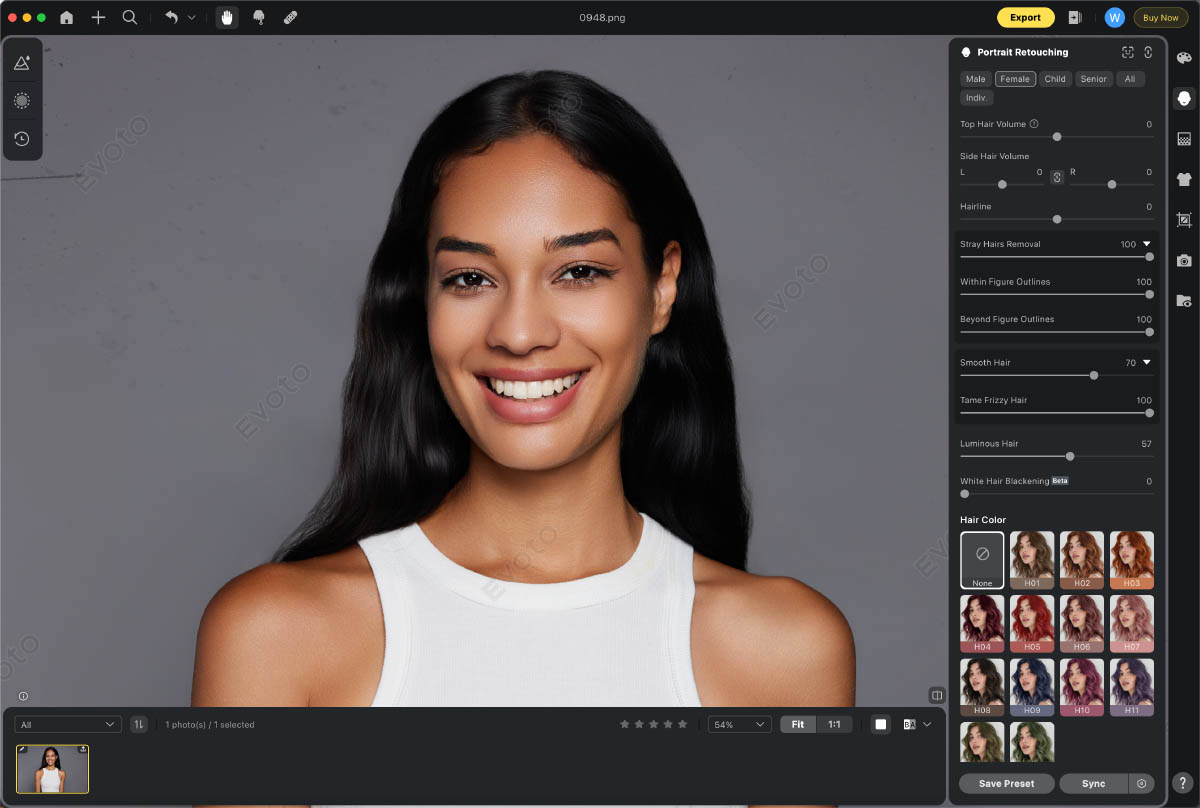
Next, let’s look at the eyes, teeth, and hair in our portrait. With a few more clicks, we can brighten the eyes, whiten the teeth, and improve the overall appearance of the hair. Again, all you need to do is move the respective sliders.
The common theme here should be taking shape for you: the technical, tedious aspects of this process are taken care of for you; all you must do is use your own subjective, creative vision to decide what looks best for each unique situation…
Step 5: Edit the Background
Finally, visit the ‘Background Adjustment” panel to eliminate any blemishes or distractions in the studio backdrop, making the portrait stand out.

…After that we are at the end of the process; simply click “Export” to save the edited photos to the local disk or cloud storage. Now, you’ve finished the portrait retouching within minutes!
You can also copy the edits and apply them to your other portrait photos of the same project, saving even more time. This is one of the key benefits of a dedicated AI software; the automation is going to exponentially increase your overall time savings. You will have more time for creative artistry, as well as even more time left over to just get off your digital devices and go be with family and friends!
What about the Photo Retouching Result from Evoto AI?
The blemish remover in Evoto AI is incredibly efficient for high-volume photography such as portrait sessions. Especially when the images are at all similar, it can handle a large number of blemishes in a short time, across multiple images, which is a huge time-saver for busy photographers. The results are natural-looking, with no signs of over-editing.
The dodge and burn function is equally impressive. It provides a high level of control over skin tones and facial features. The ability to enhance the portrait’s depth and dimension gives your photos a professional edge.
However, as they say, the proof is in the pudding. Do the real-world results actually show consistent quality output?

The results of using Evoto AI’s Blemishes Remover are indeed remarkable, and consistently so. It can remove blemishes in a matter of seconds, saving significant time, especially when dealing with a large number of photos.
The photo editor is highly accurate overall, rarely missing any blemishes, and it does an excellent job of preserving the natural skin texture. This means that the retouched photos look authentic and not overly edited.
How about Photoshop’s portrait retouching? Let’s give it a go:
Photoshop Blemish Remover and Dodge & Burn
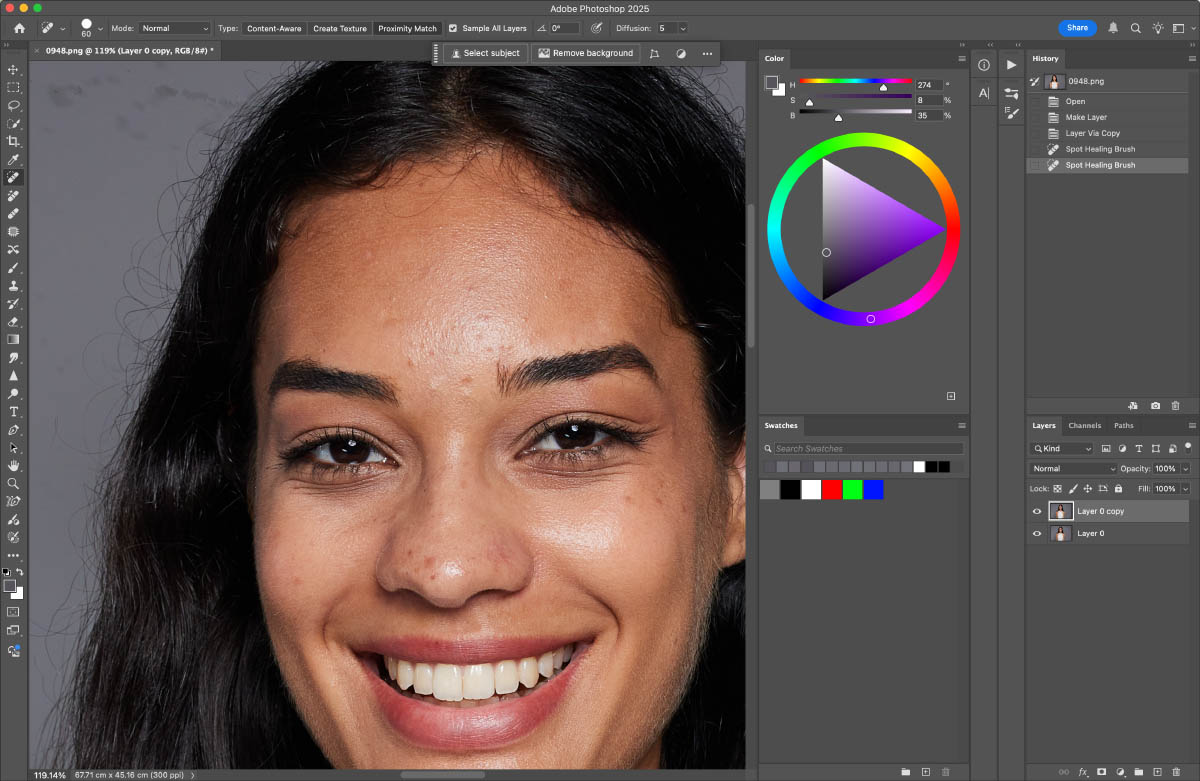
Photoshop’s blemish remover, like the Spot Healing Brush, is a go-to tool. It works by sampling pixels from a good area of the image. Then, it replaces the blemished pixels with these sampled ones. This helps blend the new pixels with the surrounding area for a seamless look. It’s great for getting rid of small blemishes such as acne, freckles, and moles manually. It works well, however, you are largely responsible for understanding how to “source” adjacent skin areas. Even when using the more automated retouching tools, the user is still responsible for understanding brush size, precise area selection, etc.
What about the Dodge and Burn tools in Photoshop? They are based on traditional darkroom techniques. The Dodge tool lightens areas, while the Burn tool darkens them. This is useful for adjusting exposure in specific parts of an image. For example, you can use the Dodge tool to bring out details in shadows and the Burn tool to add depth to highlights.
But, using these tools requires patience and skill. You have to be careful not to overdo it, or the image might look unnatural. Even as an expert with a keen eye, the process is still time consuming because you are responsible for getting advanced with things like luminosity masks, making manual selections, etc.
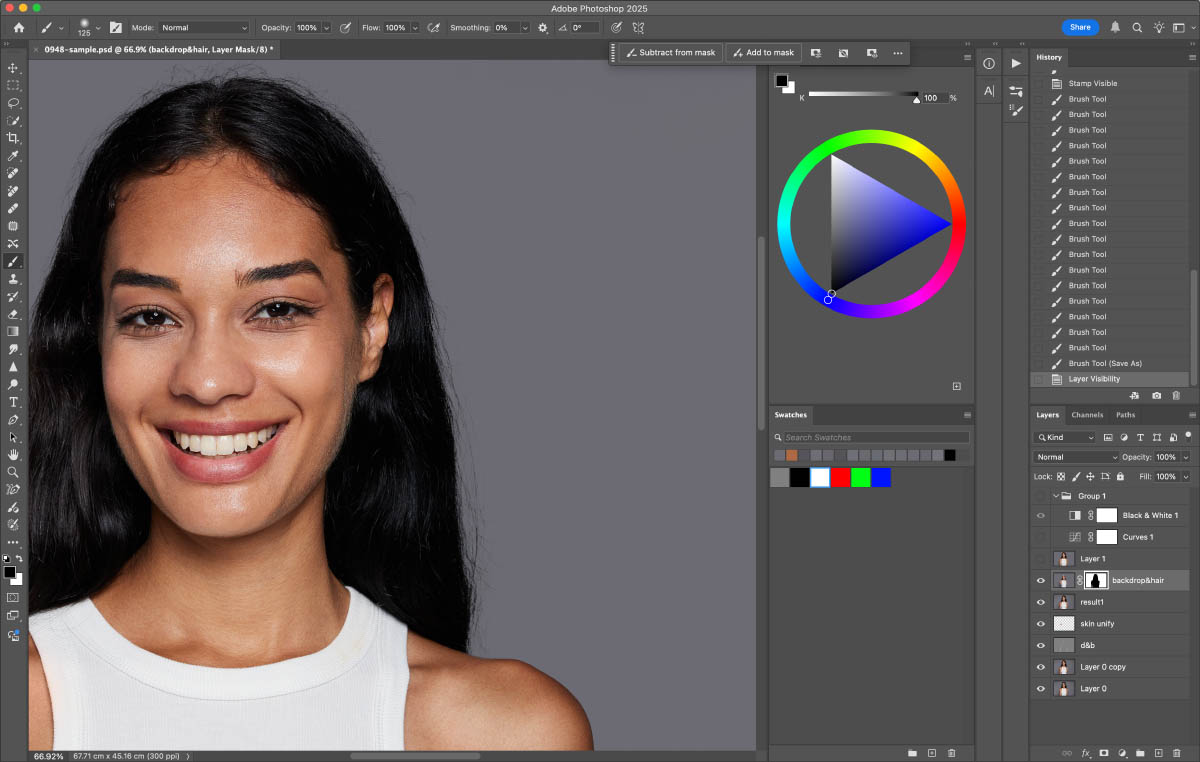
The following is a step-by-step guide for portrait retouching in Photoshop:
Step 1: Open and Prepare the Image
Open your portrait photo in Photoshop. Then, add a new blank layer. This helps keep your retouching work separate from the original image.
Step 2: Use the Healing Tool for Blemishes
Select the “Healing” tool, like the “Spot Healing Brush”. Adjust the brush size and hardness in the options bar. Then, click or drag over the blemishes to remove them. (In other words, if you don’t manually identify and select every single blemish yourself, it won’t get retouched…)
Step 3: Set up for Dodge & Burn
Create a new layer for dodge and burn work. Set the blend mode to “Overlay” and fill it with 50% gray. This allows for non-destructive editing.
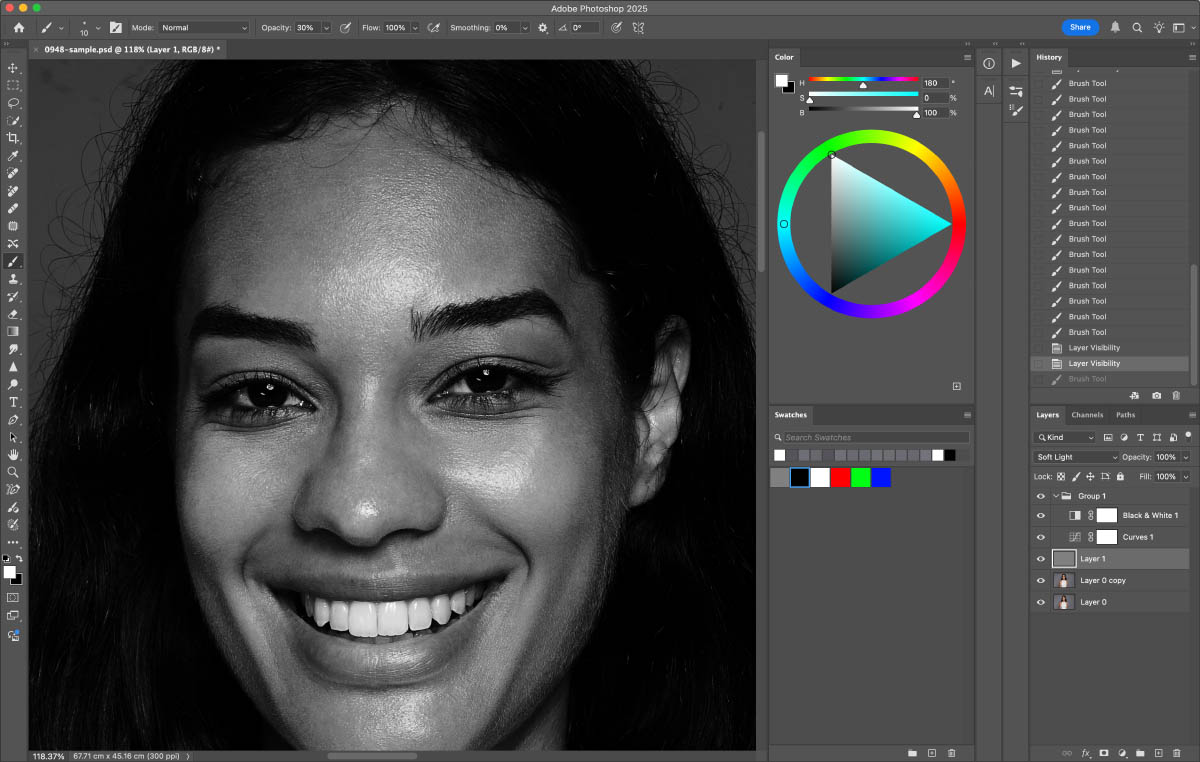
Step 4: Dodge and Burn Adjustments
Select the “Brush” tool. Set the foreground color to white for dodging (lightening) and black for burning (darkening). Lower the brush opacity to around 10 – 20%. Then, paint over the areas you want to adjust. It may take hours to repeat the step when the portrait photo includes heavy blemishes.
Step 5: Final Retouches
Check the overall look of the portrait. Make any additional adjustments as needed, such as color correction or sharpening.
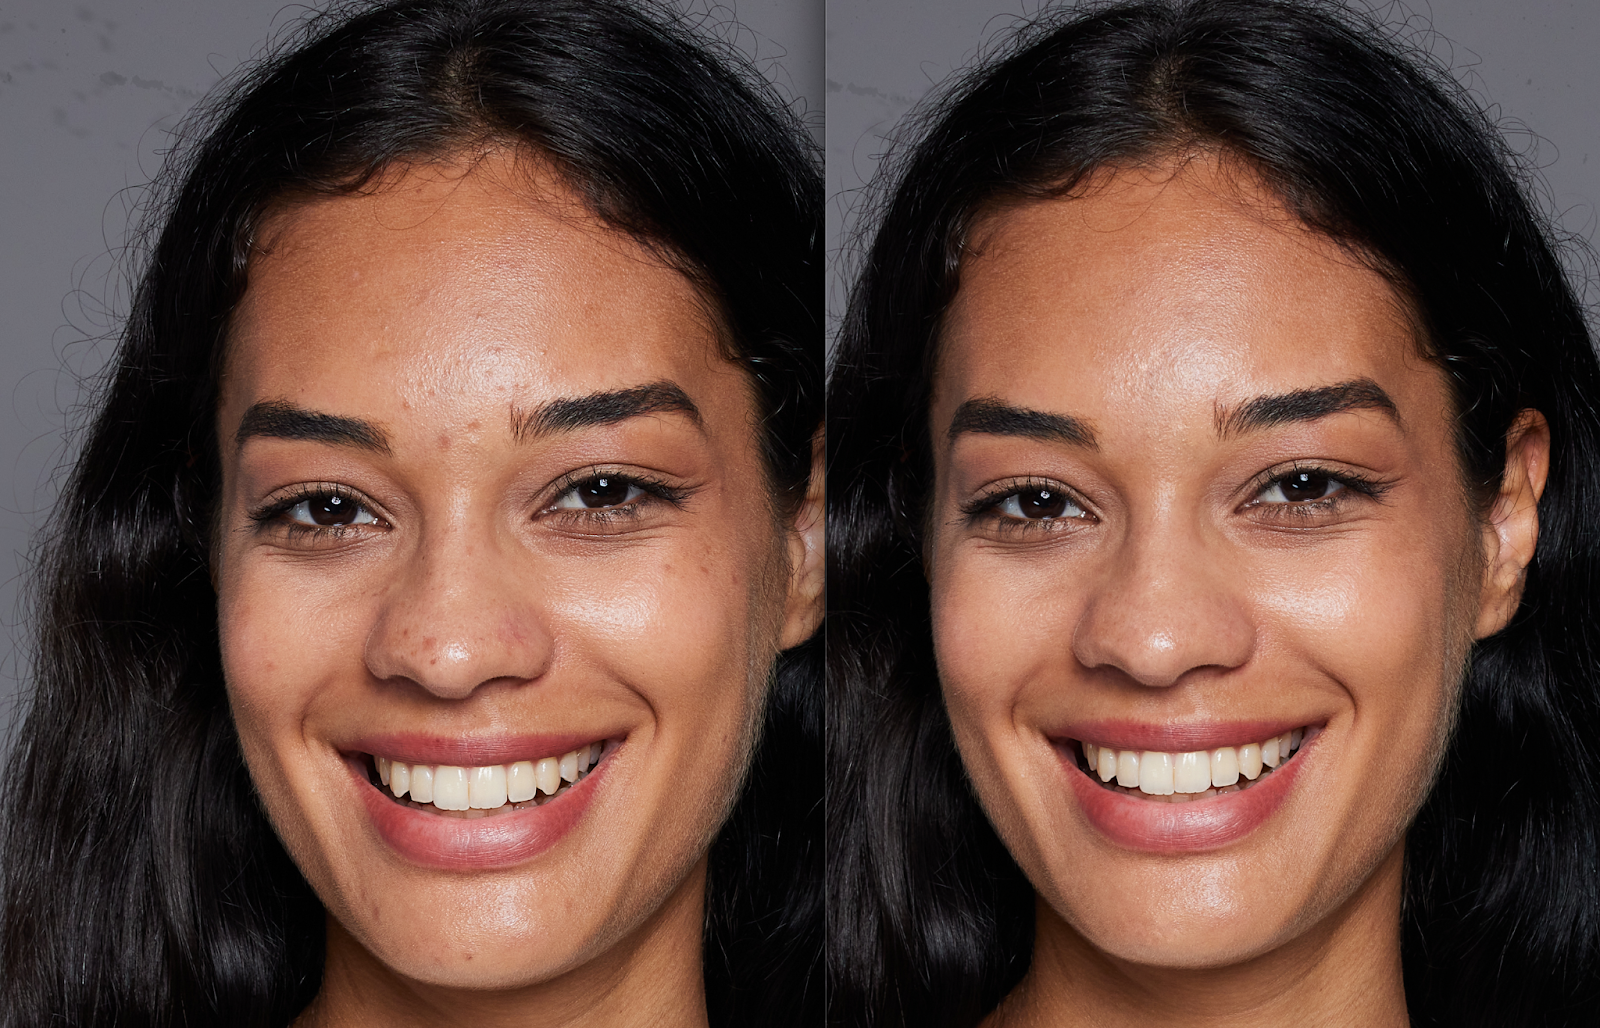
The Retouching Results of Photoshop
Photoshop’s Spot Healing Brush is a highly precise tool, indeed. It does an excellent job of replacing the pixels of a blemish with well-matched ones from the photo. This makes it super effective for dealing with small-scale blemishes like pimples or freckles. However, it’s not without its drawbacks. You’ve got to spend time adjusting the brush for each blemish, which can slow down your workflow. It’s a bit of a pain, and definitely more time-consuming, especially when you’ve got a lot of photos to edit.

With dodging and burning tools in Photoshop, you have an incredible amount of control. You can zero in on specific areas to lighten or darken them. It’s perfect for bringing out hidden details or adding that extra depth to your images. But here’s the catch: it’s easy to go overboard. One wrong move, and your photo can end up looking over-edited and unnatural. So, you’ve really got to be careful with it. This can be a concern with all photo editing apps, of course, but Photoshop presents by far the highest risk that you’ll “mess up” someone’s appearance if you’re not skilled at manual retouching.
Evoto VS Photoshop | Comparison Summary
If we compare Photoshop to an AI-powered photo editor like Evoto AI, there are some clear differences. Not just on the spec sheets, but visually, in the results as you can tell.

| Evoto AI | Photoshop | |
|---|---|---|
| Blemish Removal | – Simple & Fast. Completes tasks like removing acne, oil shine, facial wrinkles, neck wrinkles, and armpit fat in seconds.- High-precision AI detection ensures thorough removal without harming skin texture.- Results look natural with no signs of over-editing. | – Time-consuming & complex. Tasks like acne and spot removal can take 10+ minutes to do manually. Other blemish removal tasks also demand significant time.- Results depend on the user’s skill. There may be issues like uneven removal or accidental damage to the surrounding area.- Achieving a natural look requires careful adjustment. |
| Skin Adjustment | – Quick to perform neutral gray leveling/ stereotyping, body dodge and burn, and skin texture and tone adjustment.- AI-based functions maintain the natural feel of the skin while enhancing its appearance.- Results are consistent across different images. | – Very time-consuming. Neutral gray leveling/ stereotyping can take 30 minutes or more with no upper limit.- Manual adjustment requires a high level of expertise to avoid over-processing or creating an unnatural look.- Different operators may yield different results. |
| Other Portrait Retouches | – Functions like removing flyaways, softening hair, brightening eyes, and whitening teeth are completed rapidly.- The overall set of features is comprehensive, covering various portrait retouching needs.- Easy to use, suitable for both beginners and professionals. | – Time-consuming. For example, removing flyaways takes 15 – 20 minutes.- Each retouching task requires manual operation, which is labor-intensive.- Skill-based, and the quality of results varies from person to person. |
| Background Editing | – Fast and accurate background removal.- Can also handle other background-related tasks like removing background blemishes, glitches, eliminating color banding, changing the background, adding or retaining shadows, and replacing the sky.- Minimizes the risk of accidentally modifying the subject. | – Time-consuming, with background blemish removal taking 10 minutes.- Protecting the subject during background editing often requires complex operations like precise selection & masking done manually.- The overall background editing process is more complex and less automated. |
| Total Time | – Takes only 1-3 minutes in total for all the above-mentioned tasks, which is highly efficient.- Greatly reduces the time and effort spent on photo retouching.- Batch editing allows for even more time savings across multiple images | – Takes over 1 hour per image; minimal batch editing options.- Significantly limits the number of photos that can be retouched in a reasonable daily workflow time. (Editing large jobs could span multiple days’ work.) |
We’ve seen how Evoto and Photoshop stack up in various aspects of photo editing. Now, let’s dig into their final pros and cons before we wrap up:
Evoto AI Retouching
PROS:
- Super fast for professional-grade results of blemish removal and skin retouching.
- AI-powered tools make it user-friendly for all levels of photographers, even beginners.
- Great for batch editing, especially on portrait retouching & background removal.
- Convenient iPad OS and tethering connection for on-location, high-volume photography.
- Available on multiple devices: Windows, Mac OS, iPad OS, and even a web editor.
CONS:
- Lacks offline editing due to the AI algorithms.
- The web editor is still in development.
- AI retouching is its only main focus (Photoshop is necessary for other types of advanced editing)
Suitable for: Busy photographers, e-commerce, and portrait studios. It’s perfect when you need quick, consistent results.
Beyond these, the tool keeps adding new features to streamline workflows, making it a sensible choice for anyone working under tight deadlines, or just looking to free up their time.
NOTE: If you’re ready to try it out, signing up now through this link gives you access to all these tools right away… Also, as a little extra, use the Coupon Code: SLRL5 at checkout to get 15% off your first plan, whether you’re just starting out, or scaling your professional editing workflow.
Photoshop Retouching
PROS:
- Offers ultimate manual control for detailed dodge and burn.
- Has a wide range of tools for complex skin retouching.
- Ideal for creating highly customized, professional-grade images beyond just retouching.
CONS:
- Time-consuming, especially for manual blemish removal.
- The photo editing structure and system are outdated & complicated.
- Requires a high level of skill and experience; hot friendly to beginners.
- Excessive toolsets for anyone who simply wants to retouch portraits, remove backgrounds, etc.
Suitable for: Professional retouchers working on high-end projects such as fashion editorials or product photography, where manual control is still preferred. Also for other types of photo editing in which layer masking and other tools are necessary.
When it comes to choosing between these two editing programs, if you’re short on time and need to edit a large number of photos quickly, especially portraits or any pictures that include faces, then Evoto AI is the better option. However, if you’re a pro who requires complete control over every aspect of skin retouching, and you don’t mind heavily investing more time into the process, then Photoshop is the clear winner.
Conclusion | Evoto VS Photoshop For Portrait Retouching
In conclusion, if you’re under a time crunch, for example if you’re a content creator or influencer who has a tight deadline for a commercial client, in our opinion Evoto is the way to go. Its efficiency, simplicity, and excellent results in a short time are hard to beat. As a bonus, the ability to achieve your goals from almost any digital device or platform is a huge bonus to modern professionals in the digital space.
If you have the time, the skills, and you’re aiming for highly customized, finely detailed retouching, then Photoshop remains the top choice as an industry standard.
Honestly? For us as both professionals and as casual content creators, we see value in both, and that is why we are comparing them: we actually will use them both, depending on the situation!
For more information about Evoto, including their latest AI-related updates, be sure to visit their website.


