As a photographer in the 21st century, it’s likely that you have a Facebook Page for your photos. And so you’ll know that Facebook always nudges you towards advertising on its platform, with enticing ‘Boost Post’ buttons and other similar suggestions popping up everywhere. This is a scary thing to venture into; online marketing can seem like a bottomless pit for you to pour your money in, never to see it again. But with proper understanding of how it works and a tactical approach, Facebook advertising is a beast that can be tamed, providing a great way to grow and expand your photography business.

Why Should You Advertise On Facebook?
You’ve probably noticed that when you post on a Facebook Page, very few people see your post. The number of people who see your post without any paid advertising is known as ‘Organic Reach’.

You’ll probably reach about 30-40% of your Total Page Likes for a normal post with a photo like this – and that’s on a good day. If you include a link, you can expect this to drop to 4 or 5%. There are of course exceptions – if things go viral or are particularly well received, then your reach will increase substantially. But usually it is around these levels, and that’s because Facebook only shows your post in a limited number of people’s newsfeeds to encourage you to pay for advertising.
So what should you advertise? Well, there are two approaches you can take: promoting your Page for new ‘Likes’ or increasing the reach of your posts.
Advertising for Likes
This is definitely tempting, and it’s not necessarily a bad thing. Having more Page Likes overall means that, in the long run, more people will see your posts. Before I started advertising, my Facebook Page had accumulated about 5,000 Likes. I decided that I would advertise for Likes about six months ago, and stopped once my Page reached 50,000 Likes.
Why did I do this? Well, my Page had become relatively stagnant in its natural increase in Likes. I started an advertising campaign to reach those who followed other similar photographers (we’ll talk about how you can do this later). Since then, my page grows organically by about 300 Likes per week. This is great, as I’m not having to spend any money to promote the page but the Likes continue to increase. It’s as if my campaign set the ball rolling.
[REWIND: 5 TIPS FOR GAINING FACEBOOK BUSINESS PAGE LIKES]
Advertising for Post Reach
This is something I do all the time, both on my photography Facebook page and the page for my blog. Promoting posts is great as you can ensure that the people you want to see it have it placed in their newsfeed. Facebook has some very powerful targeting options, meaning that you are unlikely to show your post to those who have no interest in it.
I promote posts when I have new or discounted products or am taking new bookings for my photography workshop sessions. It’s usually pretty inexpensive too: I spend maybe $15 on a single post promoting workshop sessions that cost $120 each. This has proved pretty popular, with one promotion like this resulting in multiple workshop bookings.
How to Advertise
So by now, I imagine I’ve peaked your interests, and you’re wondering how you should advertise. The first and most important rule is not to use the ‘Boost Post’ option; this is actually nicknamed the ‘Donate to Facebook’ button by online marketers. Doing it this way gives Facebook control over your money and how it is spent.
When you pay for advertising, you can do it in one of two ways: paying for clicks (CPC) or paying for advert impressions (CPM). Impressions just means views of your advert, so it’s not promising clicks – it’s down to having an engaging advert to tempt people to click. I experiment with both, but I find that paying for clicks is often the best move.
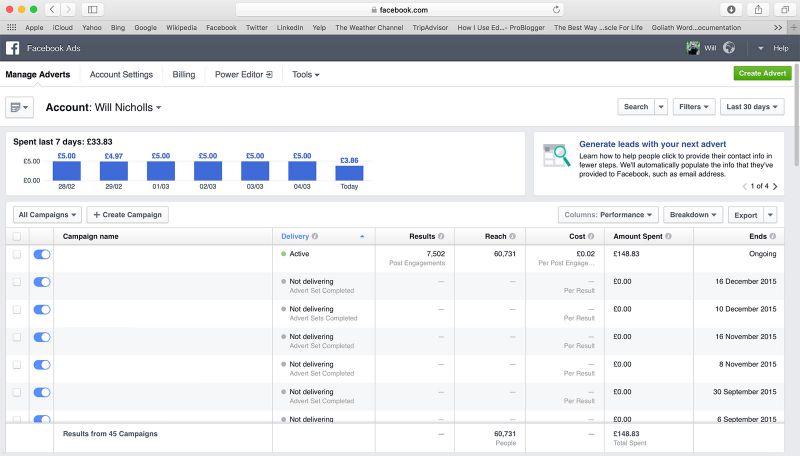
When you open up the Facebook Advert Manager you’ll see something like this:

This is my advertising control panel. You can see a list of the campaigns I’m running (of which I’ve removed the titles), post engagements and reach, cost per engagement and the amount spent. I seem to have hit a winner with my campaigns, paying only $0.03 per engagement (that’s a Like, comment, share or click on my advert). Usually, you’ll find yourself paying $0.15 or more per engagement. This is down to having an engaging advert – if lots of people are clicking, then Facebook actually reduces the amount you pay per engagement.
The first thing you should do is open up the Power Editor – this is the most functional and, well, powerful way to create adverts. You’ll need to use Google Chrome to do this.
The Power Editor
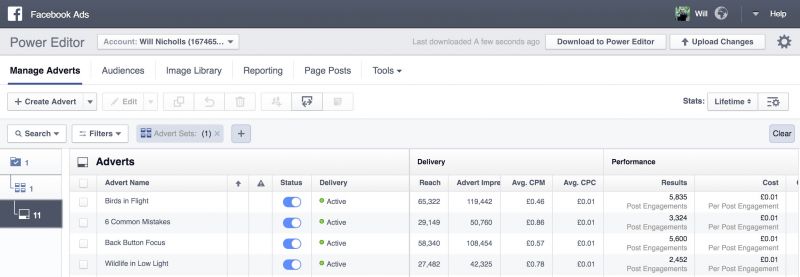
This is what I see when I open up Power Editor – it summarizes all my adverts. You start by creating Campaigns – the overall umbrella containing your adverts. Then you create Advert Sets – these are groups of adverts, and you can set your bidding options for the adverts here. Finally, you create the Adverts – designing each one individually, you can assign multiple ads to one advert set.

First, create your advert by selecting the ‘+ Create Advert’ button near the top left. You’ll then have a screen like this appear:

When you create a campaign, you get to choose its objective. The main options to look at are Clicks to Website, Page Likes, and Page Post Engagement. Choose an objective based on the aims of your advert and what you wish to get from it. Then just title your advert set, and create a name for your first advert.
Power Editor: Adverts
You can either create a brand new advert or use an existing post for promotion as shown below:

Looking at one of the adverts for my photography blog, this is what it results in. I’m promoting articles that we’ve written, encouraging users to engage with the advert. The result? A cost per engagement of about $0.02.

You can set up multiple adverts to work within one advert set. The adverts then rotate, and the most popular and engaging adverts are shown the most.
Power Editor: Advert Sets
Next, take a look at the advert set. You can set your budget based on a daily or lifetime rate. I choose to set it daily, ensuring that the money trickles out rather than floods into the pockets of Facebook.

I spend about $5.00 per day on this advert set, and $4.00 per day on another – totalling the $9.00 per day expenditure you saw in the original screenshot.
Now here’s the great thing about Facebook’s Power Editor. Clicking ‘Edit Audience’, you get a whole new pop-up of options to play with. Select the locations that you want to target your advert to – you should think carefully about this. There’s no point advertising a product only available in the USA to people in the UK.
Check out the ‘Detailed Targeting’ section. This allows you to specify the interests of people you want to target. In fact, if you’re in the USA, I believe that you may have access to some really in-depth options, including areas people have visited recently or actions they’ve taken. This isn’t yet available in the UK, so I can’t comment on it, but it’s pretty easy to understand if you do have access to it.

Once you’ve targeted your audience, Facebook will estimate the potential audience for your advert. The more targeted your adverts are, the more successful they are going to be.
It’s also worth considering if you want to target only people who Like your Page currently (when promoting a post) or one of the other options you’re given.

For this particular advert set, I’ve chosen to engage with anyone. But if you limit it to those who follow your Page, then you can be sure you are paying to reach those who want to see your posts.
Power Editor: Bidding Options
You set the price you want to pay at the Advert Set level of your campaign. Adverts work by bidding for impressions or clicks, allowing you to compete with other advertisers. The suggested bid amount varies depending on how competitive your targeted niche is. Depending on the objective of your Campaign, your bidding options may vary, but usually, you choose between Clicks, Post Engagement, and Impressions. I like to go for Post Engagement.

You want to select ‘Manual’ under the ‘Bid Amount’ section. If you choose ‘Automatic’, Facebook is in control of the amount you bid per engagement, and you’ll find that you end up paying more.
Facebook is suggesting I bid between £0.04 ($0.06) and £0.09 ($0.14). I’ve chosen somewhere in between: £0.07 ($0.11).
Starting Your Advert
Once you’ve configured all the options, you can start your advert. Click ‘Upload Changes’ in the top-right of the Power Editor and wait for your adverts to be approved. They’ll start running pretty quickly, and it’s important you keep track of their performance. You can cap how much you spend using the scheduling options of your Advert Set, turning them off after a certain time or setting a spending cap.
What to Expect
You’ll see your reach increase – it’ll be determined as ‘Paid Reach’ rather than ‘Organic Reach’. Having a successful advertising campaign is up to you. Just because you’re paying money doesn’t mean you’ll convert sales. Choose engaging images and make sure what you are promoting is something people will want to buy.
Of course, you can promote things that don’t directly result in sales, such as increasing Page Likes or just promoting photos. The latter is something I haven’t really experimented with, apart from extra special images that I want to ensure my followers see. Sometimes, this does result in print purchases, but usually, it’s just to keep interest with customers and play the long game.
If you’re interested in more about web marketing, be sure to check out our Photography SEO and Web Marketing eBook here.
Have you tried Facebook advertising? How has it worked for you? Comment below.


Get Connected!