Black and white photography is a great way to capture something that feels timeless. Lightroom provides great tools to draw out those rich and dramatic tones. In this video, I’ll be walking through an advanced 8 step black and white portrait edit.
Video: 8 Step Advanced Black and White Portrait Editing in Lightroom
Rather than a simple black and white conversion, this advanced method gives you better control over the tones. By following these tips, you can edit your image with precision and intent. I’ve outlined this step before in a previous video on landscapes, and now, I’ll be bringing the method to a black and white portrait photograph.
Before we jump in, download the exercise file here and follow along as I edit.
Related Reading: How to Edit Black and White Landscapes in Lightroom
Step #1: Neutralize the Colors

Before we convert to a black and white portrait, there are a couple steps to prepare the image. I used the eyedropper tool to select the white wall in the background. Then, I fine tuned the white balance until the skin tones looked natural.
Step #2: Exaggerate the Colors

By saturating the colors, we’ll be able to control each tone in the Black & White mixer to our liking. To separate and make the colors pop, I went to the Calibration panel.
Step #3: Convert & Lower the Exposure

Now we can convert to a black and white portrait. I also like to lower the exposure to allow the base adjustments to reveal the details, which is our next step.
Step #4: Revealing the Tones

I essentially lowered the highlights and lifted the details to bring in as much details as I can. The image will appear flat but we’ll be tackling that in the next step.
Step #5: Adjust the Tone Curve

Next, I added the contrast using the Tone Curve. I also “faded” the image a touch for that vintage black and white portrait look.
Step #6: Black & White Mixer

This is where step 2 comes into play. In the Black & White Mixer, we have control over each underlying color. I used this to boost the skin tones and add more depth to the image.
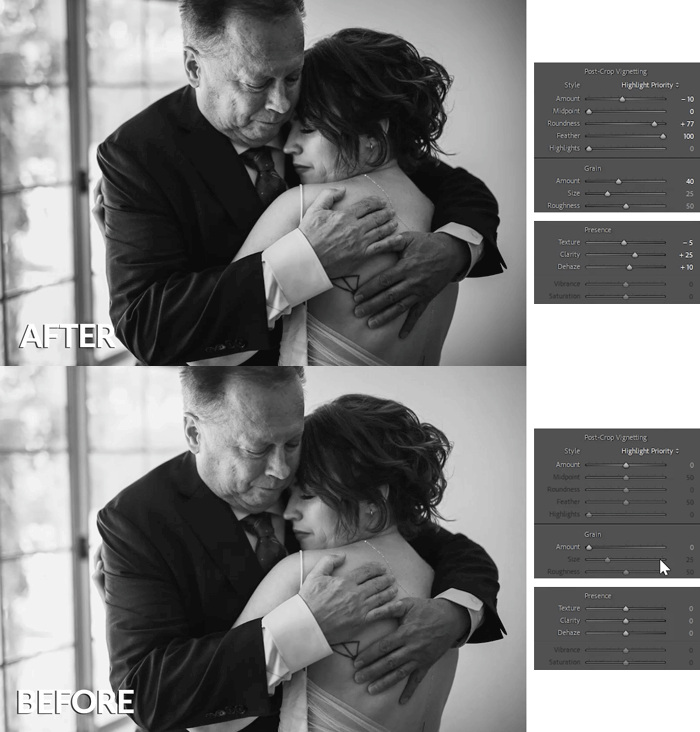
Step #7: Presence & Stylization

This is where I boost the details in the image. I added clarity, de-haze, and added a vignette as well as grain. You can save these settings as a preset to apply to other images.
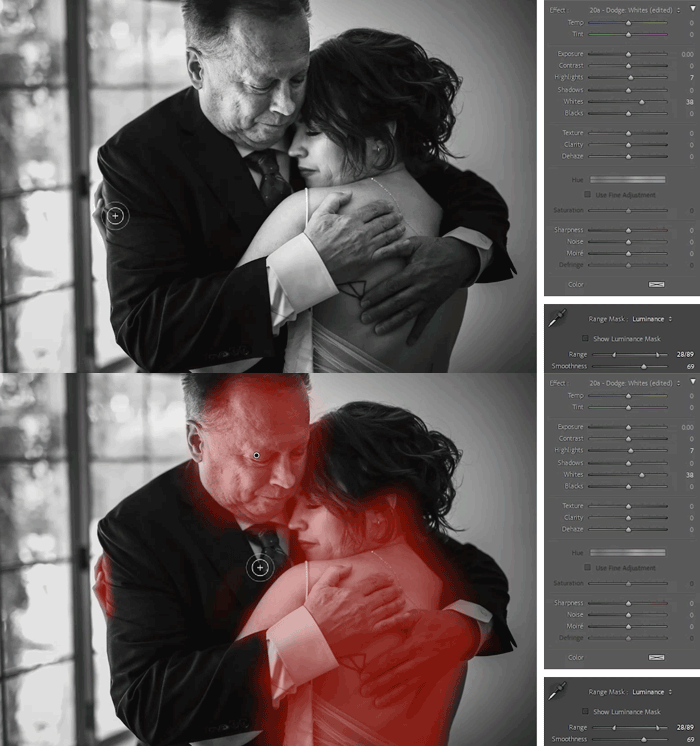
Step #8: Local Adjustments

This is where we add our final touches. I added a Radial Burn from Visual Flow’s Retouching Toolkit.

Lastly, I boosted the white tones using the Dodge Whites tool and painted it over my subjects.
Comparing the B&W Conversion Methods

Let’s compare our final black and white portrait with a simple and standard conversion. Notice the difference in retained details and depth in the tones.
Conclusion
I hope you enjoyed this article/video. The vast tools in Adobe Lightroom allows us to precisely edit our images in many different ways. By exercising control over our tones, we can edit with intent and portray the exact mood we want in our black and white portrait. For a full Lightroom tutorial, check out Mastering Lightroom in SLR Lounge Premium. In addition, for presets and a vast library of Lightroom editing tools, check out Visual Flow and the Retouching Toolkit.
Don’t miss our next episode of Mastering Your Craft on Adorama’s YouTube channel next week! If you want to catch up on all the episodes, make sure you check out our playlist!


Get Connected!