It’s that time of year again where we sing festive songs, celebrate with family, look for the best deals, and hang decorations. Christmas light photography perfectly captures the holiday spirit. The vibrant colors, twinkling lights, and creative displays seen in photographs add a certain enchantment to a scene that is not found any other time of year. This type of photography offers something special; it is emotive, nostalgic, and full of warmth and joy. Capturing these memories allows us to treasure them for years to come so we can remember the beauty of the season each and every December. In this article, we’ll expand on our previous Christmas Photography Ideas article to give you more specific tips and inspiration for your Christmas lights photography!
How to Photograph Christmas Lights – Video
Let’s start with this classic video by Jay P. Morgan from The Slanted Lens. There are a few basic guidelines to taking great Christmas lights photos. Jay P. breaks down the process in 5 easy-to-follow steps.
How to Photograph Christmas Lights – Tips
Below are a few of the tips from the video above combined with tips and ideas from our team at SLR Lounge.
Choose the Right Time of Day
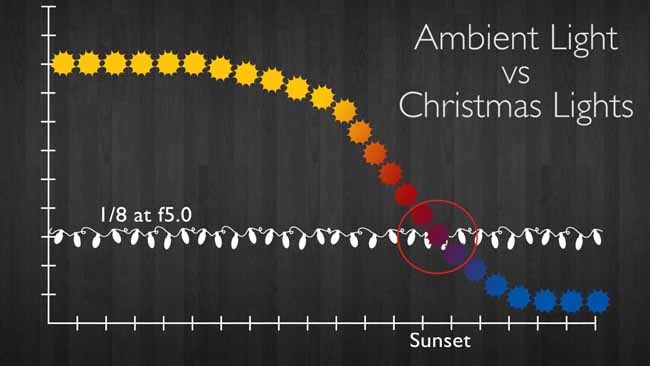
If you have ever tried to take pictures of Christmas lights, they can become almost stark against the black of night. The best time to be out shooting is around dusk or very early morning during blue hour where the there is little daylight. You will want just enough ambient light where the house still has detail and separation from the sky.

It is important to remember that you have a very limited timeframe of around 15 minutes to get the shot you desire; otherwise, the ambient light will be too bright or too dark. Experiment with the technique to find out what works for you.
Don’t Use Flash for Christmas Lights Photography

Though it may seem like a good idea to illuminate the scene with on/off camera flash, it might ruin your exposure. The Christmas lights have a constant exposure and combined with the surrounding ambient light, there will be plenty of light for a blurry free exposure.
If you do decide to use flash, just make sure it’s not spilling on to the Christmas lights. You can do this by putting a snoot or grid on your flash or by moving your subjects further away from the Christmas lights. see the example below.

Use the Right Camera Settings
Find the right exposure with your camera settings. ideally, you’re looking for an exposure that captures the Christmas lights but doesn’t present issues like blur or grain. Here are the settings Jay P. used for the image above.
- White Balance – Tungsten or Daylight
- Shoot Raw
- ISO – 620 or higher (stay close to your camera’s native ISO for a cleaner image)
- Aperture – f/5
- Shutter Speed – 1/8th of a second

You can try using the same settings, or you can decrease the aperture (if your camera allows it) in order to bring the shutter speed up. A higher shutter speed will be critical if you are not using a tripod.
Use a Tripod for Christmas Lights Photography
When photographing Christmas lights, a tripod can be a powerful tool for getting the perfect shot. It allows for longer shutter speeds to capture more light, which in turn gives the opportunity to use lower ISO settings, creating crisper images with less noise and grain. This can be particularly useful for night-time photography or festive settings looking for precise results. Tripods also offer stability when taking photos with longer focal lengths and in lower light settings, where even the smallest movement will result in blurriness. All of this makes it easy to produce stunning photography that captures the beauty of Christmas lights.

In the photo above, taken in pitch black darkness, the Christmas lights are still beautifully exposed with the help of a tripod.
Capture the Beautiful Bokeh
Capturing beautiful bokeh in Christmas lights photography requires a good eye and advanced techniques. For added interest, try keeping the camera at a low aperture setting so that your subject is sharp and the lights become an inviting blurry backdrop with shapes of snowflakes and stars. To get a better result, it’s best to use slower shutter speeds so that you can aim for brighter highlights in the background which create glowing orbs of light often associated with holiday seasons like Christmas. Additionally, experiment with different shutter speeds when you find yourself capturing brighter backgrounds to avoid overexposure.

In the photo above, notice how the Christmas lights on the building are blurry, since the focus is on a foreground object, the sign. The Bokeh creates a nice, soft effect.
Don’t Forget Your Compositional Theory
With Christmas lights photography, it might be easy to see the beauty of the lights and start firing away with your camera. But take a moment and analyze the scene. Look for opportunities for compositional techniques like leading lines, negative space, rule of thirds, perfect symmetry, balance and more!
In the photo below, notice how the lines lead right into the subject of the photo, the Christmas tree.

Conclusion
Christmas light photography is uniquely beautiful and captivating. This type of photography has a special ambience that is created when lights twinkle and glimmer in the dark night sky. Whether the photograph contains traditional stringed lights, neon colored flood lighting, or even unexpected Christmas light displays, capturing these moments is both an unforgettable experience for the photographer and a sight to behold for everyone who views their work. We hope these tips inspire your Christmas lights photography this holiday season!


Get Connected!