
In the whirlwind of emotions and events that define a wedding day, the magic often lies in the details. Wedding detail shots are not merely supplementary images; they encapsulate the style and personality of the couple’s special day. For wedding photographers, mastering the art of capturing these details is essential in telling the complete story of the wedding through their lens. In this article, you’ll learn the must-capture wedding detail shots, with tips and inspiration on each.
8 Must-Capture Wedding Detail Shots Video
Here’s a handy list of our 8 Must-Capture Wedding Detail Shots and some tips on how to take your wedding detail shots to the next level. For more video tutorials, see our Wedding Photography Workshop in SLR Lounge Premium.
Wedding Rings
The rings, symbolic of the couple’s union, provide a rich opportunity for creativity. Photographers are encouraged to find interesting places that add depth and narrative to the composition. Stacking one ring upon another or placing them on reflective surfaces can create captivating visual effects. Experimentation with different lighting setups can reveal unique looks, while incorporating a soft bokeh effect in the background can accentuate the rings’ sharpness. Including floral elements in these shots adds natural beauty and a splash of color, enriching the overall composition.

- Find Interesting Places to Place the Rings
- Stack One Ring Upon the Other
- Place Rings On Reflective Surfaces
- Try different Lighting Setups for Unique Looks
- Create Bokeh in the Background
- Include Flowers in the Background
Wedding Shoes
The shoes, often chosen with great care for the occasion, deserve their spotlight. Placing shoes on smooth, reflective surfaces can mirror their elegance, while finding interesting positions and angles for laying the shoes adds a dynamic element to the shots. Photographers should aim to capture the unique details of the shoes, showcasing the thought put into selecting every aspect of the wedding attire.
- Place Shoes on Smooth, Reflective Surfaces
- Find Interesting Positions to Lay the Shoes
- Try Unique Angles You Haven’t Seen Before
- Photograph the Details on the Shoes

Wedding Dress
The wedding dress, with its intricate details and flowing fabric, is a centerpiece of bridal photography. Hanging the dress on a tree or an architectural element can blend its elegance with the natural or designed environment. Utilizing mirrors can offer new perspectives, adding depth to the images. Close-ups of the dress’s details highlight the craftsmanship, while positioning it next to a window uses soft light to envelop the dress in a gentle glow, emphasizing its beauty.
- Hang the Dress on Various Objects like a Tree
- Use a Mirror to Provide a New Perspective
- Dangle the Dress on Arches or Ledges
- Get Close to the Dress Details
- Attach the Dress Next to a Window For Soft Light

Necklaces
Necklaces and other jewelry pieces are arranged with precision to showcase their elegance against varying backdrops, creating dramatic looks. Hanging or placing necklaces on different surfaces can highlight their design, while careful manipulation of light through the jewelry enhances its sparkle and allure. These shots not only capture the physical beauty of the jewelry but also the sentimental value they hold.
- Arrange the Necklaces into a Neat Order
- Change the Background to Create Dramatic Looks
- Hang or Place Necklaces on Various Surfaces
- Reflect Light Through What’s Holding The Necklace

Grooms Watch
The groom’s watch, a symbol of timeless commitment, is captured with a focus on its elegance and the craftsmanship behind its design. Photographs of the groom posing as if putting on the watch or laying the watch on top of or next to his tie add a personal touch to the story, illustrating the groom’s preparation for the momentous day. As one of the few wedding detail shots for the groom, these are important to capture.
- Make the Watch the Focus
- Position the Groom’s Arm to Hold His jacket
- Get Close Ups of the Inner Works of the Watch
- Pose The Groom as if Putting on the Watch
- Lay the Watch on Top of or Next to a Tie

Wedding Earrings
Earrings, with their delicate design and significance, are photographed to emphasize their beauty and the bride’s interaction with them. Finding compelling places to hang the earrings or placing them on interesting surfaces can highlight their intricate designs, adding a layer of elegance to the bridal ensemble. You can photograph these wedding detail shots by themselves or with all of the other jewelry from the big day.
- Have the Bride Highlight the Earrings
- Place them on Interesting Surfaces to Highlight
- Find Compelling Places to Hang the Earrings

Brides Bouquet and Groom’s Boutonniere
The bouquet, a vibrant expression of the wedding’s color scheme and floral choices can be photographed by itself or photographed being held by the bride. In addition, including bridesmaid bouquets next to the bride’s adds a sense of unity and collective beauty.
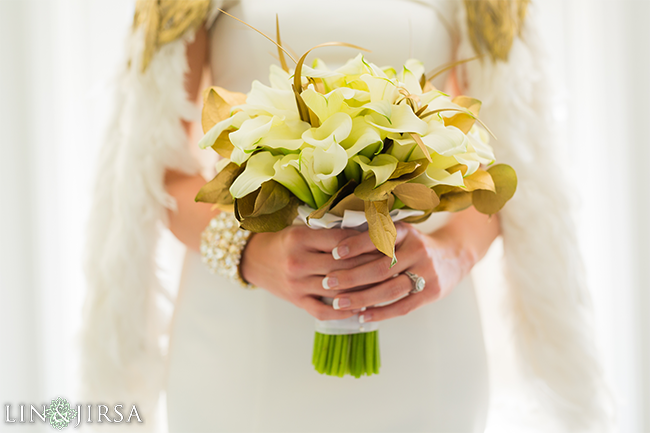
- Have Bride Hold the Bouquet at Waist Height
- Include Bridesmaid Bouquets Next to the Bride’s Bouquet
- Place Bouquet on a Reflective Table
Bracelet
Bracelets are photographed on the bride or stacked creatively to showcase their design and the personal style of the bride. Spreading them apart or arranging them in a neat order offers a glimpse into the detailed planning that goes into selecting every piece of the wedding attire.
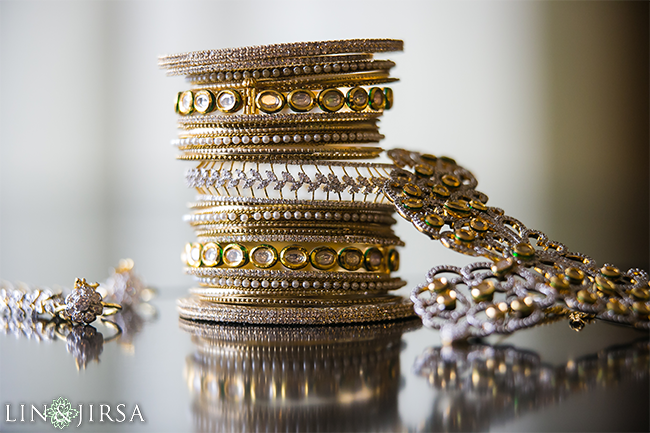
- Photograph the Bracelets on the Bride
- Stack Them on Top of Each Other
- Place A Row of Bracelets on Top of Each Other
- Spread Them Apart in any Fashion
Ceremony Wedding Detail Shots – Arbor and Other Decor
The space where vows are exchanged is often adorned with significant details. These elements hold immense emotional value and merit careful documentation. Be comprehensive in these wedding detail shots, capturing every item no matter how big or small.
 To learn more about photographing the ceremony details, see this article.
Reception Table Settings and Decor

The couple’s painstaking effort to curate the reception’s ambiance deserves recognition. Capture the elegance and thematic consistency of the venue’s decor to reflect the mood of the celebration in your wedding detail shots of the reception.

Remember to capture the wide photos, medium crop photos and tight wedding detail shots. This approach tells a complete story and ensures that you don’t miss any items from the reception. See the following article to learn more about photographing wedding reception details.
Wedding Invitations
Wedding invitations and stationery are a glimpse into the wedding’s theme, style, and color palette, offering guests a preview of the day’s ambiance. For wedding photographers, capturing these wedding detail shots are about more than just photographing objects; it’s about immortalizing the story and personality of the couple, woven into the fabric of their wedding day.

The art of photographing invitations and stationery requires a nuanced approach, blending creativity with storytelling. Photographers are tasked with capturing these elements in a way that reflects the wedding’s mood and aesthetic. This might involve selecting backgrounds that complement the color scheme, using natural light to highlight the textures of the paper, or incorporating floral arrangements and other decor items that will be featured throughout the wedding day. Each photo should contribute to the narrative, offering a cohesive glimpse into the day’s carefully curated details.
Conclusion
Wedding detail shots are a vital component of wedding photography, capturing the essence of the day in its most intricate forms. As photographers, focusing on these details not only enriches the narrative of the wedding album but also honors the thought and care the couple has invested in their special day. Continuously seeking innovative ways to document these moments will not only enhance your portfolio but also provide your clients with a treasure trove of memories to cherish forever.


Get Connected!