Photo Editing
Photo Editing tutorials, tips and news. In this section, we review the following:
- Lightroom
- Photoshop
- Skylum Luminar
- Capture One
- Photoworks
- Impossible Things
- Retouch4me
- Adobe Photoshop Elements
- Affinity Photo
- HDR Soft
- PortraitPro
- DxO Nik Collection 2.5
- DxO PhotoLab
- ON1 Photo RAW
- Corel PaintShop Pro
- ACDSee Photo Studio Ultimate
- Canva
- PhaseOne Capture One Pro 2020
- Exposure Software Exposure X5

How to Manage Develop Presets in Lightroom 4
In this tutorial, we will demonstrate how to create a new preset in Lightroom 4. In addition, we will go over how to manage develop presets as well as how to bring presets into Lightroom.
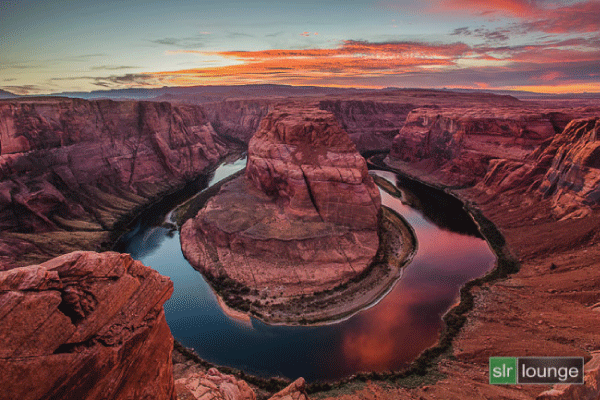
Horseshoe Bend: How It Was Shot – From the HDR Photography Workshop Series
We stopped in Page, Arizona to get some shots of Horseshoe Bend. In this article, we will discuss how we got this shot that will be eventually processed as an HDR image. In addition, we will go over the scene considerations of this shot.

How to Use the Previous and Reset Buttons in Lightroom 4
In this article, we will discuss how to use the Previous and Reset Buttons in Lightroom 4. The Reset Button will reset all settings made to an image while the Previous Button will sync settings from a previously selected image to the next image selected. The Previous Button is great when editing images shot at the same scene.

2 Reasons Why You Need to Clean Your Camera Lenses and Sensors for HDR Photography – From the HDR Photography Workshop Series
In this article, we will discuss the importance of cleaning your camera lenses and sensors when shooting HDR photography. Although it is important to have clean lenses and sensors whenever you are shooting, its is especially important in HDR photography since we need to stack multiple images to create the final HDR image.

How to Create a Typical Film Grain Effect with the Effects Panel in Lightroom 4
In this tutorial, we will demonstrate how to create a typical film grain effect for our images with the Effects Panel in Lightroom 4. In addition, we will go over the 3 different Post-Crop Vignetting styles found in the Effects Panel.

How to Correct Distortion and Lens Vignette with the Lens Corrections Panel in Lightroom 4
Lens vignetting naturally occurs when shooting photography. In this article, we demonstrate how to use the Lens Corrections Panel in Lightroom 4 to correct the distortion and lens vignette of your images.

How to Reduce Noise in an Image Shot at a High ISO with the Detail Panel
When shooting at a high ISO, we are bound to get a significant amount of grain in our images. High amount of grain decreases the image quality and the image will not look good when printed out. In this article, we will use the Noise Reduction settings in the Detail Panel to turn a grainy image into a quality image that can be printed.

How to Create Split-Toned Images with the Split Toning Panel in Lightroom 4
In this video from our Lightroom 4 A to Z Workshop on DVD, we will explain what Split Toning is and how to use the Split Toning Panel in Lightroom 4 to create split-toned images. In addition, we will show you how to create the common Split Toning effect, known as Sepia, to our images. Using the Split Toning Panel gives us a lot of creative options because the additional color to the highlights and shadows can create different effects to our images. Split Toning will also add tones to the highlights and shadows in black and white images.

5 Different Syncing Methods to Cut Down Workflow in Lightroom 4
When you are editing a group of photos from the same scene, it is a good idea to sync develop settings from one image to the rest of the images in the group. By doing so, this will cut down your workflow significantly. In this tutorial, we will go over 5 different syncing methods that can save you a lot of time in post production. We will also discuss when to use each syncing method in certain situations.

How to Create a Standard Black and White Preset to Create a “Soft Portrait” Look in Lightroom 4
In a previous tutorial, we created a Standard Color Preset to create a “soft portrait” look for our portraits. This preset made the portrait more flattering overall because it softened up the highlights in our portraits and also reduced the appearances of blemishes on the skin. We highly recommend that you go through the Standard Color Preset tutorial before going on to this tutorial because we will be applying almost the same exact settings from the Standard Color Preset to the Standard Black and White Preset. In this tutorial, we will demonstrate how to create and save the Standard Black and White Preset in Lightroom 4.This preset will give our portraits that “soft portrait” look again, but our portraits will be in black and white instead of color.

Create a Soft Portrait Lightroom Preset
In this tutorial, we are going to create a Standard Color Preset for portrait images, which is referred to as a “soft portrait” look. This Standard Color Preset will soften up the highlights, reduce the appearances of blemishes and imperfections of the skin and overall, make a portrait more flattering. In portraits, our subjects are the primary focus of the image. However, even if the subjects’ faces are not zoomed in on, the image can still be considered a portrait. In this tutorial, we will also use the Standard Import Preset that we created in a previous tutorial. It is a good idea to read about the Standard Import Preset before creating the Standard Color Preset because you will have a better understanding of this tutorial. These settings are the specific settings we apply to portraits at Lin & Jirsa Photography, so if you do not like a certain setting, feel free to tweak it to fit your personal style. However, hopefully some of these tips will help you create your own unique style for your portraits.

How to Fix Red Eye with the Red Eye Correction Tool in Lightroom 4
In this video from our Lightroom 4 A to Z Workshop on DVD, we will explain what causes “red eye” in your subjects’ eyes and how we can fix this problem with the Red Eye Correction Tool in Lightroom 4. Although it is important to know how to use this tool, you will rarely use it if you are shooting with DSLR cameras and off camera lighting. Instead, “red eye” normally occurs with point-and-shoot cameras. We will discuss why that is in this article as well.