
If you’re looking for something exciting to do this weekend, (or if you’re free next Tuesday night / Wednesday morning) then you should check out this year’s Perseid Meteor Shower! One of the strongest, most impressive meteor showers every year, the Perseids always deliver at least a handful of truly stunning, giant meteors streaking across the sky.
This year, there will be a nearly 50% moon on the peak night(s) of the Perseids, so the more faint meteors will not be visible. However, it’s still a perfect opportunity to get out and do some nightscape photography! With a little bit of moonlight, you can capture some gorgeous astro-landscape images, and don’t worry, the big, bright, “fireball” meteors that the Perseids are known for will definitely show up in your photos, and be visible to the naked eye!

The Perseids tend to peak late at night (early AM) on August 11th and 12th. In a night sky without any light pollution, you might see as many as 100 “shooting stars” per hour, with dramatic “fireballs” here and there. On a night with a bit of moonlight, you might not see a meteor every single minute, but you’ll still see plenty of impressive ones if you simply stargaze for a couple hours.
Five Tips For The Best Meteor Shower Photos
How do you capture amazing photos of a meteor shower? In this article, we’ll cover the five simple steps that will virtually guarantee you get some beautiful meteor shower photos!
[Related: Become a master of Milky Way photography with the complete SLR Lounge workshop!]
Perseid Meteor Shower 2020 | Step 1: Plan Ahead

Before you worry about cameras, lenses, exposure settings, or anything else, the best thing you can do is very simple: PLAN AHEAD! Start by checking the weather, and make sure it’s going to be clear, of course. Instead of checking just one forecast, though, try checking multiple forecasts with an app such as MeteoBlue.
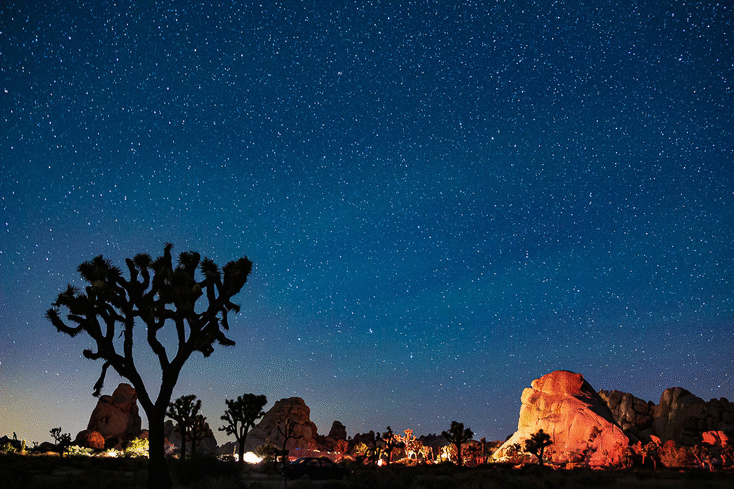
Next, plan to find a spot where there are truly dark skies, free of light pollution. This includes getting out of the city, of course, which you can figure out using a website like Dark Site Finder. However, there’s another thing to consider: even if you get away from city lights, you could still wind up somewhere that other people have campfires, flashlights, or car headlights going back and forth all night long. (See above for what a meteor shower looks like all night in Joshua Tree National Park! It’s a busy place, even at 3 AM…)
Last but not least, try to plan to go out on a night with no moonlight, or just a waxing/waning crescent moon. Moonlight can be beautiful for illuminating a nightscape, but unfortunately, its brightness will also make it very difficult to see all but the brightest meteors. Of course, most meteor showers peak on just 2-3 nights, and sometimes this means your entire “optimal viewing time” is ruined by a full moon.
Bonus Tip: Best Meteor Showers Of 2020
Speaking of moonlight, by the way: since there is going to be nearly 50% moonlight during this year’s Perseids, don’t despair! If you go out this weekend, or next Monday or Tuesday night, and you don’t see many meteors, you might want to plan to try again in October, November or December, when the Orionids peak, (October 20-21) or the Leonids peak, (November 16-17) …or the Geminids peak. (December 13-14) Good news, everyone!: ALL of these meteor showers peak at a time when there is a new or almost new moon!

Perseid Meteor Shower 2020 | Step 2: Charge Your Batteries & Grab Your Tripod(s)!
Again, before we talk about cameras, lenses, or exposure settings, there’s another very important matter of preparation: Having fully-charged batteries, and rock-steady tripod(s).
Yes, that’s right, if you have more than one camera, even if it is your old beginner DSLR with a beginner kit lens, bring it! And, grab a second or third tripod. (We’ll talk more about why multiple cameras are a good idea next.)
Regarding tripods- a big, heavy one is always better than a cheap-o, lightweight “travel” tripod, especially for nightscape photography. Those wobbly, short tripods with 5-section legs and a three-section center column will be almost worthless if there is even a light breeze. So, ditch the idea of a no-name knock-off tripod, even if it’s fancy carbon fiber, and get yourself a “beast” like the Slik 700DX ($99), with a heavy-duty head like the Oben BE-126 ($109).
Your best chance of capturing a beautiful meteor photo is not having the best camera or lens, or perfectly clear skies even. It’s having a fully-charged battery that can allow your camera to shoot hundreds of photos all night long!
In fact, if you can, try to use an external power source, such as a USB power bank for your mirrorless camera (if it has direct USB power capability, as all Sony cameras do), or a “dummy battery” system like the Tether Tools Case Relay for your DSLR.
This might sound like the nightscape photographer’s equivalent to the “spray and pray” method, which many photographers scoff at. However, when it comes to capturing the split-second phenomenon that is a meteor fireball, it’s the name of the game. So, charge up your batteries!

Bonus Tip: Grab a Remote Shutter Release!
As one final matter of preparation, grab a camera remote shutter release, if you have one, so that you can not only capture photos without shaking your camera, but also so that you can “smash the shutter button” all night long, and allow the camera to capture back-to-back images until your battery dies. This is the secret weapon that will ensure you capture a meteor! (NOTE: Most Nikon cameras only allow your shutter to fire 99 times consecutively, so you’ll want to use the built-in interval timer instead.)
Perseid Meteor Shower 2020 | Step 3: What Is The Best Lens? Two lenses!
Of course, the most exciting question that people always ask is, “what is the best lens is for meteor shower photography?” This is a great question because photographers like to know which focal length is best, or what fast aperture they might need, for such a unique and fleeting subject.
However, in my 10+ years of experience photographing meteors, here’s what I’ve found: Instead of the one best lens, I’d rather have two half-decent lenses, on two cameras & tripods, running at the same time! Why? Because I’ve lost count of how many times I decided to point my camera in what I thought was the best direction, only to see the biggest, brightest meteor streak through the sky just OUTSIDE my image frame. Even with an ultra-wide lens, it never fails…
So, I started setting up two or even three cameras and pointing them in different directions. Right away, the number of photos that captured meteors almost doubled or tripled!
The truth is, you can photograph a meteor shower with ANY lens, as long as it has a relatively fast aperture. Hopefully, you already have at least one lens with an f/2.8 or faster aperture. That’s great! But, even if your other lens is an f/3.5-5.6 “kit” zoom or an f/4 zoom, you should still bring it, borrow a 2nd camera if you have to, and set it up! An f/4 lens might not capture the very faint meteors, but it’s more than enough to catch the incredibly bright fireballs, and with a ~50% moon lighting up the nightscape, you’ll be able to get the right exposure, too. (More on meteor shower exposure settings next!)
Below are photos made using an 8mm circular fisheye lens, which captures literally the ENTIRE night sky in a single frame, …and an 85mm telephoto lens, which captures just a tiny fraction of the night sky. Of course, if you’re interested, here’s a shortlist of some of the best lenses :
- Sony 12-24mm f/2.8 GM ($2,999)
- Any 14-24mm f/2.8 or similar ultra-wide zoom
Sigma 14-24mm f/2.8 DN/DG Art ($1,200-1,400)
Canon RF 15-35mm f/2.8 L ($2,200)
Nikon Z 14-24mm f/2.8 (arriving later in 2020???)
Tamron 17-28mm f/2.8 ($899) - Sigma 14mm f/1.8 DG Art ($1,599)
- Any 24mm or ~20mm prime lens
Sony 24mm f/1.4 GM ($1,398)
Nikon Z 20mm f/1.8 S ($1,046)
Sony 20mm f/1.8 G ($898)
Nikon Z 24mm f/1.8 S ($996)
Tamron 20mm f/2.8 ($299)
Rokinon/Samyang 18mm f/2.8 ($329) - Any ~14mm prime lens
Rokinon/Samyang 14mm f/2.8 ($279-599)
Rokinon/Samyang 14mm f/2.4 ($749)
Irix 15mm f/2.4 ($475-595)
Venus Laowa 15mm f/2 ($849)
Venus Laowa 12mm f/2.8 ($949) - Wide-Angle Lenses for APS-C:
Tokina 11-20mm f/2.8 ($499-529)
Tokina 14-20mm f/2 ($369-499)
Rokinon 12mm f/2 ($279-329)
Rokinon 10mm f/2.8 ($349-379)
Sigma 18-35mm f/1.8 ($679)
…Whatever lens you have, just remember this very important thing: the trick is not so much where you point your lens to get the most meteors. It’s about patience and endurance. In other words, point your camera in any direction, as long as you have a creative composition, plug in that remote shutter release, …and then just wait to see if a meteor appears in your frame!
Of course, it does pay off to point your main camera in the general direction of the meteor shower’s “radiant” point, which you can easily find because each meteor shower is named after the constellation from which its meteors appear to originate from. (Finding constellations is as easy as downloading the Stellarium app or SkyView app…)


Perseid Meteor Shower 2020 | Step 4. Dial In Your Camera Settings & Focus
Okay, now the exciting part, exposure settings! First, start with a fast aperture, such as f/2.8 or brighter. (F/2, f/1.8, f/1.4, f/1.2…)
Then, a high ISO, such as 3200 to 6400, depending on what level of image noise you are willing to put up with. Personally, I push my full-frame cameras to ISO 6400 or 12800 even!
Last but not least you’ll want a long shutter speed, such as 8, 15, or even 30 seconds. This last setting will vary depending on your lens, the moonlight, and if there is any light pollution nearby. But, whatever shutter speed you choose doesn’t affect your chances of catching a meteor, because remember, you’re going to just smash that shutter all night long!
By the way, if you don’t have a remote shutter release, don’t worry! Many cameras have a built-in interval timer now. For example, if your shutter speed is 30 seconds, just set the interval to 33-34 seconds and you’re good to go! Or, as a last resort, wad up a little ball of gaffers tape, stick it on top of your camera shutter release button, then tape that down tight with another piece of tape, and let it rock n’ roll!
What is the most important thing about your exposure? It’s NOT about having that exotic, ultra-sharp f/1.4 lens instead of a more budget-friendly f/1.8 lens. Seriously! The most important thing is simply getting your exposure right, which should be no problem with a little bit of moonlight.
So, the most important thing you can do is to check your histogram to make sure your exposure is in fact towards the RIGHT; do not just look at your image on the LCD and assume that it’s good enough; in the darkness of nightscape photography, your eyes will fool you every time!
[Want to learn more about perfect exposures for your nightscapes? Check out this article!]
The final challenge is, of course, to set focus for a good sharp image of the night sky. Many lenses these days do not have an “infinity” mark anymore, or if they do have it on a digital scale on the camera LCD, it isn’t accurate!
The best thing you can do for sharp photos of the night sky is, to point your camera at the brightest star or planet in the sky, and focus on it using magnified live view. Just make sure that your lens is switched to manual focus, so that nothing gets messed up when you start hitting the shutter.
Bonus Tip: Turn Off In-Body And/Or Lens Stabilization!
Speaking of sharp images, of course, you’ll want to turn off any stabilization features your camera or lens has. This is one thing that many people forget, and then their nightscape images turn out half blurry and half sharp, because sometimes the stabilization held still, but other times it moved. Save yourself the headache, and trust your big sturdy tripod; just turn stabilization off.
Perseid Meteor Shower 2020 | Step 5. Sit Back And Let Your Cameras Run!

[Related Reading: How To See Comet NEOWISE! | A Step-By-Step Astronomy Guide]
Indeed, this is what we’ve been preparing for. The best way to capture meteors is to just frame a shot, and let the camera shoot as much as possible. Sometimes you’ll get lucky and that single composition will capture a dozen meteors or more over the course of 2-3 hours, and other times, you might be lucky if you get just one big fireball.
Whether you have one camera, or two or three, get them all set up and get them started clicking. Then, just sit back and relax, and watch the night sky! The best part of photographing a meteor shower is, of course, actually watching the meteors themselves with your own eyes…

Take care, and good luck! If you have any additional questions or tips of your own, please comment below. We’d love to see your photos of whatever you capture!
[Related Reading: Adobe – How To Add Color to s Starry Scene]


Get Connected!