
Welcome to part three of our official Wedding Photography Guide, a series of weekly articles designed to teach you the fundamentals of wedding photography. In our previous article, we covered how to photograph groom prep, which includes everything from getting to know the groom and his VIPs to directing and photographing individual and group portraits. This week, we present our Bride and Bridal Party Guide, an overview of how to best capture the bride and her party on the wedding day.
All of the education from the guides as well as our workshops is derived from our experience at Lin and Jirsa Photography, a Los Angeles Wedding Photography Studio with over 10 years of experience and over 2,000 weddings. For comprehensive wedding photography education, be sure to check out our full workshops in our store.
Introduction | Why We Are Here
There are many similarities between bride and groom prep in terms of how to prepare for the sessions, but each session incorporates distinctly different goals. For example, photographers generally want to make grooms look masculine and chiseled, while the focus on brides typically leans more towards capturing curves and femininity. Each of these goals is achieved using unique approaches to posing and lighting, and the differences don’t stop there.
In this article, we share 8 tips that will help you recognize and accomplish goals for photographing the bride on her wedding day.
1. Plan Ahead For The Details

A bride’s details often include several accessories like bracelets, earrings, and necklaces, in addition to the dress, shoes, and rings. Request that the bride gather all of her details into one convenient location ahead of time.

Communicate with the bride to see if she would prefer to showcase the details by themselves or on her person. More often than not, the bride will want an image of the dress by itself, but that’s not always the case with the smaller details. If the bride opts to have the details photographed while she’s wearing them, then you won’t have to waste time setting up product-style shots of the details that she really won’t care about.
2. Re-enact Makeup Shots For A Flattering, Finished Look
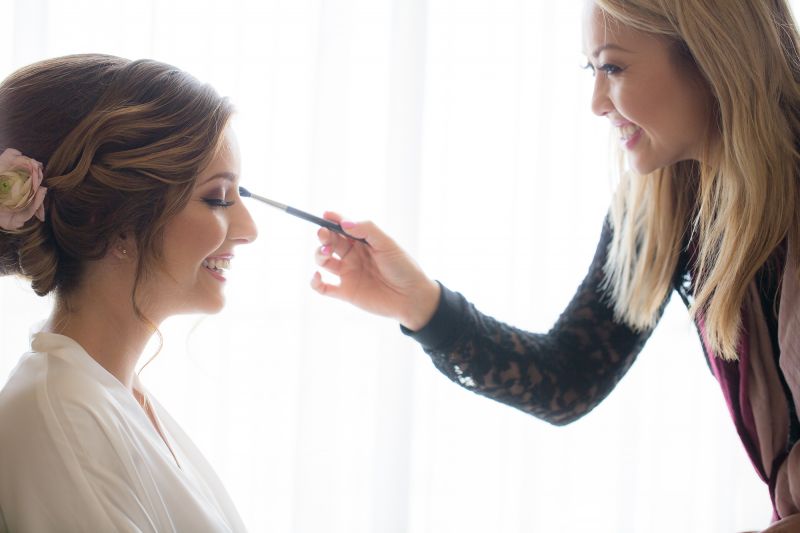
The best wedding images usually look like they were captured candidly, regardless of whether or not they actually were. Makeup shots are no exception. Surprisingly, they tend to require more direction than one might expect and are rarely photographed photojournalistically.
In reality, they are often shot after the makeup has been fully applied. Some photographers refer to these reenacted shots as “fakeup” photos since the makeup artist is only pretending to apply makeup.

Another common misconception regarding makeup shots is that these images need to be photographed wherever the makeup artist has set up his/her station. Occasionally, because they are using their own lights, makeup artists will choose a spot that is less than ideal for photographs. When this occurs, we recommend asking the makeup artist for permission to move to a location with better light, preferably with a soft, flattering light source like a large window with sheer curtains.

This is a great opportunity to show off your creative abilities and incorporate off-camera flash lighting techniques into the prep portraits. These simple backlit hairspray photos are sure to wow your clients and vendors and take a couple of minutes to set up.
3. look for clean light & Direct the action
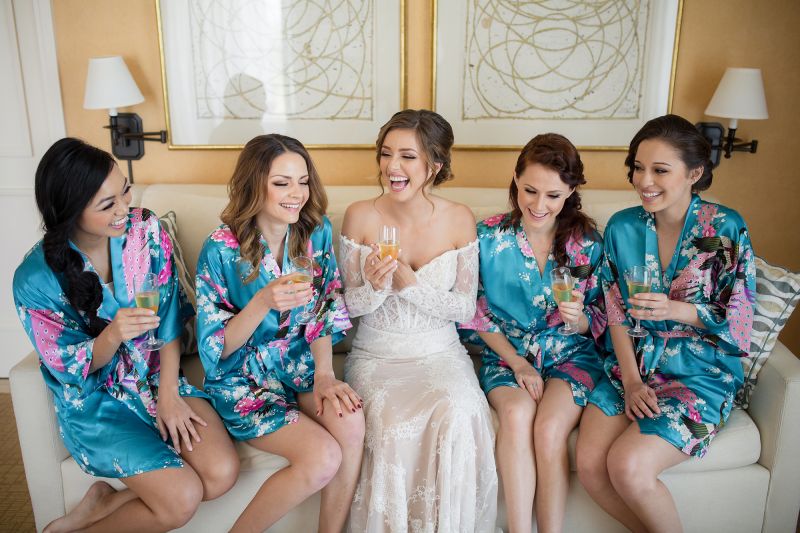
After the bride and her bridesmaids have finished having their makeup applied, don’t be afraid to initiate activities or direct the action taking place. Some common activities include the bridal party exchanging gifts or toasting with champagne, or the bride writing her vows, etc. Your job as a photographer goes past just taking pictures and delves into interacting with the clients and your subjects to get the results they want.
When setting up these shots, choose a clean background and ask the bridal party to gather close enough together to capture them in a single, well-composed frame. This is not to say that they all need to be included in each image, but the action will appear more interesting if the bridal party fills more of the frame as you work your way around the group, capturing their reactions. We want to be careful not to overstep our bounds and ruin a naturally fun moment by posing the subjects too much. 


4. Tell The “Getting Ready” Story With Wide, Medium, And Tight Angles

Basic visual storytelling is built on three basic angles: Wide, medium and tight. The wide angle, or environmental portrait, shows off the entire scene, what they are doing, and where they are doing it.

Then, we step in closer to get reactions and expressions making sure everyone’s faces are visible because the bride has chosen these specific people to be a part of her special day. Incorporate them into the photographs with direction and have them involved to show action instead of posing them side by side.

The last part of the storytelling process is to capture the closer details of the action: Zipping up the dress, placing the jewelry and the shoes on the bride, etc. The three compositions are imperative for effective storytelling.
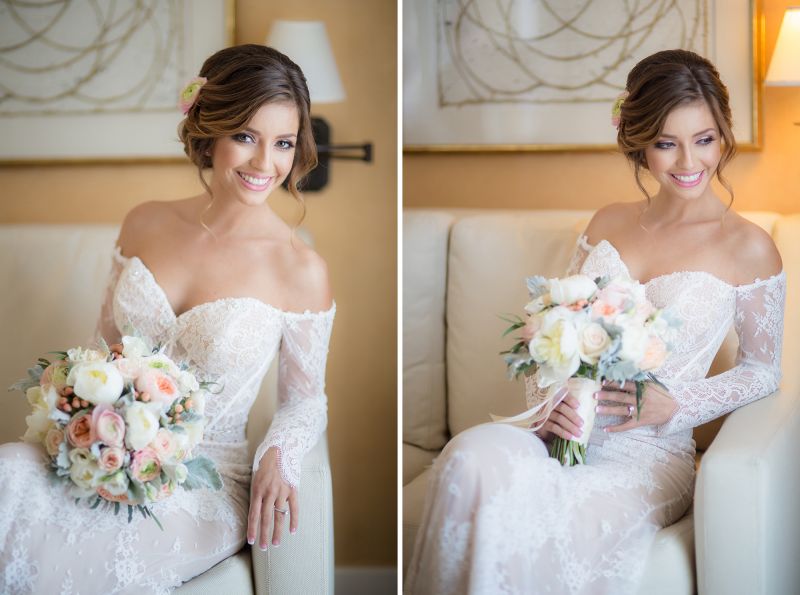
5. Use Posing & Lighting To Highlight Femininity In Bridal Portraits
The subject of flattering female posing is vast and includes several nuances in poses and the art of direction. We’ve dedicated a large portion of our Photographing the Bride workshop to guide you in creating a flattering, feminine, pose with beautiful, soft lighting.

Must-have bridal portraits can include details, usually of the bride’s face, dress, or flowers, as well as full length (front & back) portraits, and images of the bride getting ready (on her own). To capture more images in less time, use the same lighting and location for both formal and bridal prep portraits.

[REWIND: How To Pose A Sitting Bride Or Any Seated Subject]
Using soft light to illuminate the bride also plays a huge role in accomplishing our goal of capturing the bride’s femininity. Soft light is light that has been diffused through a light modifier (such as a soft box or sheer curtain), either on or off camera, and it generally produces fewer (or softer, less contrasty) shadows. For more information on off-camera light modification, check out our fifteen favorite off-camera flash light modifiers in this article!

Note: The focal length you use to capture bridal portraits can make a drastic difference in terms of compression and lens distortion. You can read more about our three favorite lenses for bridal portraits here.
6. Focus On Connections In Bridal Party Shots

Most bridal party images feature classic, symmetrical posing, which is quick, relatively simple, effective for safely capturing group portraits, and works well with both small groups of six or fewer and large groups of 20 or more.
When placing the bride and bridesmaids into position for a group portrait, place the VIPs closer to the bride (Maid of Honor, family members, etc.) and watch for contact points between the bridal party. Make sure that the bridal party is connected, but they should not overlap one another by more than 20% unless instructed to do so for a particular pose (such as a group hug).

Once the bridal party is in position, mix up the poses and expressions by making micro-adjustments. This is as simple to do as asking the bridal party to look at the camera, look at the bride and lean into her, or just start laughing out loud (a literal lol), which usually results in genuine laughter.
[REWIND: 12 Bridesmaid Posing Cues From 12 Extraordinary Wedding Photographers]

The alternative to symmetrical posing rests in editorial posing. The greatest challenge for editorial posing is getting balance in a shot. which can take anywhere from a 5-10 minutes depending on how large the group is. Not all bridal parties are interested in editorial images, however, so it’s important to communicate with the bride before the wedding to find out if she is interested in this style.
7. show personality In Bride And Bridesmaids Individual Shots

After photographing bridal party group portraits, capture individual images of the bride with each one of her bridesmaids. Try to balance formal and fun poses, getting at least one standard pose and one funny pose. For the standard pose, place the subjects shoulder-to-shoulder and watch for flattering expressions. For the funny pose, you can ask the bride and bridesmaid if they share any inside jokes that they can use for inspiration.
8. Don’t Forget To Capture Family Portraits During Prep

You will undoubtedly photograph the bride with family during family formal portraits later in the day, but it’s worth the time to include her parents in some way on one of the biggest days of her life.
Conclusion
Whether we’re discussing how to photograph brides, grooms, or other elements that fall under the umbrella of wedding photography, one thread runs consistently through each of the wedding guide articles: Careful planning and great communication from the start will make the experience a better one for all involved, and it’s the experience and the way you make your clients feel that they’ll remember most.
Join PremiumPhotographing the Bride is a comprehensive course in our Wedding Workshop series that covers everything you need to know about how to create incredible wedding-day imagery; from posing the bride and her bridal party, learning how to light scenes with highly portable lighting setups, and so much more! Check out this course in the SLR Lounge Store or stream it as an SLR Lounge Premium Subscriber.


Get Connected!