In this digital age we live in, maintaining a solid online presence is absolutely crucial, especially for professionals and businesses of any kind. Professional or aspiring photographers, whether they do art photography, commercial gigs, weddings, portraits, or fashion, need a means for showcasing their best work. And a photography portfolio website is the best means there is.
A photography portfolio serves multiple purposes. Among other things, it:
- Establishes your brand
- Promotes your presence and visibility
- Helps you get new customers
- Helps you grow your network
- Reinforces your creative identity
Today, we’re going to show you how to create your own photography website using WordPress. We will be covering:
1. Getting Started
Making websites and putting them out there for everyone to see probably seems like an impossible endeavor for photographers and creatives who aren’t exactly fluent in coding, web design and UX. This is one of the reasons why so many of them don’t have their own websites yet, and it’s a shame, since creating a portfolio website doesn’t actually have to involve any special tech skills.
You essentially have two options: hire a developer and a designer to make you a website, or use a user-friendly, robust and flexible CMS, like WordPress, combined with a ready-made theme or template.
The second option is, by most accounts, the best solution both for beginners and for well-established photography professionals and artists. It’s not only a matter of budget, although it is definitely a much, much cheaper option. It’s a matter of usability, scalability and flexibility.
Using WordPress and one of the many premium quality photography themes, you can set up a stunning presentation that you can control, build upon, customize and basically shape any way you like – all by yourself. This level of autonomy should be enough of an argument in favor of WordPress. And to prove this point, today we’re going to show you how to create your own photography portfolio website using the gorgeous Esben WordPress theme.
2. About Esben
Esben is a photography portfolio theme for WordPress that comes with 13 different homepages, each designed to put photography in the first plan. From fullscreen sliders to various galleries and interactive layouts, Esben allows the user to showcase the work in a striking manner that leaves a lasting impression. With Esben, the photographs are allowed to shine in uncluttered layouts that flatter them instead of stealing the spotlight. The design of the theme is modern, airy, somewhat ethereal, and decisively clean. It is ideal for fashion photography, but also for portraits, landscapes, and even for abstract pieces.
 In addition to galleries and sliders, Esben comes with an impressive set of features allowing the user to easily display various types of content. The theme developers have made sure to include shortcodes that can be placed anywhere on Esben’s pages, displaying text, video, testimonials, counters, clients, and so on.

 For photographers who have physical or digital copies of their work to sell, Esben also allows you to run a full-featured shop, powered by WooCommerce.
 Finally, Esben also includes proofing galleries, both password-protected and unlocked, for users who want to allow their clients to review, select and download the photos from their project.
 In addition to being a gem of web design and an amazing vehicle for displaying quality photography work, Esben is also a theme that is very easy to use. The backend is neatly organized and very intuitive, allowing everyone, from newbies to seasoned WordPress users, to shape the theme into a stunning, fully functional portfolio website.
In this article, we’ll highlight some of the more useful features of the Esben theme and show you how to use them to create your own online photography portfolio.
3. Installing WordPress and the Theme
Before actually building your website, uploading your photos and taking care of everything else regarding the content, you have to install WordPress first.
This is a good moment to point out that a lot of people get confused about the difference between WordPress.org and WordPress.com. If you’re going to use the Esben theme for your portfolio website, you will need to use the .org kind. The WordPress.com has its own themes but they are quite limited, and premium themes require the kind of robustness and flexibility that only WordPress.org can offer.
Before you install the CMS on your server you will need, well, a server (which means you will need hosting) and a domain name for your website.
Once you have taken care of that, you can proceed to download and install WordPress. This shouldn’t take up much of your time. In case you need some guidance, check out this tutorial on how to install WordPress and your theme, as well as how to import its demo content. The tutorial is made for the Bridge WordPress theme but the steps are essentially the same.
Our recommendation is that, once you have installed WordPres and the Esben theme, you should also import all the demo content. You can use it as a base and a point of reference for creating your own pages and adding your own content, and you can always easily delete everything that you don’t need.
4. Adding Your Photos
Esben comes with full portfolio functionality, allowing users not only to post their photos but to arrange them in Portfolio Items – these can include a single photo, or a series of contextually or otherwise related photos.
Of course, you will want to showcase your work by creating lists, galleries or sliders. Esben offers several portfolio layout options – you can choose from Standard, Gallery, Pinterest and Masonry. Each of them includes options for setting the number of columns.
Below is an example of what your portfolio will look like if you opt for the gallery with four columns.
 And this is the standard wide portfolio with three columns:
Clicking on any of the photos takes the user to its Portfolio Item page, where, like we said, the photo can be displayed alone or with other related images, along with any information you choose to share. Here’s an example of a Portfolio Item page:
 In order to add a photo to your site – to display it in a portfolio list, gallery or slider, it is necessary to create its Portfolio Item first.
Before you add your first photo, go to Edge Options>Portfolio to set everything up according to your preferences.
 Here you can set the options for the archive pages. These are the pages that list all the items under a certain category or tag and they open when the visitor clicks on a certain tag. For instance, if you have a category called “portraits”, when the user clicks on the category, he will be taken to the archive page where all the portrait photos can be found.
Next, here you will set all the options for the portfolio single pages, which is basically your portfolio item pages. Note that you have a wide choice of available layouts for the portfolio single, which you can choose from the menu under Portfolio Type. Whatever type you set here in Edge Options will be the default portfolio type which will be applied throughout the website. In case you want to set a different portfolio type for a specific item, you can do so in that portfolio item’s page settings. As for the portfolio list settings, these lists are added via custom shortcodes to any page and part of page you want. The settings for the lists are located within the shortcodes themselves, and that’s why you won’t find them here in Edge Options.
In your Dashboard menu, navigate to Edge Portfolio. Here you will see an option for adding a new portfolio item (Add New), and for adding categories and tags. These are very important since they not only help you organize and classify your content but you will also probably use them for displaying photos in lists and sliders. For example, if you want to create a one-category list where all the photos belong to the category “Fashion” or “Nature,” you will enter that category in the list shortcode.
After you have set your categories and tags, it’s time to create the portfolio item.
The default page builder in this theme is Gutenberg, but if you want to use WPBakery, which is our editor of choice, you will need to change some settings first. Go to WPBakery Page Builder>General Settings>Role Manager. Under Post types, select Custom and then check all the available options, including portfolio-item. That way, WPBakery will become the default editor for all types of content.
Now go to Edge Portfolio>Add New. You will notice that all the fields are quite self-explanatory so we won’t be going through all of them. After you have set the title for your portfolio item, assign it a category and tags. Next, upload the featured image and click on Publish.
 The featured image is the image that appears in the lists and galleries. In a way, it’s like a “cover photo” for your portfolio item.
The other photos in the item are added using the Edge Portfolio Images section in the page settings. You can upload several images at the same time (multiple upload) or upload them one by one (single upload).
 If you want to add a short description of your photos or add some info, you need to add it as a text block. If your portfolio item is currently working with the Classic Editor, make sure to switch it to the WPBakery Backend Editor.

Next, click either on the plus sign in the upper left corner, or on +Add Element to open the list of element shortcodes. Choose the Text Block shortcode from the list and enter and edit your text. Don’t forget to click on Update whenever you make any changes.
5. How to Display Your Photos
As we mentioned earlier, Esben allows you to display your photographs in a number of creative, visually stunning ways. After having created your portfolio items, you can use the available Edge Portfolio shortcodes to display those photos in lists or sliders, creating beautiful page sections. The shortcodes that will be of particular use for your portfolio website are the Edge Portfolio List and the Edge Portfolio Slider.

Portfolio Lists
Masonry lists are a good solution for photography portfolio websites. They arrange the photos in positions based on the available vertical space, creating an interesting, dynamic yet tidy layout.
 To add this list on one of your pages, you will need to use the Edge Portfolio List shortcode. Find the spot for it, create a new row and add the shortcode into that row. Next, open the editing options by clicking on the tiny pencil icon. You will notice that there’s a lot you can do with this shortcode, adapting it to your own needs. For instance, the list doesn’t have to have a masonry layout – it can be a gallery layout, too.
 You can decide what you want to happen when your visitor clicks a photo – it can open the portfolio item page or the entire gallery in Pretty Photo view, and you can also set the number of columns or the number of photos to display (Number of Portfolios per Page).
An interesting theme feature that’s worth mentioning here is that you can choose which photos you want to display in the list based on the category or the tag (One-Category Portfolio List/One-Tag Portfolio List), which is useful if you want your list to show only photos of, say, food, or landscapes, or portraits. Alternatively, you can hand-pick them and list them using their ID number. You can find the ID for each portfolio item in the item’s URL, displayed as post=number. For instance, if you have a portfolio item whose URL ends in post=1, the ID of that item is the number 1.
In the Content Layout tab you can set the item style, specifically the hover animation. You can choose from Overlay, Narrowing, Shader and so on, and, if you want, you can also set a parallax effect for your images.
The example above uses the Masonry template with four columns and small space between items, with eight items per page, the Gallery-Overlay style and enabled title, which is shown upon hover, as an overlay.
The same shortcode offers another template you can use – Gallery. This option is great if you want all your displayed images to be of the same size and proportions, whereas Masonry is ideal for combining different-sized photographs in one compact display.
 Portfolio Sliders
Another powerful and striking vehicle for displaying your photography are image sliders. They provide much needed dynamicity and add a contemporary feel to your portfolio.
One of the great things about Esben is that it comes packed with Slider Revolution, the market’s leading plugin for creating sliders.
To add a slider to one of your pages, you need to use the Slider Revolution shortcode. In your backend, go to the page you want to add the slider to, and create a new row by clicking on the plus sign for adding a new element in the WPBakery builder (make sure you’re switched to the Backend Editor mode). This will open a selection of shortcodes. Search for “Row” or type “Row” in the search field and click on it.
 Note: You will add all other page elements (shortcodes) this way.
Now that you have a place to put your slider, it’s time to add the Slider Revolution shortcode. Click on the plus sign within the row itself and find the shortcode in the list. Another way to add a slider shortcode is to copy it from the list of available sliders under Slider Revolution>Slider Revolution. This is especially useful if you already have some premade sliders or if you plan to customize the ones that came with the demo. Copy the shortcode and paste it in the Edge General>Slider Shortcode field underneath the editor.
 And in order to create an actual slider from scratch, go to Slider Revolution>Slider Revolution>Create Slider. The first thing to do is to give your slider a title and an alias, and to set your preferred options (the slider type and layout, among others). Once you’re done, click on Save Settings. Your main go-to button is the Add Layer one. Select Image to add a photo from your media library or to upload one from your computer. Note than you can also add other elements, too, like text, buttons, and so on.
Go through all the options to make sure you have set everything just the way you want it. Slider Revolution is a powerful plugin but it is fairly easy to use. For more in-depth guidance on this plugin, check out this Slider Revolution tutorial.
In addition to the sliders you can create with this plugin, you can also use the theme’s custom slider shortcodes. The Edge Fullscreen Image Slider and Edge Vertical Split Slider allow you to put your photography in the absolute foreground, showcasing them in an exciting and impressive way. The Edge Portfolio Slider allows you to display your portfolio items in a slider instead of a static list or a gallery, and it can be placed basically anywhere on any of your pages.
 Portfolio Galleries
Another way to display your photographs is to use one of the custom-made image galleries. These are similar to lists, but they don’t display the portfolio items you have previously created. Instead, they allow you to display any set of images, independent of your created portfolio items.
The Hana homepage features a carousel gallery that scrolls horizontally, creating a nice, smooth effect.
To create a gallery like this, you will need the Edge Image Gallery shortcode. This is an extremely straightforward shortcode that allows you to choose the gallery type. It can be an image grid gallery, a masonry gallery, or it can be something more dynamic – a slider or a carousel.
 After you set the type and add the images to display, you can also set the image size and image behavior, among other options. Image behavior is particularly interesting: you can make all your images display in grayscale, turning full color upon hover. Another option is to add a zoom effect on hover.
And if you opt for a carousel or slider type of gallery, click on the Slider tab to set its duration, loop, pagination, arrows, the number of visible items and so on.
You can also create a combination of different elements for displaying your photos. For instance, the Emma homepage combines Slider Revolution with Edge Portfolio List:
In the backend, it looks like this:
 You may have noticed that the list has a Load More button underneath the pictures. The button is added through the list shortcode itself, in the Additional Features tab, under Pagination Type.
6. Other Page Elements
Depending on your style and preferences, you may want to keep your website as minimalistic as possible, using perhaps only a fullscreen slider or a list, or you may want to display some additional information about yourself, your studio and your work. Esben comes with a wide set of shortcodes for you to choose from.
Titles and Text
In addition to photography, you may want to display some information about your services, your work, perhaps your awards and achievements, and so on. Esben has some smartly designed sections that let you display textual content in an elegant way.
The section pictured above is actually comprised of two sections: Edge Section Title and Edge Icon With Text. The latter is a combination of the custom icons that come with the theme, and your own text. You can use these elements to highlight your services or anything else you might want to share with your visitors. This part of the page should look something like this in the backend:
Team List
 If you work with a team and you want to introduce your teammates, Esben has a shortcode created just for that purpose: Edge Team List.
Before you add the shortcode to your page, the same way you added list or gallery shortcodes, you will need to make a quick jump to the Edge Team option in your Dashboard. The team list uses categories to display your members, so before you actually add a team member, you need to create a category first, by clicking on Edge Team>Team Categories.
 Give your category a name and click on Add New Team Category. You can now head over to Edge Team>Add New and add your team members one by one. Don’t forget to assign them the category you have just created. The title should be the team member’s name; their picture is added as a featured image, and you can add their position and additional information in the Edge Team Member Info section. When you’re done, click on Publish.

 After you have added all the team members this way, head over to the page you want to add the Team List to and add the Edge Team List shortcode. Within the shortcode settings, you can specify the number of columns, the number of team members and spacing between them, set the order, and, most importantly, define which team category to display. In the Content Layout tab, set whether you want the team member information to be displayed below the image or upon hover.
Testimonials
Another interesting section you can add to your portfolio site is client testimonials. These add credibility to your work and show your prospective clients that you have a solid background in your field.
Just like team members, client testimonials are added to the page using a shortcode, but you first have to create each testimonial individually.
Go to Edge Testimonials>Testimonials Categories and add your categories as you did for team members. Next, go to Add New, add a title, and set the featured image. In the Edge Testimonial section, type in the title, the text of the testimonial, the author’s name, and his or her position. Then, click on Publish.
 In the example above, the testimonials are added without pictures, and the text “They Say” in the background is added using the settings for the row in which the shortcode is placed. However, you can modify these settings to fit your needs.
 7. Social Icons and Instagram Feed
If you are posting your content elsewhere on the web or you simply want to keep your visitors in the loop with your activities, you will most likely want to add links to your social media pages. Esben allows you to do so in an elegant, unpretentious manner, using social icons that come packed with the theme.
You may notice throughout the various homepages of this theme that there are plenty of places you can put your social icons. The header and/or the footer are the classic locations for these links.
Here they are in the header:
 And these are the social icons placed in the footer:
 If you opt for a left vertical menu (more on that in a bit), you can add your social icons there, too:
 And you can also put them in your side area:
 Depending on where you want to place these icons, you will either need the Edge Simple Social Networks widget (for displaying the social icons in the footer, header or side area) or the shortcode of the same name (for adding social icons to your pages).
Since header, footer and sidebar are ideal places for these icons, we’re going to focus on the widget here. The Edge Simple Social Networks widget is ready to use – all you need to do is add it to the widget area of your choice.
To do this, go to Appearance>Widgets. The available widgets are going to be located to the left and the widget areas to the right. Find the Edge Simple Social Networks Widget and drag it to the area of your choice. If you have imported the demo content that comes with the theme, the widget will already be located in the appropriate widget areas.
In the examples we used above, the widget areas are as follows:
- Header: Header Widget Menu Area
- Footer: Footer Column 2, Footer Custom Black 2 or Footer Custom White 1
- Left vertical menu: Left Menu
- Side area: Side Area
After adding the widget to the desired area, you can customize it as you like. The available icons include Twitter, Facebook, Instagram, Pinterest, YouTube and Google+. To add the icon for the network you want, click on Enable (name of the network) and then paste the link for your social network profile. Once you’re finished, click on Save.
If you have Instagram (and we’re sure you do, as the platform has become indispensable for anyone involved in visual media in any way), you can also opt to display your Instagram feed, or at least a part of it, on your portfolio website.
You can display the Instagram feed in your side area, or you can put it at the bottom of your page. In any case, the widget you’ll be using is the Edge Instagram Widget. Before you add it to the desired widget area (Side Area, Instagram Content Bottom…) you should first connect your Instagram account.
To do so, head over to Edge Options>Social Networks, find Instagram in the list of available networks and click on Connect with Instagram. You will be redirected to the Instagram login page where you need to type in your credentials. And that’s all there is to it. Now go to Appearance>Widgets and add the Instagram widget to the area of your choice.
8. Header, Footer and Menus
All page elements, including the essentials such as headers, footers and menus, side areas and content areas, are designed to fit the context and the rest of the layout to perfection. This means that, once you opt for one of the Esben homepages you want to use, it is best not to change anything about the page design itself. Still, if you want to switch things around a bit to make the design more your own, you can fully customize it using Edge Options for general, site-wide settings, or the local page settings for individual pages (located in the page backend).
Esben offers a choice of several header types:
Standard header:
 Centered:
 Vertical (closed):
 Vertical (open):
 Minimal:
 To set the default header for your entire website, head over to Edge Options>Header, where you can also set how you want your header to behave upon scroll, set its skin, transparency, color and so on. Note that you can set a different type of header for individual pages, if you want. For example, if your website features the standard header as default, but you want your About Me page to have a minimal header, you can set that in the settings for the About Me page. These local settings will override the global (Edge Options) ones.
While you’re in the Edge Options section of your backend, you will also want to upload your own logo (Edge Options>Logo). It is recommended to upload all versions of the logo, and to use an image that is twice the needed size, in order for the logo to display properly on all screen sizes. Note that in some cases it may be necessary to upload the logo in an individual page’s backend. As for the footer, the steps are similar. Make the settings and adjustments in Edge Options>Footer and if you want a particular page to display a slightly different footer version, make the adjustments in that page’s backend settings.
The content of the footer, however, is added using widgets. Just like you did with header widgets, locate the widget area you want to use and drag and drop the widgets there.
When it comes to menus, it’s very important to make them both functional and fitting your page style. You don’t have to place them in the same spots as in the demo, but our recommendation is to try not to stray too far away from the demo design, unless, of course, you’re a designer yourself.
The actual menu items, of course, can and should be changed. Navigational menus are one of the pillars of good UX. If your visitors can’t find their way around your portfolio quickly and easily, they will lose interest, and you definitely don’t want that.
Esben offers several menu options. In addition to the main menu, which can be seen on the main homepage, you can also opt for a fullscreen menu, which is especially useful if you plan to use fullscreen sliders or galleries.
 A vertical menu displayed in the left portion of the screen is another interesting option:
 If you want your menu to appear in the header but you want to place the logo in the middle, you can use the combination of Left and Right menus (divided navigation), creating each of them separately. However, in order to use these two divided menus, you have to make sure your homepage uses the divided header, which you can set in page options.
To set and customize your menus, navigate to Appearance>Menus.
 To edit a menu, select it from the dropdown and click on Select.
The left portion of the screen will contain a list of pages, posts, portfolio items, galleries, products etc, which you can add to the menu, and the menu structure will be located just to the right. You can delete any of the demo items you don’t want to use and add your own by dragging an item from the left and dropping it to the right. The items that are slightly indented to the right are the sub-items.
When you’re done customizing your menu, don’t forget to check the box next to the location where you want to display it, and, of course, to click on Save Menu.
 9. Additional Pages
While photo galleries, sliders and lists naturally represent the most important part of your portfolio website, you may want to use some additional pages that come with Esben, for example the About Us page.
 To edit this page, go to Pages>All Pages and find the About Us page in the list. Going through the WPBakery page builder, you will see the shortcodes used to create this page. You can keep all of them or just some of them. You can add other shortcodes of your choice, creating additional page sections and elements. It’s completely up to you.
In case you want to keep the sections but replace the content with your own, just select the shortcode in question and click on the little pencil to customize it.
Let’s take a look at this section, for example:
 It contains a background picture, a title, some text, and a button. Now let’s take a look at this section from the backend:
 The title and the text are added using the Edge Custom Font shortcode. The Edge Button shortcode is, well, for the Contact Us button. And some Empty Space shortcodes are added to keep things nice and leveled. As for the image, it was added as a background image in row settings.
 Customize, add or remove the other page sections this way until you get a personalized About Us page with your own content and info. Esben also includes a simpler version of the About page for those with more minimalistic proclivities:
 The page to look for in the backend is called About Simple and the images are added using the Single Image shortcode.
 If you’re a freelancer working by yourself, without a team or a studio, you can skip the About Us page altogether and use an elegant, minimalistic About Me page instead.
 You will notice that this page has an Instagram feed displayed near the bottom of the page. This section is created in Appearance>Widgets by adding the Edge Instagram Widget to the Instagram Content Bottom widget area. The widget is then selected in the page settings, under Edge Content Bottom>Sidebar to Display.
 Another page you will most likely want to use is the Contact Us page.
 Looking at the backend of this page, you will notice it’s pretty straightforward and easy to customize:
 Just a couple of things to mention here: in order to use the Edge Google Map, you will need to have an active Google Maps API Key, which you will enter in Edge Options>General>Google API.
As for the contact form, as you can see from the image above, the theme uses the Contact Form 7 plugin. In order for the shortcode to work, you need to set your contact forms in Contact>Contact Forms and then enter the name of your contact form in the shortcode. Additional options are located in Edge Options>Contact Form 7.
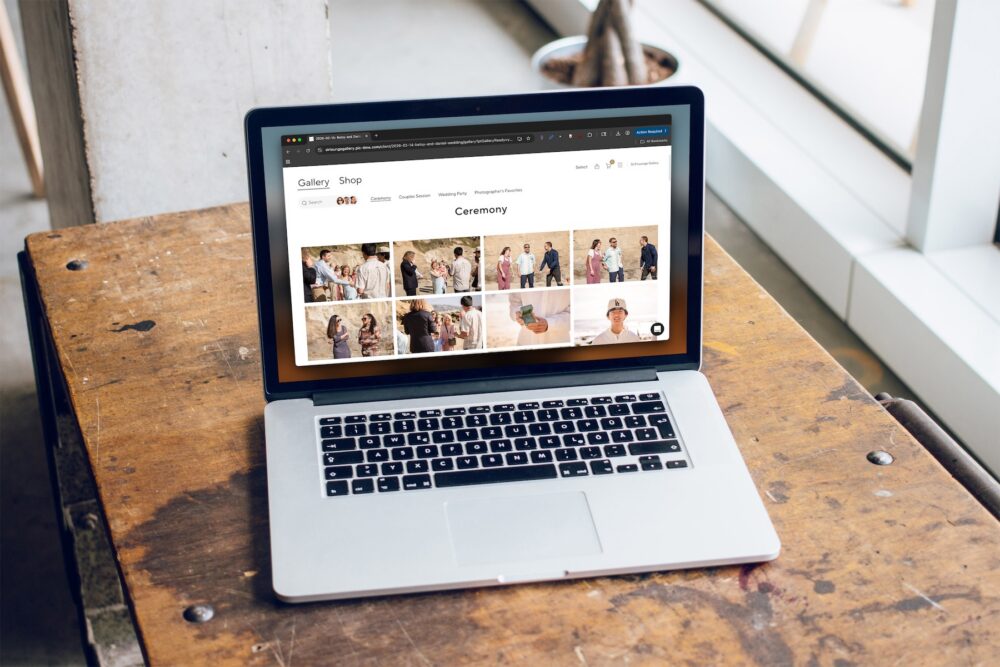
10. Proofing Galleries
If you’re a photographer working with clients and commissioned photos, you will definitely need a proofing gallery. Esben comes with two gallery types – a regular, unlocked gallery, and a password-protected one.
Proofing galleries are a great time-saver for both parties – the photographer and the client. After you have created a gallery with the photos from the project, the client will be able to go through it, approving or rejecting the photos. You will keep the approved ones, discard the rejects, and then create a zip file with the photos the client wants to use. You can then upload that zip file to your media library and make it available for your client to download right from the proofing gallery page (more on this later).
 Password-protected proofing galleries are even better, as they guarantee that no one else but the authorized client will be able to see and approve your work. Password-protected proofing galleries also ensure no can steal or misuse your photos.
 Let’s take a quick look at how to set up these pages.
The first step is to navigate to Edge Options>Proofing Gallery. Here you can set the number of columns to display in the gallery, set the spacing between the items and define their proportions. For the gallery single item, you can set the skin and enable/disable comments, among other options. There are also additional options for the password-protected galleries.
 After you have set everything here, head over to Edge Proofing Galleries. You will see two demo galleries there, one of each kind (unlocked and password-protected). You can use these as templates, but you will need to create your own galleries for each of the clients. Start by clicking on Add New.
 After giving your proofing gallery a name (ideally, the name of your client), navigate to the Publish field to your right where you will find the visibility settings. choose between Public for an unlocked gallery and Password Protected for a locked one. Click on OK and hit the Publish button.
Next, add the image you want to use as the background for the page. This image is added as the Featured Image in the right portion of the screen.
 After that, scroll down to Edge Gallery. Upload your photographs here, pick a skin for the gallery, set the number of columns, and insert the client name, date and the subject. Here you will also add the download link for the zip file, once your client decides which photos he or she wants to use. After creating the zip file, jump to Media>Add New in the Dashboard menu, and upload the file from your computer. When the file is uploaded, click on it to access the attachment details, where you will find the link for the file under Copy Link. Copy it, head back to your proofing gallery and paste the link in the field labeled Download Link.
 Update the gallery, after which the Download button will appear on your proofing gallery page.
11. Shop and Blog
Finally, with Esben you can also set up a shop and sell your photographs and other merch. The theme uses the mighty WooCommerce plugin to allow users to add products, product categories, set up payment and shipping options, customize cart and checkout pages and everything else that a full-featured online store should have.
 Everything is pretty much already set up, like everything else in this photography portfolio theme. All you need to do is make a few adjustments in your Dashboard (under WooCommerce and in Edge Options>WooCommerce) and add your products. If eCommerce seems like too big an endeavor for you, don’t worry – setting up shop is really easy to do, and you can also check out this tutorial on how to create an online store with WooCommerce that will guide you through the process.
Finally, you can also run a blog on your portfolio site, if you want. You can share news, announce upcoming events or anything else you might want to share with your visitors that isn’t necessarily your photography work. Esben has a gorgeous blog layout ready, with a sidebar, Instagram feed and search functionality, which you can, of course, customize to fit your preferences.
Conclusion
Having a portfolio website has become a must for any photographer, whether aspiring or already established. With a photography portfolio, you can not only promote and sell your works online, but you can also establish a brand presence and work actively on growing it through social media engagement, gathering customer information and so on. With a WordPress theme like Esben, you get almost half of this work done. More importantly, this theme is designed in a way that really lets your photography shine. Contemporary, smart and light, Esben offers an array of solutions for awing your visitors with your visual content. And, as we saw from this tutorial, it’s really quite easy to use. Once you start feeling at home in your site’s backend, you will quickly find yourself drawn into exploring the theme’s many possibilities, mixing and matching, customizing and creating an impressive presentation that is purely your own.