Introduction
In this video from our Lightroom 4 A to Z Workshop on DVD, we will demonstrate how to color correct a JPEG landscape image in Lightroom 4. We will also demonstrate how to convert the color corrected version of the JPEG landscape image into a black and white image. In this tutorial, we will also briefly explain the differences between shooting in RAW and JPEG. For a more in-depth explanation of the differences between RAW and JPEG, visit our article, “RAW vs. JPEG (JPG) – The Ultimate Visual Guide.”
Watch the video or continue reading the article below!
Watch the Video
RAW vs. JPEG
We recommend that you always shoot in RAW, especially if you are shooting professionally. This is because the RAW format provides you with much more control than shooting in JPEG. Shooting in RAW also provides you with much more information and leeway when it comes to editing. However, this does not mean that there is no reason for shooting in JEPG. In fact, we at Lin & Jirsa Photography shoot in JPEG quite often. However, we only shoot in JPEG in very specific situations and we make sure to dial in the correct settings in the camera while shooting. This is extremely important as you save a lot less information when shooting in JPEG. Settings like white balance and exposure need to be flawless, otherwise you will not have much room to edit in post production. So, to get the best and most professional results from a JPEG image, make sure to dial everything in perfectly in the camera. This is also true for when shooting in RAW, but you have more leeway when shooting in RAW. Once again, visit our article, “RAW vs. JPEG (JPG) – The Ultimate Visual Guide,” for more information on shooting RAW vs. JPEG.
Of course cell phone cameras and most compact cameras simply cannot shoot in RAW, so JPG is your only option! This is yet another reason why it is important to understand how to properly shoot and edit JPG files.
How to Color Correct a JPEG Landscape Image
Select a landscape image and jump into the Develop Module by pressing “D.” To switch to Full Screen Mode, press “F” twice. Below is the image that we will be using for our tutorial.

The Basic Panel
To expand the Basic Panel, press “Ctrl + 1.” When we are editing a JPEG file, we have different controls over Temperature and Tint than if we were editing a RAW file- our control is restricted the JPEG file, whereas in a RAW file we can dial in the exact Temperature and Tint that we want without any harm at all coming to the image.
With JPEG files we only have the simple options of warmer or cooler. This will actually edit and shift colors from what they currently are, and is therefore considered “destructive” editing as soon as you go to export the finished file. (Although of course Lightroom is still a non-destructive environment, and you can dial the slider up and down all day long without degrading the file quality.)

For our image, we can leave Temperature and Tint at their defaults because we did a good job of setting our white balance in-camera.

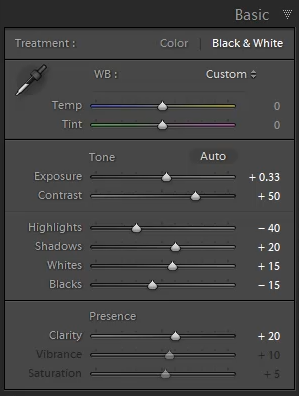
To brighten up the image a bit, take Exposure up to +0.33. Next, bring Contrast up to +25. We want to have a little more color in the highlights of the image, so bring Highlights down to -40. Next, we want to increase the detail in the shadows, so bring Shadows up to +20. To brighten up the specular highlights just a bit, bring Whites up to +15. This will preserve the super bright areas of the image so that we have a nice contrast in the image, while increasing our dynamic range a little bit. Finally, we want to pull the Blacks down to -15 to add even more “pop”. Finally, bring Clarity up to +20 to add more midtone contrasts in the image. Next, bring Vibrance to +10 and Saturation to +5 to get a little extra color.

The Detail Panel
Next, skip down to the Detail Panel (“Ctrl + 5”). To zoom into an image, simply press the Space Bar and check where the focal point is in the image. With a JPEG file, there is already in-camera sharpening that has been applied to the image so JPEG images actually come out of the camera much sharper. This means that we will not have to do much sharpening when editing JPEG files. Under the Sharpening settings in the Detail Panel, set Amount to 60. Bring Radius up to 2.0 and Detail up to 50. This image was meant to look a bit grungy anyways, so a little extra sharpening will fit this image just fine. Of course do not do this with portraits shot in JPG, as you do not want to bring out every little detail in the skin and face. While you are zoomed into the image, check to see if there is any noise in the image that needs to be fixed. Our image is fine, so we do not need to adjust the Noise Reduction settings in the Detail Panel.

The Lens Corrections Panel
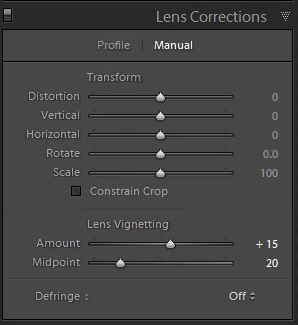
Finally, open up the Lens Corrections Panel (“Ctrl + 6”) to fix any vignetting that might have occurred in our image. We want to make sure that the colors are uniformed from edge to edge, unless we are trying an artistic vignette. For this particular image, we will not be applying any vignettes. Instead, we want even colors from edge to edge, so we are going to reverse the vignette to brighten up the edges. Under the Lens Vignetting settings in the Lens Corrections Panel, bring Amount to +15 and Midpoint to 20 for a subtle shift. We want the blues in the image to match across the screen so that we do not have natural vignetting from the lens.

Below is our final color corrected image.

How to Convert Images to Black and White
To convert an image to black and white, simply press “V.” With black and white images, we could use some more contrast to create a more dramatic image. Go back to the Basic Panel (“Ctrl + 1”) and increase Contrast to +50.

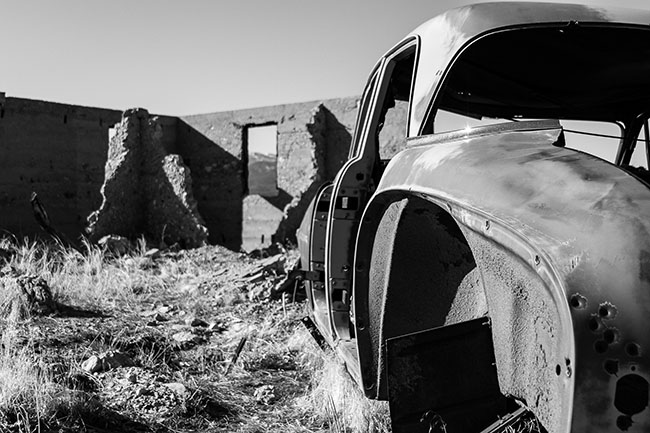
Below is the final black and white color corrected version of our image.

Conclusion & Learn More!
Remember that when shooting in JPEG, you have much less control in post-production compared to RAW, so you need to be much more careful with your exposure and white balance. If you find yourself shooting JPG and clipping highlights or shadows too often, try turning down your in-camera contrast, or turning on the “Active D-Lighting” type camera functions, …or of course you could try shooting RAW!
Keep in mind that this tutorial is strictly for color correcting a JPEG landscape image, and the adjustments are different for JPEG portrait images. In our next tutorial, we will demonstrate how to color correct a JPEG portrait image.
We hope you enjoyed this article and video excerpt from the Lightroom 4 A to Z Workshop on DVD. Stay tuned for our next article and episode!
The Lightroom 4 A to Z Workshop on DVD is a 14 hour video workshop turning any Lightroom novice into a complete master of Lightroom 4 in no time! The Lightroom 4 A to Z Workshop can be purchased by itself, or within the Lightroom 4 Workshop Collection which also contains our award winning and industry standard Lightroom 4 Preset System, as well as the Lightroom 4 Workflow System.


Get Connected!