Some of the most beautiful portraits are captured using simple setups. No need for multiple lights, sets, and gear to get gorgeous results. In this video, I’ll walk through an easy one light portrait setup for photographing professional level headshots.
Video: Easiest One Light Portrait Setup for Professional Headshots
Let’s jump right into it. For this one light portrait setup, you’ll need a flash and a camera with a portrait lens. Here’s my setup for today’s photoshoot:
- Canon EOS R5
- Canon RF 70-200mm f/2.8L Lens
- Profoto A1 On/Off Camera Flash
- Profoto Umbrella
- Manfrotto Nanostand
- MagMod MagShoe
Keep in mind that this one light portrait setup setup can work with practically any light and camera setup, so remember to not let cost be a barrier.
The guest of honor today is my friend Kiara and you can check out her Instagram here.
Step #1: Composition & Ambient Light

I like my headshots with a simple background, so I placed Kiara in front of this dark wall. This way, the focus of the image is directly on your subject.

Now let’s dial in the ambient light settings. To achieve this one light portrait setup, I need to nix all the natural light from the window and rely on only the flash. At 1/200 sec, f/5.6, and ISO 200, we’ve practically cut out all natural light.
Step #2: Add & Modify Light

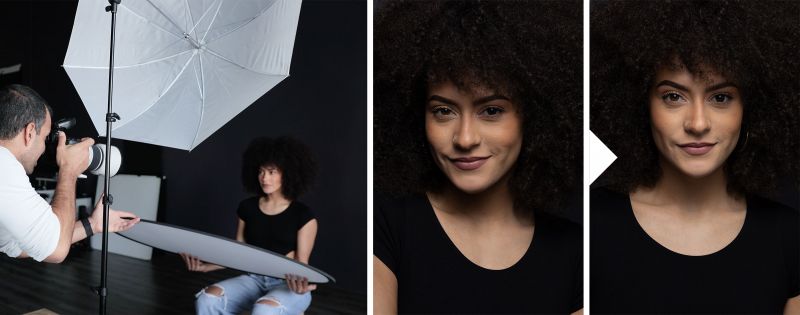
This one light portrait setup is incredibly simple. I attached an umbrella to my Profoto A1 and set the light beam to wide in order to fill the entire umbrella. This will provide the softest light possible. I raised the light as high as it can go and keeping it center, aimed it down at Kiara. This center lighting is called “Paramount / Butterfly Lighting”
Related Reading: 5 Common Key Light Patterns Every Portrait Photographer Should Know

Here is our first test shot. An important part of portrait photography is the catchlight in the eyes. A catchlight is the highlight reflection in the eyes that gives them that “sparkle.” To get a stronger catchlight, simply lower the light a touch.

One tip to get the maximum softness from a modifier is to measure the width of the modifier and place the subject that same distance away. For example, the umbrella is roughly 3 feet wide. Therefore, I placed Kiara approximately the same distance away.

You can also add fill light from below by placing a reflector just underneath your subject.
Step #3: Pose & Photograph

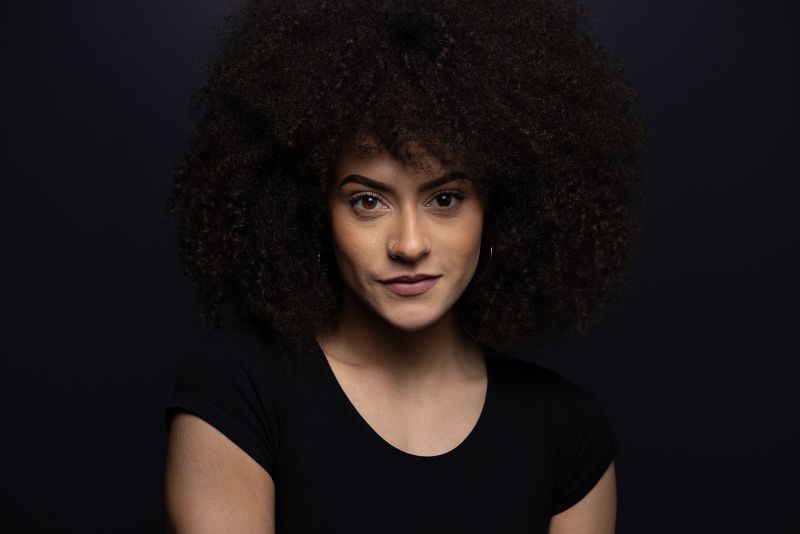
Now it’s time to photograph away! Here are some of our final shots using this one light portrait setup. Edited using VF Presets.
Conclusion
I hope you enjoyed this article/video. Now have a go at capturing your own professional level headshots using this easy one light portrait setup. No more complex and expensive setups. The gear that you have and a fun subject are all you’ll need to capture incredible portraits.
For those serious and want to take the next step, check out the Flash Photography Training System at SLR Lounge Premium. There, we introduce more advanced lighting setups and styles for complex portraits, weddings, editorials, and more. Also, be sure to check out VF Presets for intuitive lighting based presets and retouching tools like we used here.
Don’t miss our next episode of Mastering Your Craft on Adorama’s YouTube channel next week! If you want to catch up on all the episodes, make sure you check out our playlist!


Get Connected!