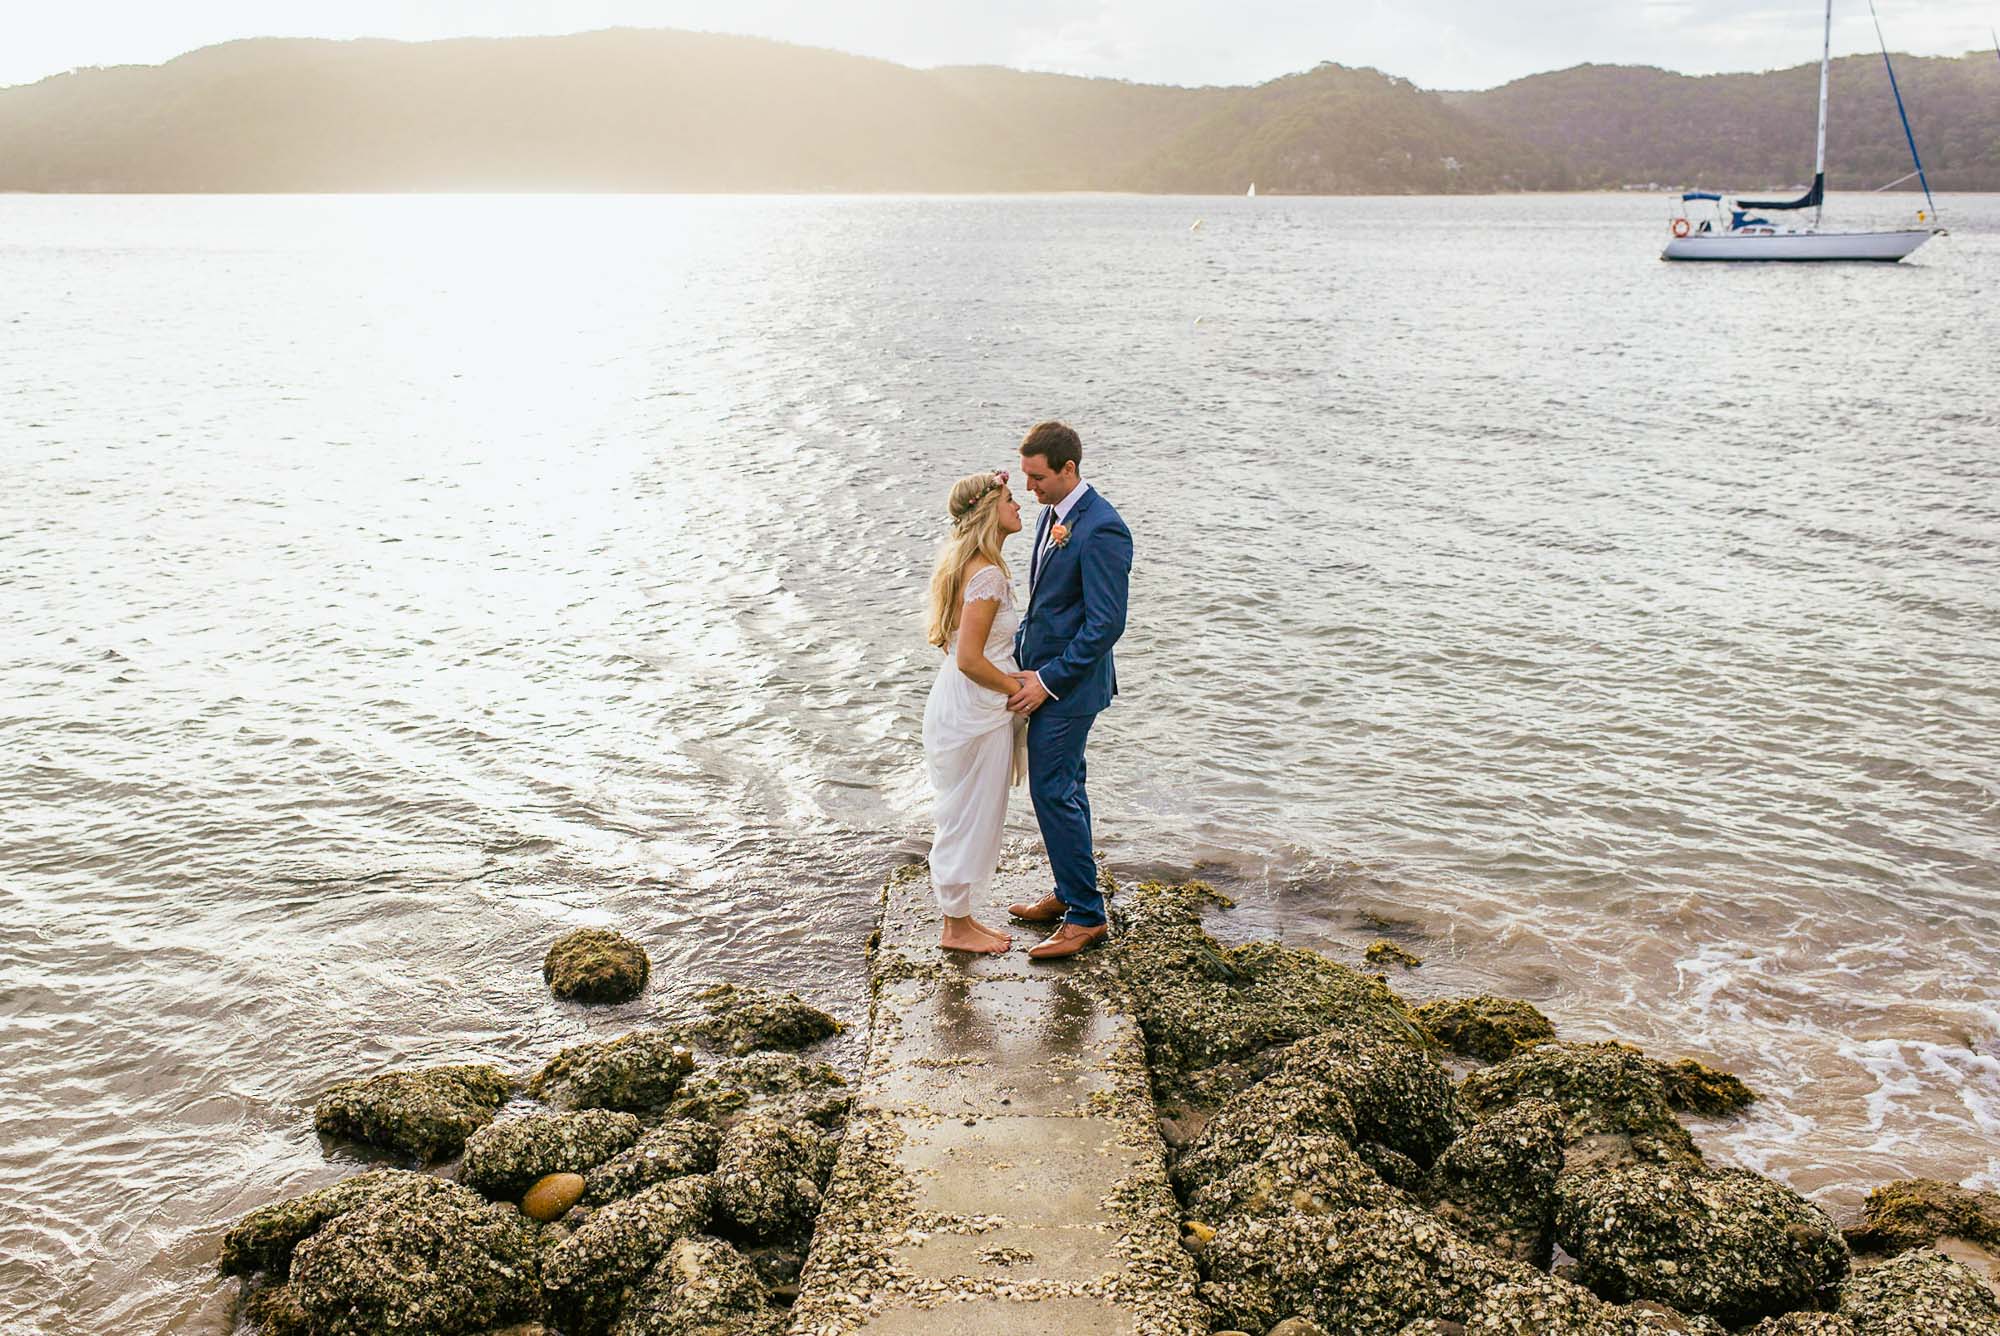
Whether we like to admit it or not, for us wedding photographers, destination wedding photography has a certain allure to it.
Perhaps it’s the prestige we feel when a client values our work so much that they’re willing to pay for us to fly somewhere for their wedding rather than hiring a local photographer, or perhaps it’s simply because deep down we all want to travel, and getting paid to do it makes it even more enjoyable.
Whatever the reason, shooting a destination wedding is often at the top of our wedding photographer bucket list!
The reality of traveling for destination weddings is, of course, not all the glamour it may seem. Aside from the fact that it’s rarely more lucrative than a local wedding and makes little short term business sense, it can also be tiring, stressful, and lonely.
I wrote a post on travel tips for photographers which tackles some of the issues that overseas photography work brings with it, but it’s clear that arriving safely with all your gear intact, and performing as you would do locally, is a skill in itself that takes experience to get right.
This being said, destination wedding photography certainly does have its benefits. Shooting beyond your normal environment is a welcome break that can open your eyes creatively and provide a mental refresh for what is often a somewhat monotonous job. In addition, having work from a destination wedding in your portfolio can open new doors by adding value to your brand, elevating your work from local competitors.
How to book a Destination Wedding… if you’ve never shot one
“Show what you want to shoot” is the default advice from successful veterans, but for eager newcomers to the world of destination wedding photography, this catch-22 situation is frustrating.
How can you show destination wedding photos on your site if you haven’t shot a destination wedding?! The paradox reminds us of when we first started out as wedding photographers, needing to somehow build our wedding portfolio out of thin air.
So here’s my fast track guide on how to book your first destination wedding. The ‘in 10 days’ is merely to illustrate that this method is a shortcut – the first time I implemented it I actually booked an overseas wedding in just 7 days, with zero prior destination wedding experience.
Intrigued? I’m about to break it down for you step by step but before I do, I recommend you get hold of a copy of More Brides for an iPad version of this process, as well as many more tips on boosting your wedding bookings.

Before I start, there’s one caveat. If this is your first destination wedding photography gig, you need to be prepared to work for much less than you are accustomed.
Traveling for photography work is an acquired skill, and without this experience, you shouldn’t be charging your clients the same rate as you do in your home town.
Also, unless you’re in the small percentage of wedding photographers out there with outstanding and unique wedding work, the client can easily book someone local who may well provide a similar level of service for a cheaper price.
Think of your first few destination wedding photography gigs as a way to build your portfolio and add value to your brand. If you can breakeven after all the travel expenses, count yourself lucky.
After you’ve had a bit of experience, you can work out a way to charge for both your travel and your service, but for now, remain humble! But, enough of the preamble – let’s jump into this, and get packing for our first destination wedding!
The step-by-step guide to booking your first destination wedding

Overview:
Using a combination of a targeted landing page, a modest Facebook advertising budget, and some basic sales psychology, you can vastly reduce the time required to book a wedding outside your locality.
#1 The Landing Page
I cover the topic of landing pages in more depth in this post on online marketing for photographers, but all you need to know at this stage is that it’s beneficial to use a landing page rather than simply directing paid Facebook traffic to your homepage.
Step 1
Create a blank landing page. You can use specific landing page software or just create a new page on your website. If you go this route, I recommend you remove your website’s existing menu and any other elements that can cause distraction.
Step 2
Choose a headline (the ‘H1’) that mentions the exact location you are trying to target. You can choose a country or a city in that country if you have a specific location in mind. Don’t worry too much about optimizing for search traffic at this stage. The goal here isn’t to make your landing page rank in Google – it’s to convert visitors into leads, i.e. to get a bride’s email address!
As an example, I used ‘New Zealand Wedding Photography’ as my landing page’s headline.
Step 3
Insert one of your best portfolio photos as the ‘hero’ image. Make sure it’s not location specific (i.e. doesn’t show the Eiffel Tower in the background). Just make sure it’s one of your best.
Step 4
Under the image, write some short content, being careful not to say outright that you’ve shot in said country, but rather, try and allude to the fact that you have.
There is a subtle difference between outright lying (never do this!) and leading the client to think what they want via your writing and images.
Here’s an example of the text I used:
Hi there, I’m Mark. I offer Creative, Candid and Modern Wedding Photography in New Zealand. If you’re getting married in New Zealand, I’d love to be your photographer!
Whether you’re getting married in Wellington, Queenstown, Aukland, Lake Tekapo or anywhere in this wonderful country, I’m excited to hear more about your wedding plans.
Get in touch using the contact form below and I’ll tailor a custom wedding collection to your budget.
It’s worth noting that this text is markedly different to what I’d normally have on my website. I’m casting my net much wider with this approach – more on this soon.
Step 5
Add around 5 more portfolio-worthy images that are also non-location specific.
Step 6
Add a contact form with Name, Email Address, Phone Number, and Wedding Location.
If you have any other elements you think will add value to your services, such as a graphic to show awards won or recent blog features, feel free to include them here. Just don’t go overboard as your page needs to load quickly. Then hit Publish.
Recap
By now you have a targeted landing page which suggests to anyone who lands on it that you’ve shot a wedding in your target country. It may even suggest that you’re from that country, depending on the text you’ve used.
The next step is to send some targeted traffic to it, and for this we require good old Facebook ads.
#2 The Facebook Ad

Facebook Page owners who lament the bygone days of strong organic reach are missing the bigger picture – thanks to Facebook Ads, everyone now has access to the most powerful (and affordable) advertising medium of the 21st century.
As wedding photographers, we are missing out on a huge market if we choose to ignore paid Facebook advertising. With this in mind, let’s jump right into creating our first Facebook Ad.
[RELATED: The Facebook Pixel For Photographers | When ‘The Knot’ & ‘Wedding Wire’ Won’t Cut It]
Step 7
Click on the small downward pointing triangle in the top right hand corner of your Facebook screen and select ‘Create Ads’.
Step 8
Select ‘Send people to your website’ and choose a campaign name.
Step 9
In the ‘Locations’ drop down, select ‘People who live in this location’ and start typing the destination you’d like to work in.
Step 10
Choose the ‘Age’, ‘Gender’ and ‘Languages’ of the audience you want to target. I chose 25-35 year-old women who speak English.
Step 11
Next comes the ‘Detailed Targeting’ section, an incredibly powerful feature which controls the reach of your ad. You can experiment with various different metrics, but the first to try should be ‘Demographics – Life Events – Newly Engaged’.
Just start typing ‘Newly Engaged’ in the search box for the various options to start appearing.
Step 12
Ignore ‘Connections’ and move on to ‘Placements’, i.e. where you’d like your ad to appear.
I tend to get the most success from the Desktop News Feed placement since it allows for more text, but again, this is one to experiment.
Step 13
In ‘Budget & Schedule’, set your daily ad budget to $10, and set a start and end date 10 days apart. Leave all the other settings as they are.
Step 14
Under ‘Format’, select ‘Multiple images in one ad’. This image carousel tends to be the most eye-catching, and allows you to show off a variety of work for the same cost as a single image.
Then you’ll need to upload up to 5 portfolio-worthy images. Remember that your ad will often be displayed quite small, so avoid any image where the couple is too small.
Step 15
Under ‘Page & Links’, you’ll need to write your ad’s text with a focus on your target country, e.g. ‘Candid New Zealand Wedding Photography – Secure your date today.’
I wouldn’t worry too much about crafting amazing ad copy for the additional text in the ‘Headline’ and ‘Description’ of each image in the carousel. With so many other distractions in the newsfeed, it’s arguable as to whether Facebook users will even read these tiny sections.
Under ‘Destination URL’ and ‘See More URL’, enter the URL of your new Landing Page.
Step 16
Choose your ‘Call To Action’ Button. I suggest using ‘Learn More’, but feel free to experiment here too. On the right hand side of your screen, you can see a preview of how your ad will look in the various locations. If you’ve chosen to advertise to mobile users, make sure your text still makes sense when it’s truncated.
Leave all other options alone for now, then click the green Place Order button. Congratulations! You’ve just created your first targeted Facebook ad!
Recap
Setting up a landing page and Facebook ad campaign may take you a few hours to get right, but once you have them set up, with just a few small tweaks you’ll be able to run other campaigns to target completely different locations. I currently have landing pages set up for 3 different continents!
Notice how in the example above I didn’t include any pricing in my content. This is important and I suggest you do the same. With this technique, you’re casting your net wide to try and attract as many potential leads as possible. By leaving off your pricing, it allows you some room to negotiate.
If after 10 days you haven’t received a single lead, look at the results of your Facebook ad campaign, and you’ll be able to see whether users were clicking on your ad or not, and should be able to ascertain whether the problem was with your ad design (image/text) or on the landing page itself.
If you have Google Analytics installed on your landing page, you’ll be able to examine metrics such as the time visitors spent on your site, which should give you some indication as to their actions after clicking the ad, and for even more detail you could install a heat mapping software to track the users’ movements on your landing page (my recommendation of a free heat mapping tool is described in this post).
The above process isn’t an exact science, but the benefit of having it all set up is that it’ll be easy for you to make adjustments to either your landing page and/or the ad campaign and test your changes immediately. Then it’s a case of making small adjustments until you get your first lead.
Once you get your first lead, you’ve won the first half of the battle. Now the challenge is to convert the lead into a client.
#3 The Booking (Closing the Sale)

Everyone has different methods for booking the client, but the one key thing is that you need to get your lead on the phone – don’t email her your pricing. Just email her to thank her immediately, and let her know that you will be phoning her the next day to hear more about the wedding. If your lead doesn’t answer, phone back the next day, then the next. Then give up and move on.
If your lead answers, keep the conversation as much about her and her wedding as possible. Then explain that whilst you haven’t shot in her home country, you have had a lot of experience shooting locally. Don’t lie to your lead about having shot a wedding in her country, however tempting it may be at this point. You should have researched where she’s getting married, so be sure to ask a few questions specific to the location to show your interest.
At this point I usually explain to the lead that it’s my dream to shoot in her country, and for this reason, I’m happy to work as closely to her budget as possible. A little honesty goes a long way, and saying something like this shows your enthusiasm. After all, what local wedding photographer would say it’s their dream to shoot her wedding?!
After the phone call, I write an email with a link to my regular wedding photography prices. In the email I make it clear that I’m including my local pricing just to show what’s included in each package, and that I’m willing to try and meet her budget.
You need to swallow your pride at this point, and keep in mind your goal – booking your first destination wedding! Forget about making money and focus on the huge opportunity this one new client could provide to your business.
Don’t worry that discounting your pricing will harm your brand like it could do normally. You’re targeting a completely different market to your usual one, so you can afford to experiment a little.
Including your regular wedding photography prices serves to elevate your perceived value. In this way, when you offer to shoot her wedding at a reduced price, your lead will feel she’s made a real saving and should be more likely to make the booking.
You’ve booked a Destination Wedding! Now what?!

If you’re fortunate enough to book the client using this method, be sure to make the most of the wedding. For want of a better phrase, you need to shoot the sh*t out of it!
Think of your whole time in the new location as an opportunity to grow your destination wedding portfolio. You need to return home with tons of great photos not only of the wedding, but also photos that highlight the country in question. Take your camera out days before the wedding. Take photos of the town, the locals, your hotel – anything that shows the local flavour.
On the day of the wedding, shoot twice the number of images you’d normally shoot. At the end of the day, ask the clients if they’d like a complimentary day-after session. Or, working backwards here, ask them before the wedding if they’d like a complimentary engagement session.
Keep in mind that with every photo you take whilst abroad you’re building up marketing material which will help you to book your next destination wedding.
Final Words
Even if you decide destination wedding photography isn’t for you, having a destination wedding on your website definitely adds value to your services, and can set you apart from your local photographers.
I booked my first ever destination wedding in just 7 days using the exact steps outlined above and a Facebook Ad budget of only $50. Within a week of publishing the photos, (and posting the sh*t out of it!) I’d booked my second wedding in the same location.
[RELATED: What Photography Gear Should You Pack For A Destination Wedding?]
If you’d like to discover many more time-saving techniques to book more wedding clients, reserve your copy of More Brides.
About the Author:
Mark Condon is a British wedding photographer living in Sydney shooting weddings worldwide. Mark also gives photography enthusiasts a peek at the camera gear of some of the world’s best photographers over at Shotkit.


Get Connected!