Take a deep breath, it’s going to be okay. There’s no reason to be afraid to wet clean your own sensor!
I’ve been wanting to create a tutorial on how to clean your sensor for many years. I actually don’t get asked about sensor cleaning very often, though, because I think many people are afraid of it.
So, the reason I’ve been wanting to create this tutorial is that I believe it’s actually very easy, and quite safe, to do. It can seem a little scary to be actively touching your sensor, but it’s just one of those things that you simply mustn’t over-think. Just go for it!

Recently, Joseph Cristina (JCristina.com) sent us a pack of his new product, the Aurora Camera Care kit, for cleaning your sensor and lenses. It comes with what are called wet cleaning sensor swabs, but there’s more to it- the ten swabs that are included are actually five wet and five dry swabs.
That is, five of the swabs already have the perfect amount of cleaning solution on them, ready to go! When I realized this, I was excited to nut just review this product, but also finally write this quick tutorial on how to wet clean your sensor.

Save Money, Clean Your Own Sensor
Paying a professional to clean your sensor can cost between $35-75. I charge my own friends and coworkers $20 to clean their sensors!
The thing is, sensor cleaning equipment usually only costs about that much. The “original” sensor swab is just $35, and it comes with twelve swabs. The Aurora Camera Care Sensor & Lens Cleaning Kit that Joseph Cristina sent us costs just $25-30, and comes with five pairs of wet and dry sensor swabs, as well as two packets of wet and dry lens cleaning wipes if you spend the extra $5. Right off the bat, it seems like a potentially good value. We’ll talk more about value and other options later.
Before we continue, a DISCLAIMER: I’m going to review the Aurora Camera Care sensors swabs, while also teaching you how to wet clean your own sensor. This is NOT a sponsored post, mind you; I am going to give you my honest opinion as someone who has been cleaning their own sensor for about 15 years.
HOWEVER, some of the suggestions I am going to make are blatantly against the general “best practice” guidelines for cleaning your sensor. I will clearly disclaim which advice is GOOD advice, and what advice is “sketchy” and/or BAD advice.
So, if you’d like to play it safe, just follow my good advice, follow the instructions. If you’re brave, I’ll include my completely honest opinions as well.
Fair enough? Don’t worry, it’s highly unlikely that you’ll ever scratch your sensor, unless you try to clean it during a sandstorm.
How To Wet Clean Your Sensor

In the past, wet cleaning your sensor usually involved buying two different products- a pack of dry swabs, and a bottle of cleaning fluid. The swabs run about $35 for a pack of 12, and the solution (Eclipse) runs about $9.
The technique seemed simple enough to me at first, a relatively fearless, (reckless?) engineer. Just squeeze a few drops of solution onto the sensor swab, and go to town on your sensor.
Really, though, a bit of precision is indeed required. You don’t want to put too much cleaning solution on the swab, or you’ll risk dripping whole drops of solution onto your sensor, and potentially the surrounding electronics. Not enough cleaning solution, and you’ll be “scraping” a dry swab across your dusty, dirty sensor, which could be bad if any of the dust is in fact hard/sharp.
Thus, we get to the Aurora Sensor Cleaning Kit. It comes with pre-moistened swabs, as well as dry swabs to use after you’ve used the wet swabs. But, I’m getting ahead of myself.

Step 0) Get Your Camera Ready For Cleaning
First and foremost, you need your camera batteries to be fully charged. Even if you have a camera that can be plugged into power via USB, I recommend having your battery at least at 50-75%.

Also, you obviously want to shoot some test images and see if your sensor has any dust, and where it is. Throw a lens on, stop your aperture down to f/22 or so, and take a picture of a blank white wall, or an empty blue/overcast sky, anything that will reveal sensor dust the most clearly.
 Test Image, f/22 | (You can barely see one or two dust specks)
 Test Image, f/22 | With Contrast, Clarity and Dehaze turned way up
I’ve found that it also helps if you turn your in-camera contrast and sharpening all the way up to their maximum settings; but make sure you turn those settings back down when you’re done otherwise you’ll absolutely ruin your JPG images and video files.


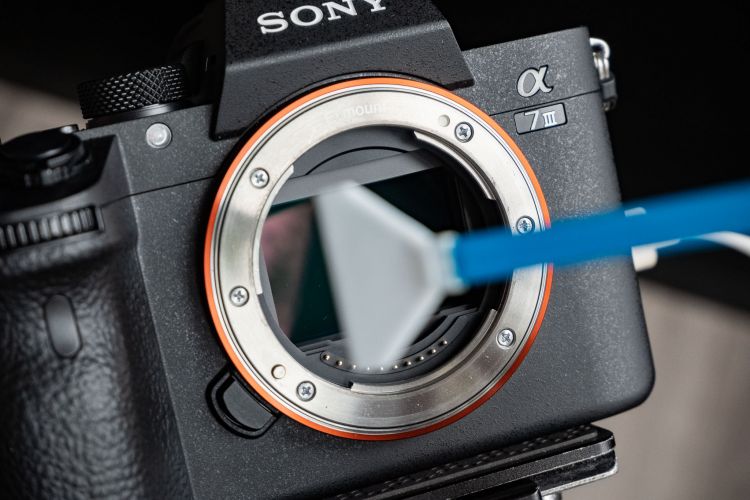
The final preparation is to access your camera’s sensor. If you have a DSLR with both a mirror and a shutter, you’ll want to find the menu option for manual sensor cleaning, which locks up the mirror and opens the shutter, and stays that way until the camera is turned off. (Be careful not to accidentally bump your camera’s power switch, otherwise, you will damage/destroy your mirror and/or shutter!

Oh, don’t forget to rip open the sealed packaging for one wet and one dry swab. Leave each swab mostly inside its packaging until the exact moment you need it!
Step 1) Wipe That Sensor! (Wet)
Go for it! Just gently touch the wet swab to one edge of the sensor, and wipe it across. The official instructions recommend doing so at a 45-degree angle, and wiping left-to-right. However I’m left-handed, so here’s my personal tip that sounds sketchy, but really is quite safe: Wipe in whichever direction you feel you can do the most gracefully and smoothly.

I’ve found that sometimes, to get perfect coverage edge-to-edge, you might need to change the angle from 45 degrees and “push” the swab the second half of the way, otherwise you’ll only get one end of the sensor totally clan. However, this is my unofficial, potentially controversial, suggestion. Feel free to follow the official instructions more closely than I do.
Either way, wipe it once, all the way across in as smooth of motion as possible, then flip the swab and wipe the sensor again with the other (clean, but still moist) side of the same swab.

If you bought the correct size swab for the size sensor you have, you should be able to wipe the entire width of the sensor in one stroke. However, if your particular camera has slightly more surface area, you may need to wipe one edge of the sensor first and then the other edge. The sensor may seem to get a little bit more wetted than with a single swipe, but it’ll be fine.

NOTE: The cleaning solution is alcohol based, if I am not mistaken, and can’t possibly cause any “stickyness” or other damage to your sensor, when used correctly. So, don’t panic if you see the residue on your sensor, it’s fine! Just hurry on to step 2…
Step 2) Wipe The Sensor Dry
Quickly return the wet swab to its pouch, and grab the dry swab. They’re clearly labeled “WET” and “DRY”, and also have a “1” and “2” in case you need help remembering which order to do things in.


Use the dry swab in the exact same way as the wet swab, that is, gently and smoothly wipe it across the sensor. The dry swab may not completely soak up all of the visible residue that was left on the sensor, even after you’ve wiped it across using both sides of the swab. Some photographers report that they usually just let this dry, and it vanishes on its own, while others report that if you let it dry, you could indeed see the residue in your photos at f/16-22, especially if you wildly over-edit your photos with the Clarity and Dehaze sliders like I demonstrated above.
So, here is another personal experience of mine that “official instructions” might frown upon: Give the sensor a good wiping until it is totally smudge-free. You should be doing this cleaning in a clean, indoor environment, without any dust blowing around from fans or windows or anything, so wiping your sensor a few extra times to fully dry it off is extremely unlikely to pose any threat to your sensor.
If you like following directions and being as safe as possible, just wipe the sensor twice with the dry swab, once on each side, and let the sensor dry the rest of the way if necessary. As soon as you’re done, put the dry swab back in its pouch.
Of course, as soon as your camera is ready, you’ll want to check and see if you got all the dust off! Put your lens back on, hit f/22 again, and shoot another picture of that plain white/grey wall, or sky, or whatever.

If you didn’t get all the dust, repeat steps 1 & 2. Of course, this brings us to the question that will cause all the “play it safe” folks to cringe: Do you crack open two new sensor swabs, or re-use the ones you just used?
Should You Re-Use A Sensor Swab?
Official answer: NO, DO NOT re-use a sensor swab. This is literally in bold, underlined capitals in the instructions: DO NOT REUSE!
(WARNING: SKETCHY ADVICE AHEAD)
…Yeah, I’ve done it before, and nothing horrible happened. The sensor did not get scratched. In fact, In my darker days as a “starving artist”, I re-used sensor swabs many few times. I’m not proud of it, but I wanted to be totally honest with you, the readers.
I do crack open a fresh swab whenever someone else pays me to clean THEIR sensor, of course, but I’ll probably re-use that same swab on my own sensors later. To date, after the 12+ professional APS-C and Full-Frame cameras I’ve owned, and the hundreds of times in total that I’ve cleaned all their sensors, I’ve never scratched a sensor.
 Saving ’em for later? Do as I say, not as I do!
Of course, common sense is required. Never clean your sensor outdoors with wind and dust blowing around. Even indoors, keep your work area very clean, dust often, etc. (HEPA air purifiers are great!) Also, always use a dust blower on your sensor first, before you do a wet clean.
Lastly, if you ever get sand in any of your cleaning equipment, whether lens cloths or any kind of wipes, thrown them all away and get new everything. A new lens cloth costs infinitely less than a new lens front element!
Okay, that’s all there is to it. It’s a very simple, relatively safe procedure. I’ve never had any accidents even with bending the rules a little bit, and It’s even safer if you follow the instructions to the letter.
Aurora Camera Sensor & Lens Cleaning Kit | Pros, Cons, Who Should Consider It
As I’ve already outlined, the Aurora Camera Sensor & Lens Cleaning Kit solves the single largest (scariest) problem with wet sensor cleaning: The product comes with packets of both wet and dry sensor swabs. This is definitely the biggest advantage to me, and probably a huge, deal-making advantage for anyone who is not as confident (blasé?) about sensor cleaning as I’ve been.
I can also say that the physical quality of the swabs themselves is fantastic. With some photography accessories, you can cut corners and get the cheap eBay version, but this is NOT one of those types of accessories. You want a good quality product like the Aurora Camera Care kit.

Additionally, the included instructions are very complete, and simple to understand. The only thing I will mention is that while the instructions do mention different types of cameras including those with mirrors & shutters and those without, they don’t specifically mention Sony sensors. Sony’s mirrorless cameras all leave the sensor fully exposed when the camera is off, however by default the IBIS unit can be a bit wobbly on some (all?) cameras when turned off. So, instead of just cleaning the sensor with the camera turned off, like you seem to be able to do with the Nikon Z-series mirrorless and Canon EOS RP, you need to go into the Sony menu system and first use the built-in sensor cleaning function, and then while the camera is still on, immediately clean the sensor manually. The camera is actively holding the sensor still for you, until you turn the camera off.
(By the way, I’m sorry to say Sony’s built-in sensor cleaning “shakey-shakey” mechanism doesn’t really seem to be very effective, and there no option for it to automatically activate at camera on/off.)
Lastly, the reality is that you’re really only buying five cleaning sessions, not ten. Unless you’re a crazy, reckless rebel and you decide to re-use your swabs once or twice. Then again, even if you buy packs of 12 swabs of other brands, you’re kinda really only buying six cleaning sessions, if you follow this same, safest procedure.
For me, I definitely consider the Aurora kit to be the best, most hassle-free choice.
Other Sensor Cleaning Solutions | (What Not to Buy?)
So, what other options are out there? I’m not going to name names, because I might get angry comments from people who love some of these other products/methods.
Simply put, though, I don’t recommend any other sensor cleaning solution that actually touches your sensor. No static brushes, no sticky goop-on-a-stick, and absolutely under no circumstance should you ever try putting tape on your sensor. Wet swabs are the only way to go.
Also, avoid super-cheap stuff that you find on eBay etc. Cleaning your sensor is a lot like memory cards: You’re trusting your actual images to this workflow; in fact, you’re dealing with a camera that cost hundreds or thousands of dollars! Don’t cheap out.

The only other product I can recommend having with you at all times is of course a Rocket Blower. Of course, the official “Rocket Blaster” is made by Giottos and you can get them for about $16, which I do highly recommend because there is indeed a difference in effectiveness between the Giottos and the cheap generic ones.
Rocket blowers, especially for mirrorless sensors, are something I use constantly. If you have a Sony camera and you switch lenses more than once a week, especially if you ever shoot at f/8 or smaller, then you need one of these. You still also need a wet cleaning kit, of course, but a rocket blower every 2-4 lens swaps will help reduce the amount of wet cleaning you need to do. Personally, I wet clean my sensor(s) once or twice a month, depending on how dusty my various adventures are.

Review Conclusion
In conclusion, I think everybody should clean their own sensor. Even if you’re really clumsy, or downright terrified of touching your camera’s sensor at all, don’t worry, it’s OK, you’ll be fine!
The Aurora Sensor Cleaning Kit is a perfect tool for both first-time cleaners, and experienced photographers who are looking for a professional solution. I don’t know what else to say, except, follow the instructions, relax and take a deep breath, you’ll be fine! You’ll also save tons of money throughout the life of your photography career/hobby.
You can purchase the J.Cristina Aurora Camera Care Kit for $25-30 depending on if you want the additional lens cleaning wipes or not.