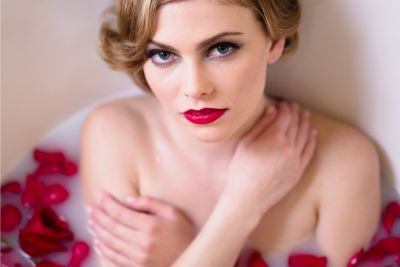
Milk bath photography has been a big favorite in creative boudoir images ever since Annie Leibovitz teamed with Whoopi Goldberg for the iconic milk bath image. One of the reasons it’s so popular in boudoir is because it gives a dreamy, ethereal quality to the images, especially with the addition of flower petals to the bath. While boudoir photography is well known for more intimate portraits in bedroom settings, milk bath photography provides a creative alternative.
If you’re not sure where to start with milk bath photography, then we’ve got some top tips for you in this article to help create intimate and sensual portraits.
1. How to Set up for Milk Bath Photography

You’ll need the basics, of course. Milk, warm water, and a bathtub are all you need to set up for a milk bath photo shoot, so it’s not going to cost you a fortune.
How much milk do you need? Usually around 3-6 liters of milk for each shoot. Whole milk works the best, but if you don’t have it, milk powder will do. Fill the bathtub with warm water and start adding milk. Bear in mind that less milk will give you translucent water, and more milk gives an opaque mixture that hides everything below the surface of the water.
If you’re not sure how much to add, don’t put all the milk in at once. Add it gradually until you get to a level of transparency that you like. Leave the milk to mix and settle for around 10 minutes before starting the shoot, and if you use milk powder make sure it’s well-mixed with no unsightly clumps and lumps in the water!
Make sure your model has a set of dry clothes for after the shoot – and she should bring at least one towel. You should use a clean floor mat and have a couple of towels handy for wiping any water on the floor so it’s not slippery.
2. Clothes and Accessories for Milk Bath Photography

If your model wants to wear something, then a sheer, see-through dress, lingerie, or fabric made of lace or chiffon will work well. If they want a bit more modesty, then a white dress will also work. It’s worth experimenting with different clothes and fabrics, especially if you or the model wants a more fashion photography vibe to the shoot.
3. Choosing Camera Settings

If you want a minimalistic, dreamy look, choose a shallow depth of field between f/1.4 and f/5.6. If you are using props, then you want a wider depth of field to keep them sharp too. Anything from f/6.3 to f/9 is where you want to be aiming, depending on the props you’re using.
If you shoot in any of the Auto modes on your camera, then it will likely give you underexposed photos. This is because the bright white surface of the milk confuses your camera’s light meter. To avoid this, use exposure compensation to overexpose your shots by one or two stops.
If you don’t already shoot in RAW format, you should for milk bath photography. This is because it’s easier to correct exposure issues like burned-out highlights and color temperature in post-processing software after the shoot.
4. The Perfect Lighting for Milk Bath Photography
Natural light is the perfect partner for milk bath photography (but not direct sunlight). Natural light gives soft shadows and even light, which is ideal. However, it’s not always possible to use natural light, so you may need to go with an off-camera flashgun or two with softbox modifiers to give a soft light. Large white reflectors can also lift any shadows.
Studio strobe lights are often too big and unwieldy to use in a small bathroom, and there’s also the danger of water and electricity mixing, so it’s best to avoid studio monolights unless you have the space to use them safely.
Some photographers decide to use inflatable pools outdoors for milk bath shoots so they can make use of natural light. However, in cold climates, this is not going to be an option – hotel rooms with decent natural light can be a good alternative if your budget will stand it.
Because milk baths are reflective, watch where you stand during the shoot, or you may end up with reflections of yourself in the photos!
5. Props and Posing

Rose petals and different flowers are popular for milk bath photography, but you don’t need to stick to this. Use colored glitters on the model’s face or body to give a different look, or use sliced fruits instead of flowers in the water.
If you’re using flowers, they need to be clean and not full of pollen. You don’t want dirt or pollen polluting the whiteness of the milk bath, so artificial flowers are often the way to go instead.
Keep the colors as neutral and soft as possible. Pastel colors don’t clash with the bright white of the milk, so they are ideal for this kind of shoot.
Posing your model effectively can be hard, but with milk baths, the milk and water help a lot as only the parts above the water show. This is good if your model has certain body areas she doesn’t want in the photos, as you can experiment with poses to hide the bits she doesn’t want everyone to see.
Make use of the white negative space around the model that the milk bath provides, but don’t forget to home in on the smaller details in some photos.
Final Thoughts

Milk bath photography doesn’t have to be cliched. You can create original, subtle, or sultry boudoir images with the right lighting and props, and the only limit is the imagination. We hope you gained some knowledge and inspiration from our milk bath photography tips to use in your next photography project.


Get Connected!