We’ve teamed up with Adorama to bring you a series of photography tutorials called “Master Your Craft” to be featured on their YouTube Channel. Subscribe to see more of our videos on their channel that cover photography, lighting, posing, and editing education to help you hone your skills and master your craft. To watch the entire series, check out our playlist!
Video: 3 Ways to Level Up Your Creativity Without Buying Additional Gear
It’s really quite simple. You can use simple techniques and the gear you already have (a camera, a lens, and maybe a tripod) to level up your creativity. This article expands on concepts covered in our Photography 101 workshop.
[Related Reading: How to Use the Lightroom Panorama Tool | Quick Reference]
Technique #1: Wide Aperture Panoramic Stitch

This technique was popularized by Ryan Brenizer and is often referred to as the “Brenizer Method.” The benefit of using this technique is that it allows you to create a wide angle image with an impossibly shallow depth of field. I say “impossibly shallow” because capturing this wide of a shot with this shallow depth of field in a single frame would require something like a 24mm lens at f/.2 (that’s f-point-two, not f-two), which—to my knowledge—doesn’t exist.
How to Capture a Wide Aperture Panoramic Stitch

- Grab a prime lens (preferably a 50mm, but whatever you have should work).
- Widen out the aperture as wide as it’ll go, preferably anywhere between f/1.4-f/1.8.
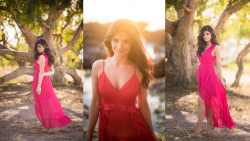
- Shoot your subject at the right distance. In other words, your subject should fit vertically into an entire frame (see the sample above). This makes it easier to stitch your images together, especially if the subjects are moving a bit. If you’re too far away from your subject, you lose the added depth of field that a wide aperture pano-stitch photo offers.
- Dial in your settings and lock your focus onto your subject. This is critical. Make sure your lens is set to manual focus after locking onto your subject so that you don’t refocus for each new shot in the series.
- Shoot the Panorama. I prefer to start in the center and then work my way to the left, and then to the right. From there, if I want to include more vertical space, I would start at the center again and then work my way to the far left at a lower level to include more vertical space, and so on (see image collage above). It’s good to overlap each shot so that the stitch is possible in post.
Keep in mind that the final stitched image will be a super large, high-megapixel image, given that it’s comprised of multiple high-resolution photos. For this reason, I recommend shooting in a medium or small RAW format. Otherwise, the amount of resulting data for the stitched photo will slow your computer’s performance and require extra time to process.
Additional Shooting Tips

For the image on the left, I lit the subject using a Profoto light for external flash inside a softbox. The image on the right was captured using natural light. You can play with different lighting effects to achieve a variety of looks.

As you can see in the image above, using different lenses will open up the possible outcomes for your wide aperture panoramic stitch portraits as well. For this image, I used a tilt-shift lens and set my focus right to the subjects’ faces. This allowed everything else to fall out of focus and in an ultra-negative space-type shot.
How to Edit a Wide Angle Panoramic Stitch

- Open the images in Lightroom and select all of the images that will be used in the panorama.
- Hover over one of the images, right click, and select Photo Merge > Panorama (see above).
Lightroom will merge the series of photos into a DNG file of the panorama. This will give you the full editing flexibility of a RAW file.
Technique #2: Pan for Motion

One of the easiest techniques you can use to level up your creativity is adding motion. When we pan for motion, we need to do the following:
- Slow the shutter speed down to a sweet spot (usually between 1/10 and 1/50) that allows you to capture motion. The exact shutter speed will vary, depending on the speed of the movement you’re capturing, lighting conditions, etc. Just remember, faster moving subjects will require a faster shutter speed while slower moving subjects require a slower shutter speed. If the shutter speed is too slow, you’ll have a hard time keeping the focus on your subject sharp.
- Set your exposure with ISO and Aperture.
- Choose a focal point. You’ll want to place your focal point somewhere in the frame that complements your composition. Use the focal point to lock focus on your subject as the subject moves past.
- Position the camera close to your body for stability. It can help to use the viewfinder for this effect because it allows you to keep the camera tucked close to you. Holding the camera away from your body will increase the risk of introducing camera shake into the photo.
- Set your camera to high speed and shoot through the entire sequence of your subject passing by. This will give you a better chance of capturing a sharp subject.
- Pan to follow your subject, moving in the same direction and at the same speed.

Expect to practice this technique in order to master it.
[Related Reading: Panning Video Tutorial for Photography – Shooting Moving Subjects]
Technique #3: Shutter Drag for Motion

Instead of moving our cameras with the subject to create motion, we can use shutter drag to capture movement. We just need to hold the camera still and slow the shutter speed enough to show the surrounding environment. Here’s how to do it:
- Place the camera on a tripod.
- Dial in your composition and move your subjects into place. Before placing your subjects, make sure that you’ve instructed them to hold completely still while you capture the shot. The slow shutter speed can quickly render your subjects out of focus if they move.
- Slow the shutter speed enough to show motion. Here’s a quick breakdown for typical shutter drag shutter speeds:
- .5″ to 2″ for “wispy” water
- 10″ to 20″ for a foggy effect. This may require creating a composite with one frame exposed for the subjects and another for the motion in the water.
- The maximum amount of time that subjects can hold still without getting blurry is one to two seconds, so you may need to create a composite and expose for the subjects in one frame while capturing the movement (of passing cars, crashing waves, etc.) in another frame.
- Dial in your exposure with ISO and aperture.
- Capture the shot.

In the image above, 1/10″ was enough to capture the entire scene in motion. You can learn more about how we created this shot here.

If you’re doing this technique in broad daylight and you image is still overexposed after lowering your ISO and closing down your aperture, you may need to invest in a Neutral Density filter, preferably one that dims your exposure by 3-5 stops.
Conclusion
We hope you enjoyed these tips on three ways to level up your creativity without having to buy additional gear. You can revisit these and other concepts in our Photography 101 workshop and dive further into the fundamentals of portrait photography.
Be sure to catch our next episode of Mastering Your Craft on Adorama’s YouTube channel next week! If you want to catch up on all the episodes, make sure you check out our playlist!