No matter your experience, I’m going to make off-camera flash easy and a lesson you can learn in less than 10 minutes. While we have full-length courses dedicated to truly understanding and mastering off-camera flash, I wanted to create a short guide for those of you that need a refresher or are looking to learn the basics before heading out on a shoot. While this video may serve a purpose for a quick answer, I highly recommend joining our Premium membership where you can find practical and detailed info on flash photography and techniques.
Video: Learn Flash in 10 Minutes
People make the subject of off-camera flash photography incredibly complicated when it really doesn’t need to be. We created a framework called C.A.M.P, designed to help photographers through this process and establish the importance of thinking before doing. Before you even pick up your camera or touching your flashes, run through our C.A.M.P. framework and simplify your lighting process.
- Composition: What do we want our scene to look like? Where do we want the camera to be? What’s the angle? What do we want our subjects to be doing?
- Ambient Light Exposure: Choose the intention of the scene. Do we want a dramatic image (darkening the ambient light and using more flash) or do we want a softer image (brightening the ambient light and using a more natural power of flash)?
- Modify/Add Light: Are your subjects visible in the frame or do they need to be chiseled out? Do you need to add an additional light source?
- Pose & Photograph: Take your shot!
Let’s walk through this flash tutorial with C.A.M.P as our guide.
1. Composition
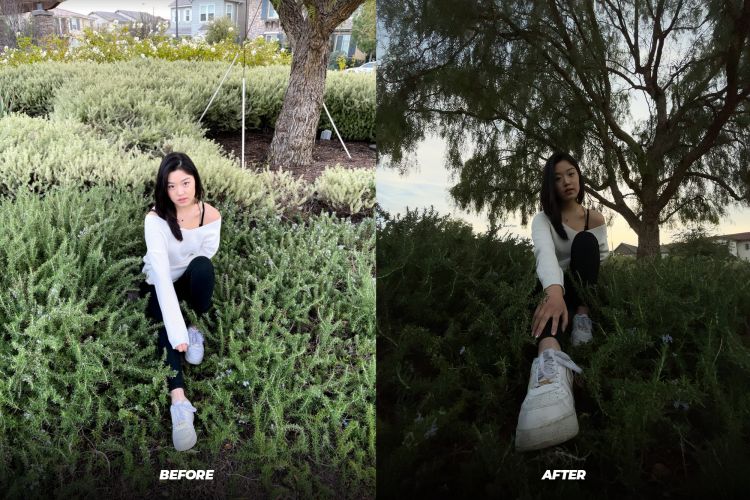 I’ve placed our model Chloe on a small junction box underneath this tree. This is a small park in my neighborhood that I happened upon while location scouting and thought it would be perfect for this tutorial. You’ll notice that we have some great things going for us already in terms of composition and natural lighting. The scene is backlit and we’ve got a natural frame for Chloe as she is surrounded by shrubs. To make this a little bit more interesting I’ve decided to shoot this portrait on a wide-angle lens which allows me to use perspective as one of my compositional tools. I next bring the camera angle a little lower to really use the tree as a framing element and still have the sun behind her to create some flare. Now that we’ve fine-tuned what we want our composition to be, let’s get into our exposure settings. To be quite honest, this natural light photo isn’t all that bad, but let’s see what happens when we add flash.
Related Reading: What You Should Check Before Taking a Photograph
2. Ambient Light Exposure
 Now that we’ve fine-tuned what we want our composition to be, let’s get into our exposure settings. To be quite honest, this natural light photo isn’t all that bad, but let’s see what happens when we add flash. I started out at 1/250th, ISO 100, and f/1.4. A darker in-camera exposure is going to require more flash power and will yield a more dramatic image. A lighter or brighter exposure in-camera requires less flash power and that’s going to give you a more natural and brighter looking image. Dial-in your exposure based on the intention you’ve set for your photograph. I want to keep my ISO and aperture the same but alter my shutter speed to 1/2500th of a second. The C.A.M.P. framework is designed to give you a step-by-step process you’re controlling one variable at a time. So now that we’ve taken care of the first two steps, we can start focusing on our primary light source and whether or not we need to modify or add light.
3. Modify or Add Light
We can’t really modify the existing light because we don’t have enough light to bounce into the shot, which means we have to add in additional light in order to balance out the scene and make sure our subject is well lit. For this tutorial, I am using the Profoto A10 on a MagShoe attached to a Manfrotto light stand. Whatever flash setup you have will work just fine, this is just the one I prefer. To see more of our flash photography gear favorites and recommendations check out this guide!
In order to create a softer light source, I am adding an inexpensive shoot-through umbrella to my flash stand and placing it close to Chloe at about 45 degrees. Since we are using a shutter speed that goes above 1/200th of a second you have to turn on the high-speed sync function. This is going to reduce overall flash power but it lets you sync flash to shutter speeds above 1/200th of a second on your camera. From there, you can also bring the light closer to make it more powerful or bring it away to make it less powerful but that will modify the quality of your light as well.
4. Pose/Photograph
Now that we’ve taken care of all the variables, all that’s left to do is pose and photograph our model! The final image you see on the right was edited with our Visual Flow Lightroom Presets.
This doesn’t even begin to scratch the surface of what you can accomplish with flash. If you’re interested in diving deeper into more in-depth lighting education, you must check out our Premium library of courses, which includes 4 comprehensive lighting workshops.


Get Connected!