Lightroom Presets v5
In the new Lightroom Presets v5, we have revamped all of the presets to improve image tonality and quality, allowing you to achieve even more amazing results. We’ve also added 95 new presets to reach a total of 311 presets.
In this series we’ll be going over how to use the new v5 presets to create great looking photos. Click Here to learn more or purchase the system.
Introduction and Look
Welcome to our weekly Ordinary to Extraordinary Raw Edit featuring the Lightroom Presets v5. With each of our Ordinary to Extraordinary Edits, we’re going to first be going through how we create our effects with the SLR Lounge Lightroom Presets v5, then we’ll be going through the details in the develop settings so everyone can understand exactly what the presets are doing. This way, whether you have the presets or not, everyone can benefit from watching this video or reading the article below.
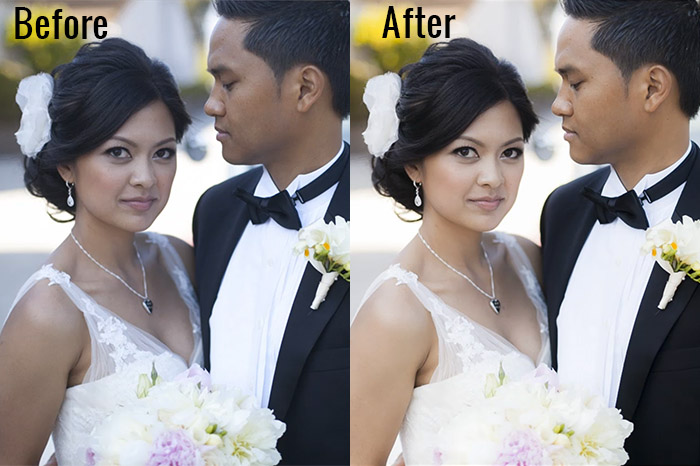
In this weeks edit, we want to create a soft and flattering look for color portraits. Overall, we want to maintain good overall contrast, while flattening out highlights and smoothing out the details a bit for a more flattering look. Each one of you will probably have different preferences in regards to overall contrast, but this Base preset and modification are pretty much our foundation for all of our color portraits. Here is what the photo looked like before and after the effect is applied.

Lightroom Presets v5 Mixology Recipe
For this photo we only used 2 presets. The Base Preset 11a. Extra Soft-Skin Desat really does all the work for us, we are just adding a bit of extra Shadows/Blacks for added contrast. If you like, you can save it as a new custom Mixology, however, since it is only a 1-click modification on our existing Base Preset, we will not be adding this to a new custom Mixology Preset.
Develop Mixology
1) 01-10 Base-Soft 11a. Extra Soft-Skin Desat
2) 03-40 Adjust Shadows Blacks 42. Darken-Medium -15, -30
Adjust Exposure, Temperature and Tint to taste.
Local Adjustments
We used the Graduated Filter and used the “04 Dodge (Brighten) +.5 stop” to brighten up the bottom left of the photo. To see exactly how it was applied, watch the video tutorial below.
Watch the Video Tutorial
Complete Written Tutorial
For those that don’t have the SLR Lounge Lightroom Presets v5, follow the written tutorial below to achieve the same look. As a general practice, the first thing I always do is just check the EXIF data on the photo which can be toggled by pressing “i”. If you want to customize the data that is shown when you press “I” you can press “CMD + J” or “CTRL + J” and you can customize what kind of EXIF Data you want to see. When we press “I”, this shows us exactly how the photo was shot. In general, I like to check my EXIF data to help me get a quick understanding of how much noise reduction/sharpening an image might need.

We started off in the 01-10 Base – Soft preset folder and applied the 11a. Extra Soft – Skin Desat preset. This preset is doing most of the heavy lifting in our overall look. Really all we need to do is adjust the image temperature and contrast to taste. So, let’s go over what this preset is actually doing starting with our Basic Panel adjustments.

In the Right Side panel of the Develop Module you can see that with this “Soft Portrait Preset” we’re lowering the highlights, shadows, whites, and blacks. The reason why we do this is to flatten the highlights over skin, then we brighten up the image to compensate. We do this to bring the Shadows, Mid tones and Highlights a little closer together making for more even and flattering skin tones. We also lower the clarity to drop the mid-tone contrast, once again for a more flattering look for skin tones.

You can see under Saturation that we have the red and orange pulled down a little bit, and that was from the “11a. Extra Soft – Skin Desat” preset. When this preset is used, it gets rid of the red and orange highlighting that can appear in shadows and highlight areas of our subjects skin.

In the Tone Curve we have a standard “S” curve, giving us a subtle contrast boost.

We like to add a little bit of Noise Reduction Luminance to our Portraits because it is a quick and effective way of smoothing pores on the face without killing too much detail. Because this photo was shot at such a wide open aperture and has such a shallow depth of field, we’re also adding a little more sharpening than usual. We don’t use “profile adjustments” for portraits because it applies different pin cushion and distortion effects that changes the way people look from the way we viewed the image in the lens.

Because of the natural lens vignetting in the photo, it creates a unpleasing look to the color of her skin on her arm as it reaches the bottom of the frame. An easy way for us to correct this is to use a Graduated Filter. We simply select the Graduated Filter and set it to “04 Dodge (Brighten) +.5 stop”.

We drag up the filter from the bottom left to the strap of her dress and what we’re left with is a nice even color and exposure on her arm. Here are the final before and after images.


Conclusion and Learn More
We hope you all enjoyed this tutorial. If you are interested in learning more or purchasing the SLR Lounge Lightroom Presets v5, please click any of the links in this article.
Stay tuned for more weekly edits!