Raw files contain nothing more than the unprocessed image data captured from your image sensor. To translate these files, there is a surplus of software solutions that can interpret the 1s and 0s into the image you captured, and Adobe came up with two. One is the default editor for most photographers, Lightroom. About 99% of the photo editing I do takes place in place in Lightroom and every once and while a photo needs a little finesse that can not be done within the confines of a catalog; that is where the second solution falls. Adobe Camera Raw (ACR) comes part of Photoshop itself, and both Lightroom and Camera Raw use the same processing engine to achieve the same results. However, plugins and presets are not directly compatible with each other.
[REWIND:3 PHOTOSHOP TIPS TO STOP YOU RUINING YOUR PHOTOS. DO YOU COMMIT THESE EDITING SINS?]
One of the biggest benefits of Lightroom is that it can apply my favorite presets automatically when I import my images, saving me time and makes my work consistent. Some of my favorite Lightroom presets, like the SLR Lounge’s Lightroom Presets CC, don’t come with Camera Raw counterparts; however, there is a workaround to import Lightroom presets that you already have and love into Camera Raw.
Apply the Preset
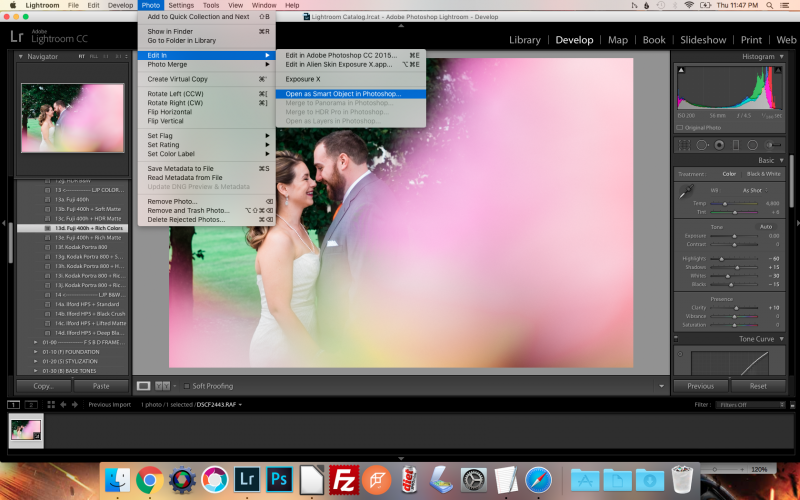
From Lightroom’s Develop Module apply the presets or mixology that you want to transfer into ACR. Here I applied of the Fuji 400h presets.
Export to Photoshop
Choose Photo → Edit in → Open as Smart object in Photoshop. This will transfer the image along with the preset applied. From Photoshop. click on the Layers Pallet, this will open Camera Raw.
Create the Preset
Click on the Presets tab and click on the Create New Preset (small button by the trash can bottom right) option. A dialogue box will appear with multiple options. Unclick – White Balance, Transform, Lens Profile, Chromatic Aberration, Lens Vignetting, and Camera Calibration. Rename the Preset to you liking. The preset will now be available from the Camera Raw panel.
While most of the Lightroom adjustments in the Presets will be transferred, Graduated Filters and local adjustments will not, and keep in mind that like any preset, the effect will vary from photo to photo and will need fine tuning.
To get the most out of SLR Lounge’s Lightroom Preset System, check out our Lightroom Crash Course.
LIGHTROOM CRASH COURSE – THE ULTIMATE LIGHTROOM COURSE


Get Connected!