What Is Symmetrical Photography?
Symmetry is when a picture has two or more matching halves. You could draw a line down the middle of a symmetrical photograph, copy and flip one side, and it would look exactly the same.
What are the Three Types of Symmetry in Photography?
In symmetrical photography, you’re basically talking about balance in your captured photos, and you can do this in three different ways: horizontal, vertical, and radial.
1. Horizontal Symmetry
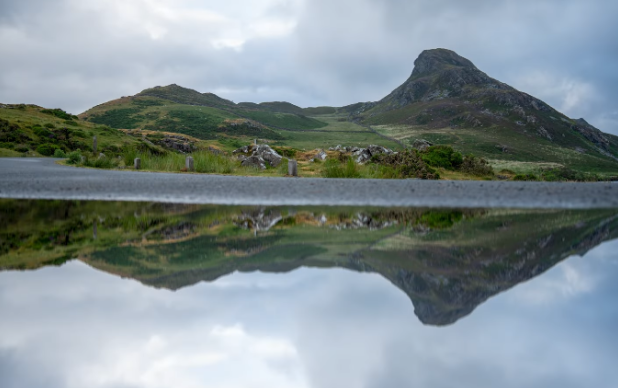
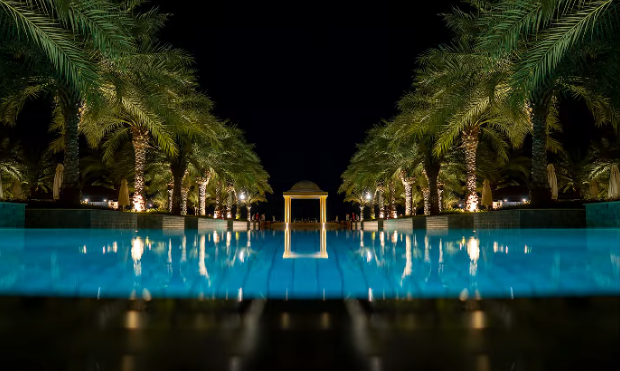
Horizontal symmetry is one of the easiest to see and one of the most dramatic forms. It happens when a scene or subject is mirrored across a horizontal line, so the top half and bottom half look the same. The most obvious symmetrical form is a reflection.
In photography, you often see this in nature. When the water is still, it acts like a mirror and reflects mountains, trees, or a skyline. A mountain that reflects in a calm lake or the colors of a sunset mirrored on a quiet river are some of the best examples of horizontal symmetry.
2. Vertical Symmetry
There is also vertical symmetry. This is when each side of your photo is a mirror image of the other, and this technique goes totally against horizontal symmetry. Instead of the top and bottom reflecting one another, the left and right sides mirror each other across a vertical line.
You can witness vertical symmetry in many subjects. The human body shows it, the front of buildings often has it, and vehicles are also designed with symmetry down the center. Because it is so common, you can use this type of symmetry to capture amazing photos.
3. Radial Symmetry
Radial symmetry is different from both horizontal and vertical symmetry. Instead of being split along a line, the symmetry spreads outward from a center point. This creates balance in multiple directions at once.
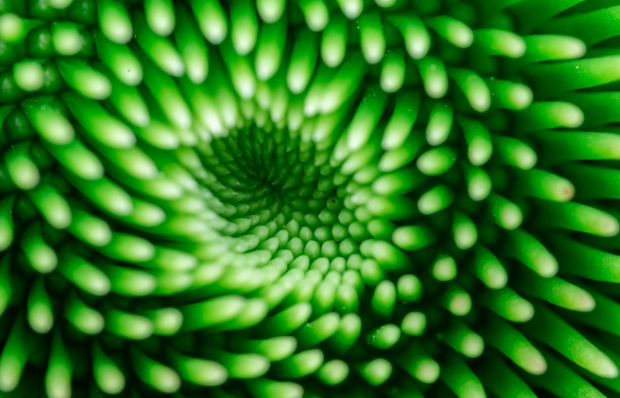
You find radial symmetry in many natural shapes:
- A flower viewed from above shows petals spreading evenly around the center.
- A starfish has arms extending outward from its body.
- A jellyfish viewed from above shows the same kind of pattern radiating in every direction.
How to Take Symmetrical Pictures?
To capture horizontal symmetry, you need patience. If the water is disturbed by wind, ripples break the reflection. You sometimes have to wait for the surface to become perfectly still before the reflection appears clearly. That waiting may take time, but the result is worth it.
You can also manufacture this by pouring a bit of water over the pavement and then lowering your camera to that bit of water, or by using a puddle. Even though it may be windy, you can still get low and take a photograph. Unless the puddle is huge, it may not be the best, but it gives you an idea of what is possible with a small body of water.
To photograph with vertical symmetry, you need to identify a vertical line of reflection in your frame. You then center that line carefully so both sides balance. It does not always have to be perfect, but the closer the two sides are to being the same, the more powerful the effect looks.
Achieving this often means adjusting your position. You may need to move left or right until you are directly in the middle. Sometimes you zoom in or zoom out to include both sides of the subject. You must also pay attention to details on each side so one side does not overpower the other.
To capture radial symmetry in a photo, you need to frame it from the right angle. That usually means you need to position your camera directly above or directly in front of the subject so the pattern is clear. The closer you are to aligning with the center, the more obvious the radial design becomes.
What are the Best Camera Settings for Symmetrical Photography?
You don’t need a special camera for symmetrical photography because it is all about what photographers call composition, which sits at the heart of every picture. No matter if you pick up a small webcam, a regular camera, or a big professional one, the same idea applies. The gear doesn’t control the symmetry; your choice of framing does.
The only tool that can really make a difference is a tripod. When you hold a camera by hand, even the smallest shake throws your balance off. A tripod locks the camera in place, and that alone changes the outcome. It also forces you to slow down. Since the camera isn’t moving, you naturally take more time to check the frame, step back, and make sure both sides match. That extra pause is exactly what symmetry photography needs.
Cameras also have some built-in features that help with balance. A good one is the bubble level. It tells you right away if your camera tilts. If your camera doesn’t have that feature, most tripods do. That way, you know the camera sits straight, and you can line up your symmetry with more accuracy.
Another feature worth using is live view. Instead of looking through the tiny eyepiece, you see the shot on the big screen at the back. That view feels closer to a finished photo, so you notice details that slip past in the eyepiece. With the camera on a tripod, the screen turns into an easy way to judge the whole frame before you click.