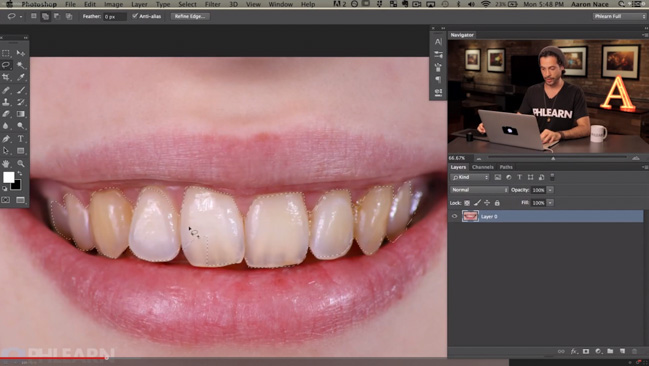
Perfecting a smile with teeth whitening in Photoshop is a skill every portrait photographer must master sooner or later. It’s imperative to emphasize from the outset the importance of moderation. While the temptation to achieve that ultra-bright, magazine-cover smile is understandable, overdoing it can lead to results that are less than natural, where teeth unnaturally outshine every other element in the image. We’ve all witnessed portraits where the teeth are so excessively whitened, they seem to emit their own glow—a stark reminder of the fine line between enhancement and overkill. This article is designed to guide you through the process of whitening teeth in Photoshop efficiently and effectively, ensuring you strike the perfect balance between a bright smile and a realistic outcome. Whether you’re refining a look for professional purposes or just enhancing personal photos, the techniques shared here will help you achieve beautifully natural results without venturing into the realm of the overly artificial.
How To Whiten Teeth In Photoshop In 2 seconds
The two second part of this teeth whitening technique is kinda cheating: use my action. All the action does is set everything up for you. Once run, you’ll end up with a few layers which will work the majority of the time. All you have to do is paint the effect onto the teeth in question.

Even though you could simply use the action and forget, I’m still going to take you through the setup. Why? Well, firstly it’s important for you to know how this stuff works. If you only ever rely on actions, you’ll never learn anything. You’ll always be asking, is there an action for this? Secondly, to get the most out of this method, you’ll need to make some little adjustments once the action has run.
How The Teeth Whitening Works
If you were paying attention at the beginning, you’d know that I take a less is more approach to retouching. I want my subject to remain who they are and look real. In certain circumstances, you may be asked to aim for perfection, but I always start with what’s natural and go from there. As such, you’ll notice a layer called “more whitening”. If you feel you want, you guessed it, more whitening, increase the opacity of that layer.
The “More Whitening” layer contains a blank, white layer, using the blend mode ‘Soft Light’. The effect has been made more natural by removing it from the shadows. To do so, I used Blend If. You can access the Blend If controls by double clicking on your layer, which will take you to the Layer Styles dialogue. By ‘ALT-clicking’ on the sliders at the bottom, you are able to gradually remove the effect from either the Shadows or Highlights. The final effect of this layer is controlled by opacity.

Removing The Yellow And Making It Look Natural
To remove the yellow, I add a Hue and Saturation layer. The master saturation is dropped a tad (-5) but the main adjustment is made within the yellow channel. By removing the majority of the yellow saturation teeth begin to look more white. Be careful here. De-saturate too much and you’re left with gray. I find -40 works most of the time but you may need to increase it slightly depending on the severity of the color. By adding a small amount Lightness the teeth take on a natural brightness.

The final step I take to whiten teeth in Photoshop is to add a Levels layer. If you simply desaturate the yellows it won’t look natural. I can’t give you a definitive answer as to why this is, perhaps it’s because whiter teeth will reflect light differently, not sure. Whatever it may be I find that boosting the highlights makes a big difference. However, it’s important to temper this boost with a slight darkening of the mid-tones. If not, it looks fake.

If you feel you need an extra boost to the whitening, I’d suggest increasing the effect of the Levels layer and / or tweaking the sliders in Blend If on the “More Whitening layer.

Teeth Whitening Action Download
Keep it real. Unless you’re being told what to do by a client, try to have a natural approach to retouching. Maybe it’s just me, but I can’t stand portraits that look fake. I have no issue with people who make significant edits but you’ve got to keep people looking real. Plastic skin, over whitened teeth, crazy eyes, and so on are just some of the telltale signs of over-editing.
To download the free action, click here. To install it in Photoshop, all you have to do is drag it into your Actions panel.
Bonus Phlearn Video | How to Whiten Teeth in Photoshop
From being just a pesky distraction, discolored teeth can steal all the attention from an otherwise wonderful image of a pretty person. To achieve the look you are going for in Photoshop, there is no set path, but the route Aaron demonstrates is a bit more in depth than what I find many do, and the resulting finished product is that much more appealing.

While it seems to some that simply desaturating teeth to remove stains is the easy and acceptable fix, it should be noted that there is more to be done once a closer inspection of teeth is taken. Aaron approaches teeth by viewing them with 3 different layers which need to be addressed separately: the outer sheen, inner white and then darker areas, and he shows how just using layer masks and some blending tools the three can be quickly dealt with.
After administering the adjustments to color, you’ll see how using the liquify tool can take some disorderly teeth, and make them into something worthy of flashing for paparazzi.

In conclusion, whitening teeth in Photoshop is a straightforward process that can significantly enhance the appeal of your portraits, giving them a more polished and professional look. By following the steps outlined—selecting the teeth with precision, adjusting the hue and saturation for a natural white, and fine-tuning the brightness and contrast—you can achieve remarkably natural-looking results. Remember, the key is subtlety; overdoing the effect can lead to an unnatural appearance. With practice, this technique will become a valuable tool in your photo editing arsenal, allowing you to confidently improve the smiles in any portrait, ensuring your subjects look their best in every photograph.


