In today’s episode of “How We Shot it”, (recently known as “Photo of the Day”) …we are going to talk about wedding portraits in night-time scenarios in a dramatic outdoor hotel courtyard setting.
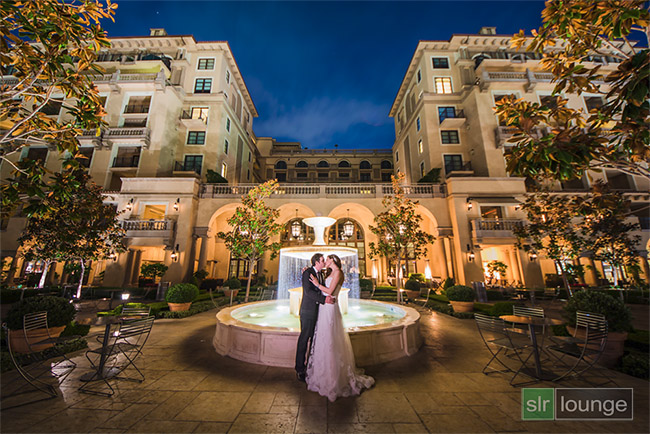
The Photo
 (Click here to view a larger version!)
The Equipment and Settings
- Nikon D7100
- Sigma 8-16mm f/4.5-5.6 DC @ 8mm
- Giottos Tripod
- Two separate Exposures:
- 1/3 sec @ f/4.5 & ISO 1600
- 30 sec @ f/5.6 & ISO 100
- Nikon hotshoe strobes & Pocket Wizard 2’s
How We Shot It
Creating an image such as this has four or five different aspects that must be considered. You’re shooting in extremely low light usually, with extremely great dynamic range between the brightly lit features below and the extremely dark sky above. So in no particular order, here are the things to concern yourself with when creating such an image:
- Use a Tripod and keep your ISO down
The first and most obvious order of business is to steady your shots. Even if you have the latest and greatest full-frame camera and f/2.8 lens, you are still barely going to cut it. The best results will come from using a tripod, and keeping your ISO as low as possible. - Use a strobe instead of constant light to illuminate your subjects
Why do we mention this? A video light may work some of the time if you can pull off a fast enough shutter speed depending on your ISO and aperture. However even then, you’re completely at the mercy of how still your subjects can hold, and a good number of images will turn out blurry. Oppositely if you use flash and your ambient lighting is dark enough not to interfere, then every single shot you click will be perfectly sharp as the flash freezes motion. - Use another flash to illuminate the scene from behind
Whenever necessary, have a 2nd flash ready to illuminate your subjects from directly behind; or to simply create an accent light in the entire scene. - Gel your flashes correctly
Whenever you’re shooting in conditions such as this, keep in mind that the rest of the ambient light around is almost always very warm, in the 3000 Kelvin range. To compensate for this, use a gel on your subjects’ flash to try and “warm down” your flash color to about 3000 Kelvin. (Oppositely, if you want your background to be blue such as in my situation, leave the flash bare or apply a blue or other colored gel.) - Capture “safety” exposures after the subjects leave the scene
Once you’ve set your scene and photographed your subjects, have them step out of the scene (or let them get back to their reception party!) …and capture a few additional image frames. Once you don’t have to worry about human motion in your photos, you can easily drop down to ISO 100, and/or increase your aperture if necessary, to capture a very clean version of the scene. If necessary, bracket some of these shots and give yourself at least one exposure that brightens up any shadow areas.
The original images from this scene look like this:


As you can see, one image is darker (The high ISO image) so that it can expose properly for the subjects and the background immediately surrounding the subjects, (the fountain) …while the second exposure is much brighter to bring out some detail in the sky without adding noise. We will attempt to merge these two exposures in post-production later!
The Post-Processing
Tune in next time for a Weekly Edit video in which we will demonstrate how to prepare the original RAW images and then merge them together seamlessly in Photoshop!
Take care, and happy clicking,
=Matthew Saville=


