
For outdoor and landscape photography, getting corner to corner sharpness is often the holy grail. Achieving a massive depth of field where your entire image is fixed in super sharp focus can really make your images POP! So let me show you how.
You’ve basically got three options when it comes to nailing that mind blowing DOF.
1 – Choosing the right aperture and focusing carefully
2 – Focus Stacking
3 – Using a Tilt-Shift lens
For this article we’re going to explore the first option of ‘Choosing the Right Aperture and Focusing Carefully’ because this is within the capabilities of all photographers, costs nothing and allows you to shoot fast when under pressure.
Focus stacking is great but it’s a slow process during shooting and editing. Tilt-shift lenses are awesome but by heck they’re pricey!
Choosing the Right Aperture and Focusing Carefully
1. How to Choose the Optimal Aperture
To harness the potential of your lens you’ll need to select a fairly narrow aperture. Choosing an aperture of f/22 while focusing to infinity will allow you to capture everything in focus but be aware that such a narrow aperture will compromise your sharpness due to the phenomenon of light diffraction. Look it up.
2. Experiment With Your Lens
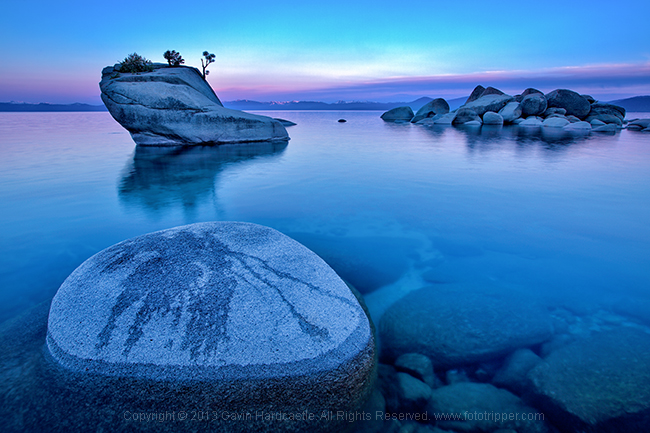
It’s essential that you put your lens through its paces by testing the results of images taken at different apertures. I find that my Canon 16-35mm gives me the sharpest images at apertures between f/8 and f/16 with f/11 being my ‘go-to’ setting for most shooting situations. Take the same shot at different apertures in the same lighting conditions and see which gives you the sharpest results. The shot below had an aperture of f/11.

3. Consider Your Foreground
So lets say you’re shooting a forest scene and you’ve got some really interesting mossy rocks in your foreground about 8 ft away from the lens. You’ve recently determined that your lens produces it’s sharpest results in low light with an aperture setting of F/8. You take the shot but that foreground looks kind of blurry.
This is where you’ll have to compromise on overall image sharpness so that you can get everything in focus, including that essential foreground. You could focus stack and stay at f/8 but lets say that time wont allow that. Try setting your aperture to f/16 and you’ll likely find the perfect compromise of image quality and corner to corner sharpness that you desire.
4. Choosing Where to Focus
This is a question I get asked all the time by new photographers. Here’s my method. For landscape photography with a huge depth of field I’ll usually pick an object that’s about two thirds of the way into the distance. The object must have some contrasting line that I can view in my cameras Live View mode. I’ll manually rotate the focus ring on my lens until that object appears sharp in my live view screen.
Examples of where to focus for big DOF:

 In my shot ‘Steamy Mornings’ of Punchbowl Falls in Oregon, I chose to focus on the small branches of a tree about two thirds of the way into my distance.
As you can see they offered the perfect subject in which to place my focus because they were sharp edged and in contrast with the dazzling morning mist. Lucky eh? I chose an aperture of f/16 in order to get the foreground leaves sharp.
 In my shot of Portland Japanese Garden, I deliberately chose NOT to focus on the tree which was my obvious subject. Instead I focused on a sharply back lit tree branch in the background.
I used an aperture of f/16 because I was quite close to the foreground. and I wanted the moss and leaves to be in focus. My DOF was… well, massive.

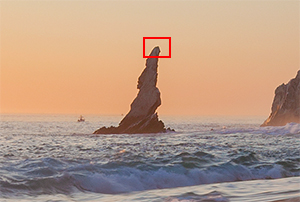 Finally my shot of ‘El Capitan’ in Cabo San Lucas, Mexico offers a very obvious focus point which also happens to be my main subject.
I used an aperture of f/11 to achieve a huge depth of field and used the sweet spot of sharpness in my 16-35mm lens.
I also prefer the sunstar at f/11 for this shot.
Give it a try
Now wasn’t that easy? Way quicker than focus stacking and a LOT cheaper than buying a specialty ’tilt-shift’ lens. Obviously you won’t achieve the same super sharp focus that those methods deliver but by choosing the right aperture for your lens and picking the right object for focusing you’ll be pretty damn close and you’ll achieve massive DOF.
Thanks for reading, please leave a comment and connect with me on Google +.


Get Connected!