[NEW REVIEW: Wacom Intuos Pro (New) Review | Refined & Essential]
I can’t function in clutter. I loathe clutter. I’m not necessarily OCD about it, but I learned a long time ago that it makes more sense for me to only acquire things I really really like, and/or utilize. I actually have Jennifer Love Hewitt to thank for this because as a kid, I would pretty much buy any movie she was in, which meant I ended up with a selection of utterly rubbish films.
This attitude carries over into photography, especially because it’s so easy to amass so many pieces of equipment you simply must have. Well, usually, you mustn’t, and then add to that I travel often and my gear goes with me, it becomes a necessity to only bring the necessities. After all, traveling today isn’t like it was before the fall of the Berlin Wall. Then, all you carried were your passports, a tatty picture of your betrothed, a bigger one of your mistress, and a paper map.
Now though? We have cell phones, laptops, tablets, and cameras, and I do my absolute best to avoid adding anything else to the list – but the one other piece I simply cannot do without now, is my Wacom tablet. It is an integral part of my photography, and my system feels naked without it. It will transform how you post process in any application, including Lightroom.

There are, at last I was told, close to 150 different editing applications that recognize and utilize Wacom touch/pressure sensitive tablets. That’s an astonishing number, and what that means, other than Wacom has the market covered, is that on almost any computer, using almost any remotely capable editing software with a Wacom tablet attached, you are able to approach retouching in a similar way.
Now, safe to say most people associate using a Wacom Tablet with Photoshop. I’ve written a few reviews on two Wacom tablets before, and among the many questions you, our extended family, have posed to me, two have stood out: “Why would I need a tablet since I do the majority of my editing in Lightroom?,” and, “Does it make more sense to buy your Preset System or a tablet for Lightroom?” [BOTH]
Clearly, there is a feeling that a tablet doesn’t serve much purpose for the Lightroom user. Over the coming weeks I’ll be sharing a few posts on Wacom tablet use, from how to set-up your tablet for Photoshop, how to do so for Lightroom, and today, allow me to explain why I think a tablet is still invaluable for all Lightroom users.
*Before I go any further, I think it prudent to mention I have no direct affiliation with Wacom, and will not even be getting an extra set of pen-nibs for my flattery.

These days, Lightroom is becoming a really dominant force in the photographic marketplace, and people are spending the bulk of their editing time in the LR Develop module. When Adobe makes an editing tool, all of us would be wise to pay attention, and personally, I feel no one pays more attention to this than Wacom. While the tablets may have begun simply as an input device that allowed a more recognizable way to navigate a GUI, the obvious applications were there for art, and by extension, photo editing.

The role of the tablet and pen is a rather obvious one: It’s an input device that lends to the computer the fluidity, and familiarity of using the pencil and paper we’ve used our whole lives. Quite basic at first, they have crawled out of their primordial ooze an entirely new beast of productivity, and Adobe and Wacom work together to make the user experience with these tablets significantly heightened. In many ways, these programs were designed with tablets in mind. You simply cannot do the same things the same way without one.
So while the association with tablets has largely been with Photoshop, Lightroom users often seem to be amiss where the tool comes into play. Frankly, Lightroom users, you can make the tablet totally integral to your Lightroom workflow. The tendency is to associate the tablets with functions that utilize pressure sensitivity and the pen motion, such as the adjustment brushes, but there’s more to it and I’ll explain.
Tools With Obvious Pen Utility
The Adjustment Brush and Spot Removal are really the 2 of the 5 primary tools in the Develop module that have the most pen utility. The Adjustment brush is essentially a mask applicator that lets you locally adjust exposure, brightness, contrast, and much more, wherever you like. When doing a portrait retouch, this becomes incredibly useful.

The beauty of applying these with the pen tablet is not only do you have the accuracy and fluid movement of a pen vs mouse, but you can control the opacity, simply by using pressure – a natural extension of what you know a pen to do on paper. You can also use the button on the pen itself to quickly adjust the size of the brush you’re using to the precise size needed. And of course we can’t forget that when using the brush you can hold the option/alt key which will turn the brush to an eraser, and you can erase with accuracy and speed.
Beyond The Adjustment Brush
Quite possibly, for many, the most utility of the tablet will not come from the ease, intuitiveness, and accuracy of the adjustment brush, but the ease and speed that Lightroom’s interface can be navigated using the pen, pen buttons, express keys, and radial menu (should your model have it).
The Express keys are simply physical keys on the tablet/pen, laid out for maximum efficiency, that can be programmed to do all manners of things. Each button can be told to function as a singular keystroke, or a group of them, and many other types of functions; from scrolling, zooming, rotating, etc. Those of you who are hell bent on having customizable buttons on your camera will fully understand how crucial this can be to efficiency. It allows you to bypass the seconds it requires to stop, move the cursor to the right menu, go through the submenus and make your choice. That time adds up quickly, and to a lot when you’re editing an entire shoot.

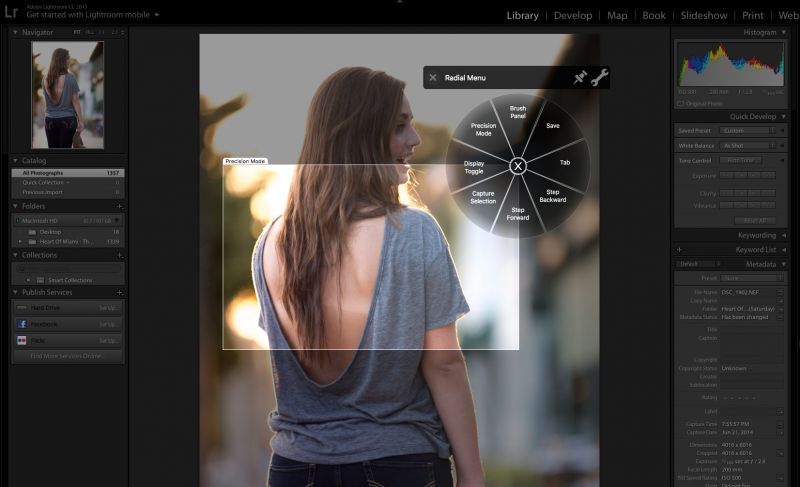
Knowing how you edit, you would assign the appropriate keys and tasks to the numerous buttons (ranging from 4 to 8 depending on the model and excluding the pen buttons and radial button), and skip all that wasted menu navigation time. Speaking of the Radial Menu, should you have a newer Intuos Pro, this will act as a pop-up semi-translucent pie-menu of 8 parts, and each part is essentially another Express Key.
What you’ll find with all of this, and the tablet’s ability to be used as a trackpad, now with multi-touch gesttures, is that it will become the only thing you keep in front of you when editing. I refuse to edit without one, and the beauty is you don’t need to spend a lot of dosh on the most expensive models to get the benefits. See my review of the Intuos Pen & Touch here, and it’s much bigger and expensive brother, the Wacom Intuos Pro Medium here.
It will transform how you use Lightroom, and soon I’ll show you how I have my tablet(s) set up for LR, just as a base for you to gauge and change to your liking. Below you’ll see an example of how I would set up for LR.
Setting Up YouR Wacom Tablet For Lightroom (My Set-Up)
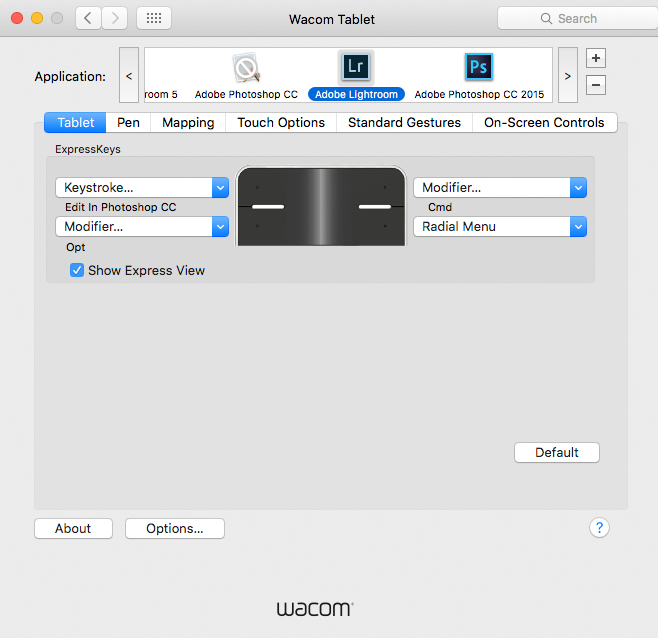
For the purpose of this article, I’m going to work within the boundaries of using a more basic tablet with only four buttons versus the Pro lines that have the radial, 6 or 8 buttons respective of size.

Buttons
Touch On/Off
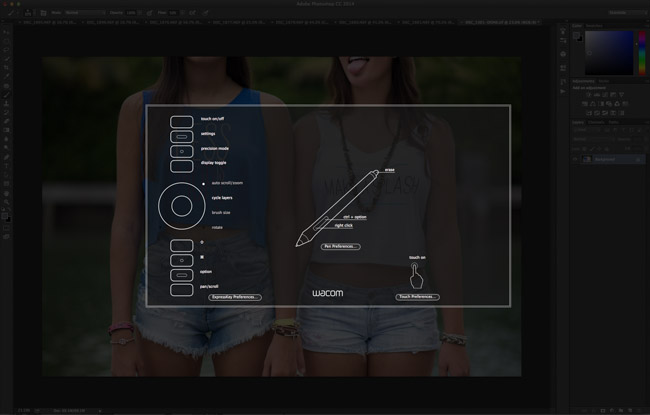
By default, your tablet’s express buttons will see one of them dedicated to switching the touch capability on and off, which I find useless. Other functions would suit it better because the tablets work in such a way where they switch from pen to touch via proximity of the pen. That’s how you can rest your hand on the tablet and use the pen without it messing everything up and recognizing your palm as input. With the pen, very close to the tablet touch is rendered off, and when it’s not, it’s back on.
‘Settings’ Button to Edit-In
This, again, is another useless pre-configured button in my opinion. This essentially brings up a menu that reminds you of the button settings on your tablet, but if you’re using a touch-enabled tablet, you can actually go into a menu for ‘touch’ and set up to use finger gestures to show the same screen. Since you’ll very quickly remember what button does what, this is a better option.


As alternatives, I use this button to switch between applications. Yes, you can do that. Within the settings button assignation menu, select Edit In and choose which. I typically set mine to Photoshop, so with a click of a button, it opens it for me. If you have done any adjustments within Lightroom, then you will still be given the prompt to choose either a copy with adjustments and so forth, but it’s still good and gets a lot of use.
Option/Alt Button
As we already mentioned, holding this turns your brush into an eraser. Having this at hand is great, and some even like to set one of the pen buttons for this function alone.

Radial Menu
The last of the minimum of 4 buttons is assigned to bring up the radial menu. Typically this gets less use. However, it allows me to quickly bring up a selection of other options, which are essentially virtual buttons that can each be assigned. In truth, I typically only assign two of them specifically, and those are to bring up Precision Mode and to Undo. You can set that with Option+Z.

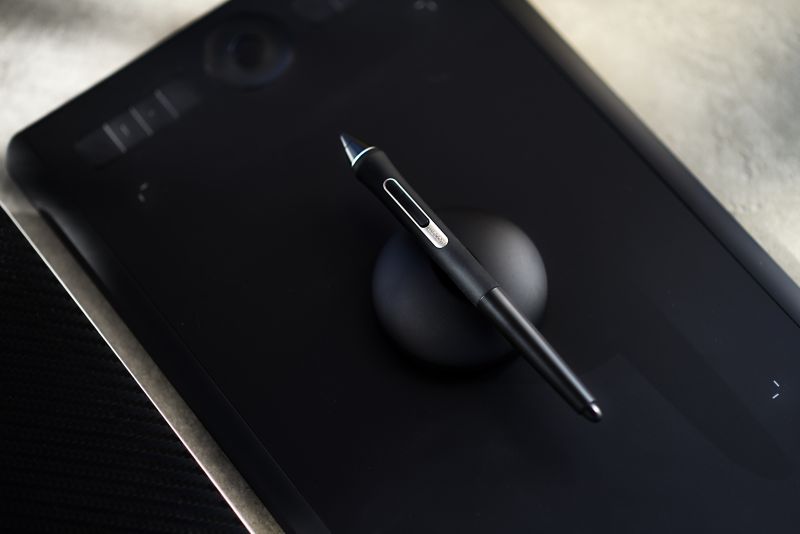
The Pen
You can see the images below for my settings exactly. I see no need for double clicking with the pen, so that’s turned off, and as far as pressure, you can set that as you like. The important ones are the two buttons on the shaft which probably get the most use of any buttons between the tablet and the pen.


The first button, closest to the point, I set to Pan/Scroll, and what this translates to in Lightroom is the ability to hold it and move the pen on the tablet to adjust the brush size. Anyone using Lightroom can imagine just how nice this ability is. It allows you not to break concentration, and it’s just totally intuitive as you’re editing.
The second button I have set to Backslash, so I can quickly toggle back and forth between the adjusted and original file before adjustments. Having it at your fingertips allow you to do it all the time and see just how well your adjustments are working out, helping to prevent you over or underworking an area, so it doesn’t blend with the overall image
Mapping
I have mentioned this before, but if you are using Photoshop or Lightroom, you do not need the entire working space of the tablet. It’s actually a hinderance as it encourages or requires much more movement of your entire arm and that gets tiring. It’s for this reason, I ALWAYS tell retouchers to go for a small tablet because you don’t need the extra real estate unless you’re a graphic artist.
[REWIND: DOES YOUR IMAGE LOOK DIFFERENT IN LIGHTROOM & PHOTOSHOP? HERE’S WHY & HOW TO FIX IT]

Instead, go into mapping and create an even smaller active area, even on a small tablet, and that means you can use a flick of the wrist to move across the entire image. That’s pretty much all there is to setting it up. Within a day or two of this set-up, you’ll see how much better the tablet is, and then, of course, modify each button and setting to suit your particular needs.
I hope this was of some help, and will help you bring out the most of Lightroom. This together with a great foundation in LR will show you just how robust this application is. Check out the Lightroom Workshop if you want to make the most of your investment and time – there is simply nothing better, and of course SLR Lounge Premium members get that workshop and all the rest.
If you’re now curious about getting a tablet check my reviews of the Small Wacom Pen & Touch and the new Wacom Intuos Pro Medium – the tablet I now use.
Find:
Wacom Intuos Small Pen & Touch
This article was originally published in February 2018


Get Connected!