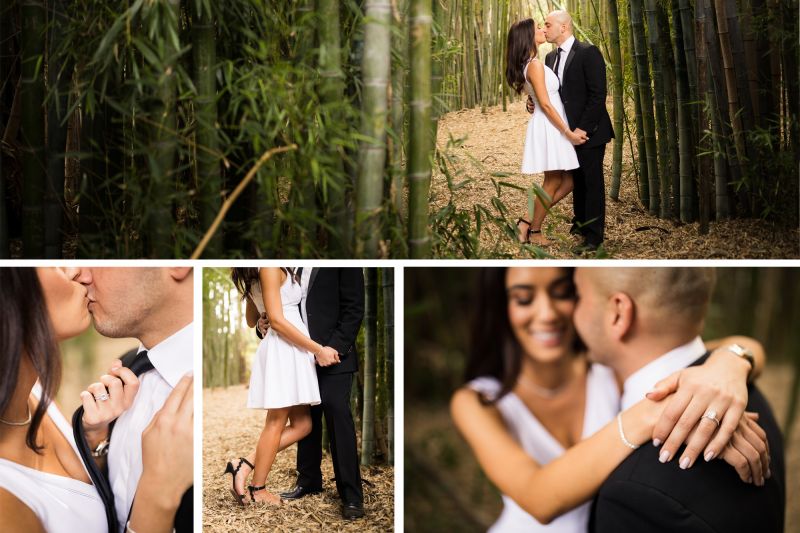
When you consider why people hire photographers to capture everything from small family sessions to elaborate weddings, a common theme arises: People value the moments that make up their lives, and photographs effectively help people share their stories for generations to come. As photographers, it is our responsibility to tell our clients’ stories in the best way possible. To do that, we must have a solid understanding of storytelling.
Problem: Stuck in the Moment
It isn’t uncommon for photographers to lock into a particular style of photography and focus on getting the perfect shot in that style; it is part of how we grow as photographers. Isolated moments, as beautiful as they may be, don’t necessarily tell the whole story, which limits how we present our work. We struggle to design album spreads or put together a sequence of images for wall art when our photos are not intentionally captured with the purpose of storytelling.
Solution: Turn Moments into Stories
When we shoot to tell more compelling stories with our images, we increase client satisfaction and we can potentially boost wall art and album sales. We do this by shooting each scene from a variety of angles and focal lengths to showcase different aspects of our subjects and their environment. We recommend shooting each scene from wide, medium, and tight angles to maximize our storytelling capabilities. Inevitably, we use these groupings of images to create clusters for print – see more on this process here:
Here is how to shoot each scene for storytelling.
STEP 1: CHOOSE ELEMENTS IN A SCENE TO HIGHLIGHT
Evaluate the scene and identify which elements will lend themselves to telling a better story. For example, objects that are unique to a subject, such as an engagement ring, wardrobe, or even makeup will likely resonate with the client and make for a great album spread when shot as a sequence of images.

Approach the scene as if the client’s wardrobe and accessories are brand new. Capture every detail for them to remember.
STEP 2: SHOOT CLOSE-UP DETAILS

After you’ve decided which elements you want to highlight in a scene, determine a different way to capture them.
During a recent session, I wanted to showcase my client’s ring and wardrobe in an unexpected way. I directed their pose and cued their interaction, and I used their candid interaction as a vehicle to capture detailed images of her ring and wardrobe.

To tell more of their story, I chose to showcase my client’s eyes and makeup, as well as her fiance’s expressions. Even though these images were captured later in the day, I shot them to remain consistent with the earlier images so that they would work well together in an album spread or as a wall art collection.
STEP 3: SHOOT WIDE TO SET THE SCENE

In addition to knowing what is happening in a story, it is important to know where it is happening. For each location, we must set the scene. You can usually find unique elements within a scene that identify that particular location, so be sure to include those in your wider shots (and include them in the detail images as well if possible). These images don’t necessarily need to include your subjects, but they should help tell your story.
STEP 4: EDIT FOR CONSISTENCY
Post-process images from a given scene with a similar look for album layouts & wall art. The most important thing to note is that even though these images were taken in different lighting conditions, they are post produced to look identical.
We take an even closer look at how to integrate storytelling into your workflow in our Wedding Workshop Series as well as other workshops like From Shoot to Post, which you can stream now in SLRL Premium.


Get Connected!