
Easter is one of those dual holidays that carries deep religious meaning alongside a strong focus on children’s activities. For Christmas, we have presents. On Easter, we have eggs filled with candy and other fun surprises. Both holidays offer great opportunities to capture family photos. That said, if you want more than the standard obligatory Easter family photo, there are simple things you can do to document your Easter with a bit more focus on quality photography or artistic value. Below, we’ve listed some of our top tips for capturing better Easter photos, along with a note on what not to do.
Note: This article was originally written in 2013 and updated in 2022 with new tips and images.
Easter Photography Tips: At a Glance
Whether you’re a professional photographer planning spring mini sessions or a parent looking to capture meaningful family moments, this guide covers practical techniques for better Easter photos.
- Candid Moments – Capture authentic, unposed reactions
- Easter Mini Sessions – Tips for professional spring bookings
- Fun Props – Creative Easter styling ideas
- Simple Backgrounds – Keep the focus on your subject
- Shoot the Details – Go beyond portraits for variety
- Avoid Live Animals – Why this prop choice backfires
Look for Candid Moments and Capture Them

While your kids are coloring eggs, take a few moments to photograph them having fun without directing the shot. The genuine concentration on a child’s face as they carefully apply dye to an egg, or the laugh that erupts when a color doesn’t turn out as expected, makes for far more compelling images than anything posed. Another great time to snap candid shots is while other adults watch the children hunt for eggs on Easter morning. Their expressions of delight and anticipation often tell the story better than the kids themselves.
To get the best candid shots, give yourself some distance and use a short telephoto focal length (85mm to 135mm on a full-frame camera works well) so you can stay out of the action without missing the moment. Put your camera in continuous shooting mode and just let the scene unfold. The less your subjects know you’re photographing them, the more natural your results will be.
Consider Easter Photography Mini Sessions

Spring is a great time for professional photographers to hold mini sessions. With flowers in bloom and the weather warming up, many families are looking to get outside and capture some photos of their family. From a timing perspective, this window also spaces out your mini sessions far apart from your holiday bookings later in the year, helping you maintain a more balanced income throughout the calendar. For more information, check out our article on Mini Sessions.
Easter-themed mini sessions tend to book quickly, so start marketing them at least three to four weeks in advance. Gardens, parks with blossoming trees, and even simple outdoor setups with a pastel backdrop and a few props can serve as excellent locations. Keep your session slots short (15 to 20 minutes each) and your prop kit simple so transitions between families stay smooth.
Use Fun Props for Your Easter Photography
From cute and fuzzy animal props like bunny ear headbands to Easter eggs, there are so many fun things you can use to symbolize Easter. You can even build entire sets using decorations and Easter colors and take an opportunity to flex your creativity. Try playing with color harmony and symbolism while you create photos your clients will love.

When selecting props, think in terms of a cohesive color palette. Soft pastels (lavender, mint, peach, and pale yellow) tend to photograph well together and give Easter sessions a timeless, finished look. A wicker basket overflowing with colorful eggs, a simple wreath, or a field of wildflowers can all serve as both props and compositional elements. The goal is to support the subject visually without overwhelming the frame.
Simple Backgrounds Are Better

It’s easy to get distracted by a busy background, but you want your viewers locked on the subject of your photos. If you’re shooting kids looking for eggs, try to angle your shots so the background is as simple as possible. Shooting from above and pointing the camera down gives you a solid green grass background. Shooting from below and angling upward gets you open sky as kids reach for an egg. Both approaches isolate your subject naturally without any editing required.
If you’re shooting in a backyard or park with a lot of visual clutter, a wide aperture (f/1.8 to f/2.8) will help blur the background and draw attention to your subject. Even a modest kit lens opened up to its widest aperture can make a significant difference when your subject is a few feet away from the background. Keep an eye out for distracting elements at the edges of the frame and reposition before you shoot rather than relying on cropping later.
Shoot the Details!

It’s easy to focus on your kids or significant others when taking pictures on a holiday. One way to really elevate your holiday photography is to shoot the details. If you’re a wedding photographer, you already know the power of a well-composed detail shot. For Easter, that means photographing the eggs your kids colored, arranged artfully in grass or in a basket. Look for repeating patterns, complementary colors, and interesting textures. A tight macro shot of a single hand-painted egg can be just as striking as a portrait.
Think about the full story of Easter morning: tiny shoes lined up by the door, a basket still half-hidden under a bush, a child’s hands stained with egg dye. These small details give a photo collection context and depth. When printed together or assembled in a photo book, a mix of portraits and detail shots tells a far richer story than portraits alone.
Avoid Animals in Your Easter Photography
There are all kinds of things you can do to provide a great experience for your clients, but here’s one to skip: using live animals as props. Sure, there is potential to get some cute images from the shoot, but there is also great potential for things to go sideways, for the animals, the kids, and for you, the photographer.
Putting animals in the hands of small children is inviting disaster for both parties. Animals can carry illness-causing germs, like those responsible for salmonella poisoning, and can bite or scratch kids. Very young children simply don’t yet understand the concepts of hurting or killing an animal, even through trying to show affection. Their inexperience can result in bites and scratches to the kids, or worse outcomes for the animals.
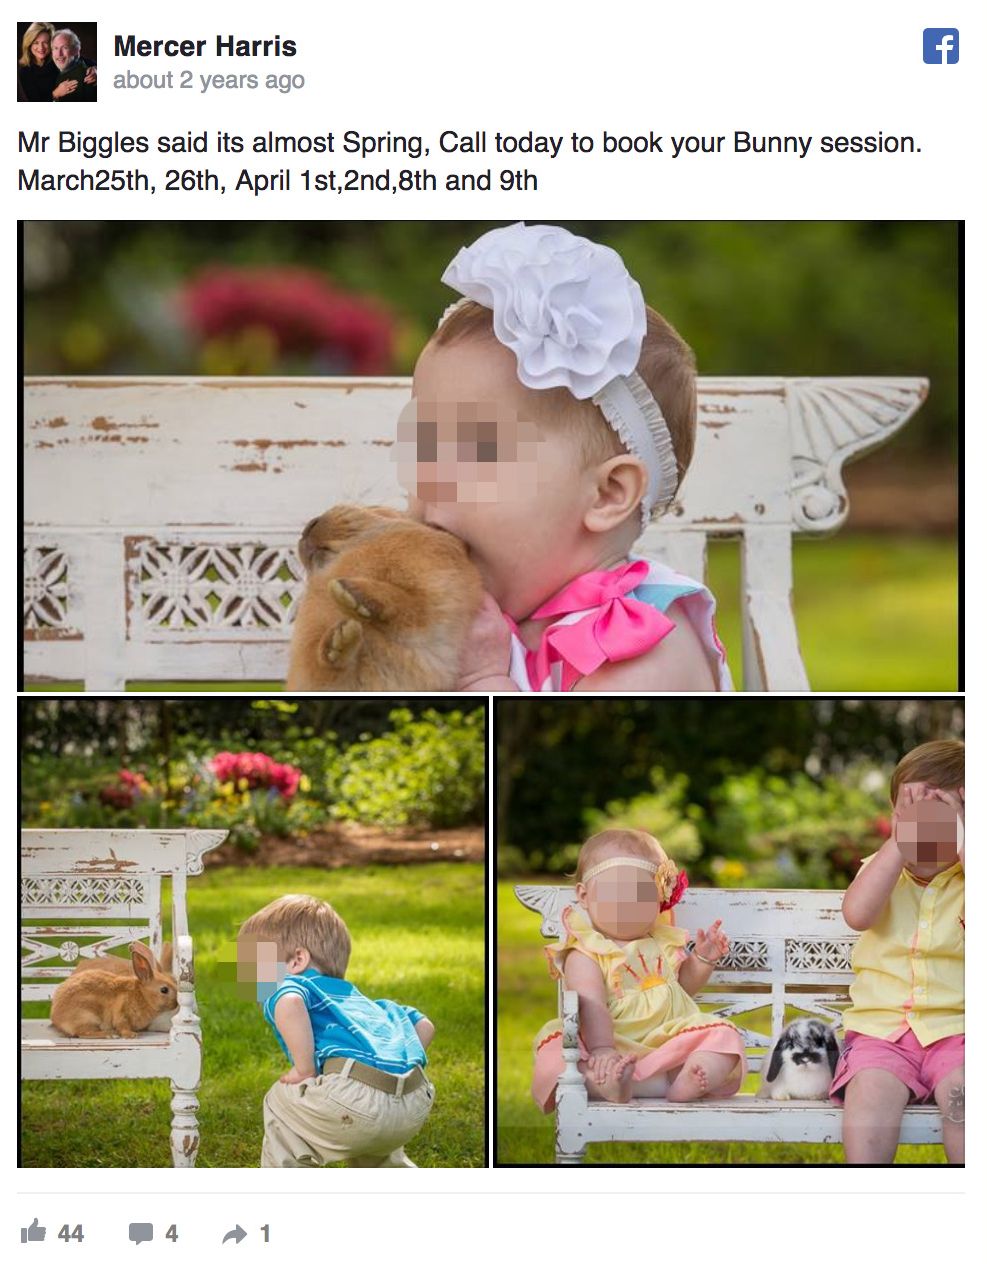
Providing an extreme example of what not to do, and the repercussions, in just about every sense is photographer Mercer Harris. Harris found himself in the virtual crosshairs of animal lovers around the world after his animal-incorporating sessions went viral. He received upset messages, phone calls, comments, and Google reviews in droves from people in many different countries. Many people were so horrified by what they saw that they reported him to authorities in his state.
For years, Harris hosted pre-Easter photo events with live ducklings and rabbits for children in his small town. He allowed very young children to handle the animals, and when things went wrong, he photographed the results. He then shared many images showing children mishandling animals on both his personal and business Facebook pages. The images contained babies and children holding ducklings by their heads and throats, flinging them into a pond with great force, and rabbits being carried by their ears or throat, dropped, and even bitten. They have now largely been removed from the corners of the web controlled by Harris, but not before being seen by thousands of people and captured in screenshots that spread across social media.
Use Animal Overlays or Fun Animal Themes Instead
In this digital age, it’s easy to add animals to your photos after the shoot in a way that can look convincing with some composite skills, or at least charming if that’s not your forte. This approach is an opportunity to have a fun and imaginative session as you direct your subjects to pretend they’re interacting with the animals you’ll later add in Photoshop. Kids tend to love the playfulness of it, and the resulting images can be just as whimsical as you’d want without any risk to people or animals.
You can also lean into animal-themed props that don’t involve living creatures at all: stuffed bunny toys, chick figurines, paper cutouts, or even printed backdrops featuring barnyard scenes. These give you full creative control without any of the unpredictability that comes with real animals.
Frequently Asked Questions About Easter Photography
What is the best time of day to shoot Easter photos outdoors?
The golden hour just after sunrise or before sunset gives you soft, warm light that flatters both kids and spring scenery. If the Easter egg hunt happens mid-morning (as it usually does), look for open shade to avoid harsh overhead light and unflattering shadows on your subjects’ faces.
What camera settings work best for Easter egg hunt photography?
Kids move fast, so prioritize shutter speed. A minimum of 1/250s will freeze most child movement; 1/500s or faster is better for very active scenes. Use continuous autofocus (AI Servo on Canon, AF-C on Nikon/Sony) and set your drive mode to burst so you don’t miss the peak moment of a discovery or reaction.
How do I get kids to cooperate during Easter portrait sessions?
Keep things fun and low-pressure. Give kids a task to focus on (finding an egg, arranging eggs by color, decorating a basket) so they’re engaged with something other than the camera. Short sessions with breaks work much better than long, formal sittings, and genuine reactions come naturally when children forget they’re being photographed.
What are good Easter photography prop ideas that don’t involve live animals?
Wicker baskets, bunny ear headbands, pastel balloons, wildflower bouquets, hand-painted eggs, and vintage wooden crates all photograph beautifully. For a more styled look, layering textures like a linen blanket with a floral wreath and a scattering of eggs creates a scene that feels intentional without being overly formal.
Should I shoot Easter photos in RAW or JPEG format?
RAW is almost always preferable when the final images matter. Easter lighting conditions can be tricky, shifting from bright midday sun to deep open shade as kids run around outside. Shooting RAW gives you much more latitude to correct white balance, exposure, and color in post without degrading image quality, which is especially helpful when you’re chasing fast-moving subjects and don’t always have time to perfect every setting.


