Accidentally overexposed your shot? Are your highlights blown out? Don’t toss it just yet. Today, I’ll be walking through 3 steps to saving an overexposed photo.
Video: 3 Techniques for Saving an Overexposed Photo in Lightroom
Photographers are taught to avoid blowing out the highlights. Blown out highlights are areas of the frame that are too bright for the sensor to capture all the information. Sometimes, a scene just is so bright and contrasted, that we simply don’t have a choice. This results in pure white spots that can’t recover detail, even with the dynamic range of current cameras. Accident or not, we might think to just scrap the shot. However, there are three techniques I use to edit an overexposed photo in Lightroom Classic. Let’s jump in.
Before we begin, be sure to download the exercise file here and follow along as I edit.
Behind the Scenes Look

Let’s take a look at our image today, shot on the Fujifilm GFX-100. If you see the behind-the-scenes, you’ll notice right off the bat that the lighting situation is tricky. The model is in the shade while the background is lit by direct sunlight. When I expose for the model’s face, this results in the background being overexposed.
Step #1: Matte Finish

The Matte look is great for softening up a significantly overexposed photo. To achieve this, we use the tone curve to pull the white point down to a bright gray and push the black point slightly up. Then, we create an S-Curve to add in the contrast.

Be sure you’re using the “Point Curve” rather than the “Parametric Curve,” as you can see here.
Step #2: HDR + HSL

If your overexposed photo is RAW format and still retains plenty of information, this is a great technique to apply next. We begin by pulling the highlights down and the shadows up. I pull my white point slightly down as well as the black point to control contrast. This is an HDR (High Dynamic Range) technique of squeezing all the information closer together. However, this causes the colors to look hyper-saturated.

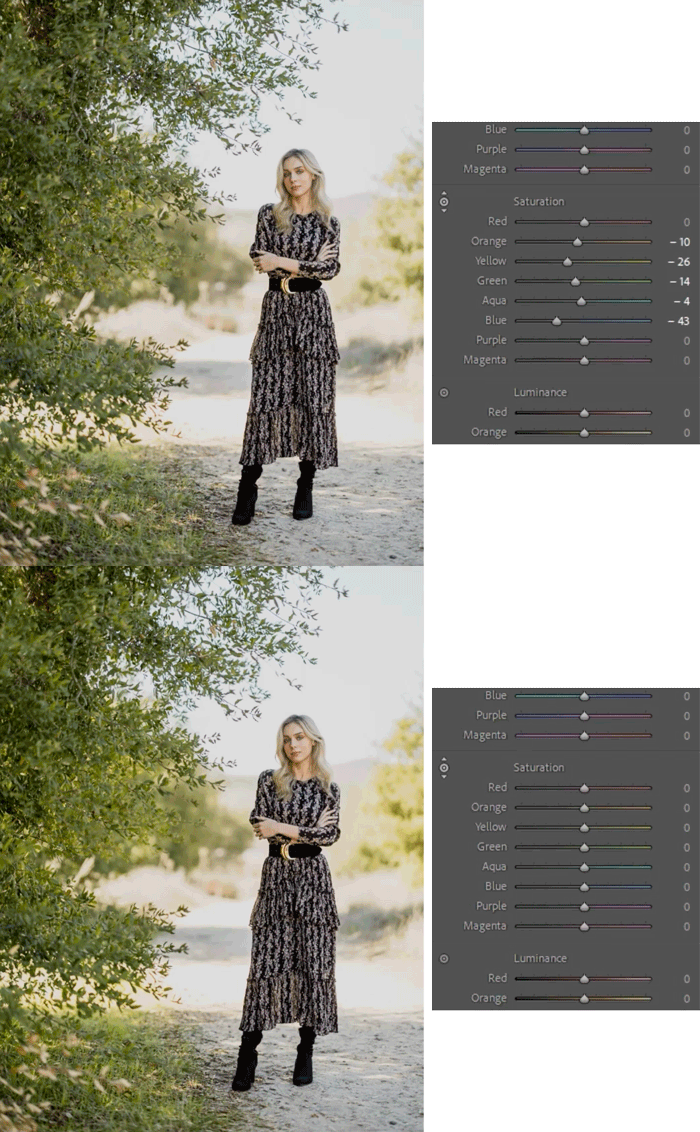
To fix the colors, we have to hop over to the HSL (Hue, Saturation, Luminosity) adjustments. Here, I’ll lower the saturation of certain colors to ring them back to normal.

Check out the difference so far.
Step #3: Selections & Local Adjustments

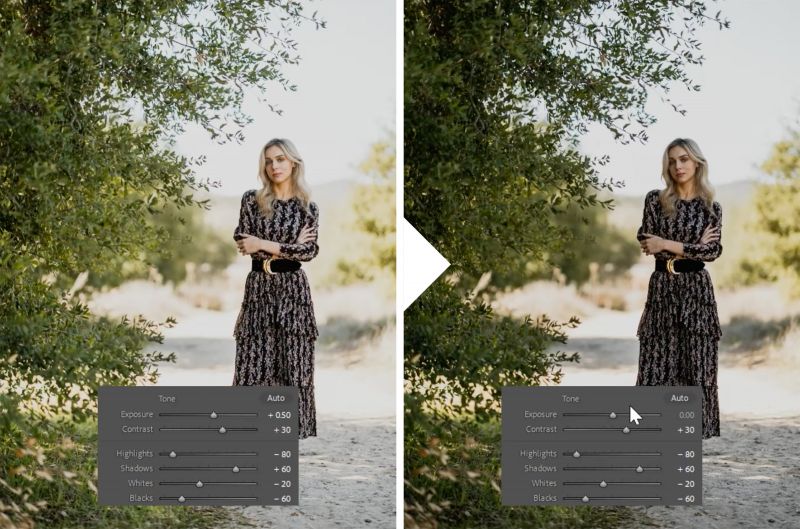
In this next step, we’re going to focus on specific parts of the image. We can start by simply lowering the exposure a bit.

Then, use Lightroom’s AI masking tool to “Select Subject.” Next, I adjusted the brightness of the model using highlights & whites. This creates a much more natural appearance than when adjusting the entire exposure. Then, with a touch of added shadow, we reach the final image.
Related Reading: Advanced Masking Using Lightroom’s New AI Features

Let’s take a look at all the steps so far.


Here is the final image next to where we first started.
Conclusion
I hope this tutorial was helpful. Next time you run into an overexposed photo, try these techniques out to get a final result that looks completely intentional. With this new skill in your toolkit, you can feel much safer while shooting in difficult lighting situations. To learn the full power of Lightroom editing, be sure to check out the Mastering Lightroom Course, available on SLR Lounge Premium. You can also check out Visual Flow for intuitive lighting-based presets as well as a host of retouching tools for full editing control.
Don’t miss our next episode of Mastering Your Craft on Adorama’s YouTube channel next week! If you want to catch up on all the episodes, make sure you check out our playlist!


Get Connected!