
Photographers often use multiple off-camera flashes for their shoots, opting for full control over the direction and position of their lighting. However, sometimes the right solution is the simplest one. Ceiling bounce with an on-camera flash can be used to create interesting and powerful results when used right. Regardless of your level of photography, understanding the full potential of overhead ceiling bounce flash can help you gain a full mastery of flash. In this video, taken directly from our Lighting 101 Workshop, part of our Flash Photography Training System, Pye demonstrates how to use overhead ceiling bounce to create dramatic effects for fitness portraits.
Overhead Ceiling Bounce Video Tutorial
In this video, Pye demonstrates the purpose of bouncing light overhead as a means of creating interesting definition and powerful highlights. With just a simple adjustment in position, your flash is modified to produce directional and controlled light.
Tips for Bouncing Flash Off Ceilings and Overhead Objects
To help reinforce the education in the video above, here are a summary of the tips presented in the video with visual examples.
1) Make Sure Your Ceiling is White for Best Results

Since our light is being bounced off of the ceiling, we want to make sure that there is no color being transferred into our scene. Your best bet to ensure this is to bounce light off of a white ceiling or use a v-flat in order to lessen the amount and spread of light dramatically. Aiming the flash directly at your subject fills in all shadows on the muscles therefore reducing the appearance of tone and definition.


2. Use a Snoot/Grid and Flash Zoom To Modify Light Spread
Now that we have our bounce prepared we can focus on the spread of light we desire. By changing the zoom settings on your flash, you are concentrating the light on a specific portion of the ceiling or v-flat without having it spread across. We can also modify and pinpoint our spread of light by using a Snoot or a Grid, the latter being easier to use because generally we are not bouncing far enough to use a Snoot.
3. Watch for Bright Non-Colored Surfaces vs. Reflective Surfaces
Bouncing light against a bright white surface will result in more diffused light being spread. Using a reflective surface, such as a silver reflector, will produce a more specular light. For this shot, the specular light was better because the harsher shadows show more definition in the muscles.
Infographic
For your convenience, we’ve summarized the information presented in the video with the infographic below. Feel free to pin or save the photo for future reference.

Bounce Flash Wedding Example 1
Although we’ve repeatedly listed bounce flash as one of the last go-to options for lighting a scene, there are some scenes that benefit greatly from this type of light source.
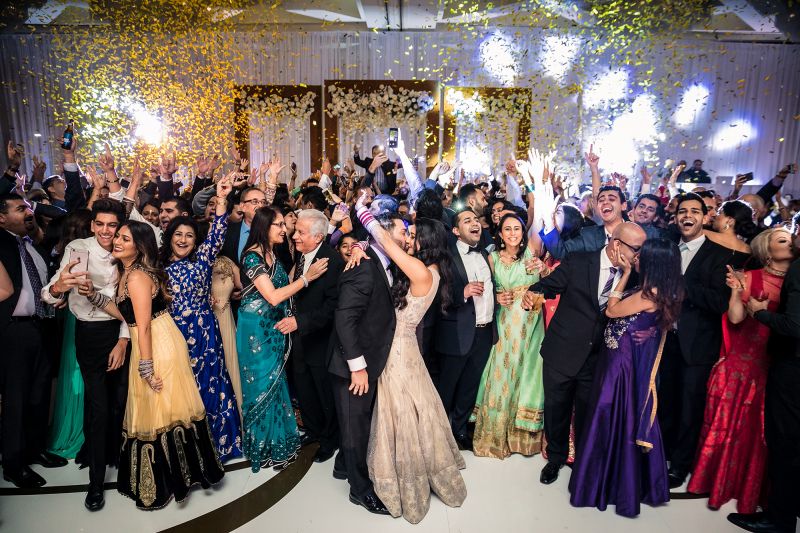
In this New Year’s Countdown image, there were DJ lights and other light sources from the exploding confetti canisters. We didn’t feel the need to add additional rim lights, and the bounce fit this scenario perfectly. Spotlighting can be risky in a one-chance must-have moment like this.

If you’re trying to take multiple shots at a higher flash power, we recommend using a battery pack to miss fewer shots (see above). Even with a battery pack, you may still expect to miss a shot here and there.
TIP: It doesn’t have to be New Year’s Eve to capture this image.
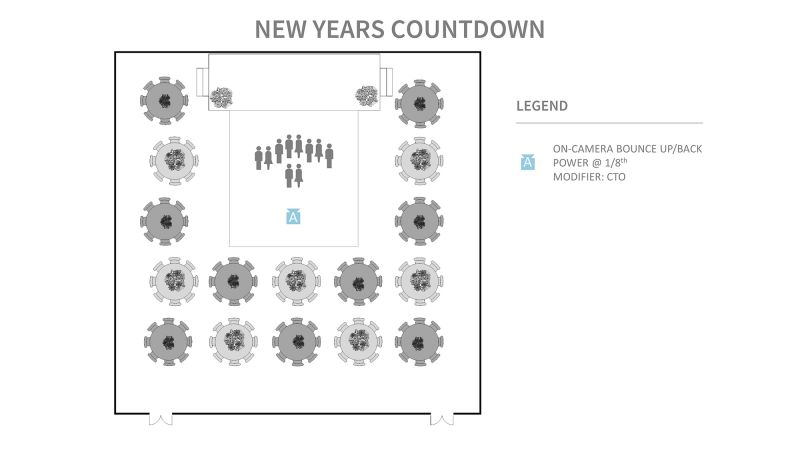
To capture the shot, elevate your position (stand on a chair, for example, with your shoes off), and aim the on-camera bounce flash up and forward so that the light can reach as far back as possible. For other settings, see the diagram above.
Bounce Flash Wedding Example 2

While using a bounce flash requires a minimal setup time of under a minute, it also requires a neutral-color ceiling/wall, which makes it less ideal than pinned OCF. Rim lighting can be added if using the on-camera bounce flash as a master, and setting up the rim lights and stands will add a minute or two to the overall setup.

Because your light source is on-camera, your range of movement is limited. If you back away from your subjects, for example, then less light will reach them. At the same time, the subjects closest to the light source will be brighter than those in the background. In the instance of capturing a bouquet or garter toss, this means that the bride and groom (if positioned closer to the camera) will be brighter than the group of participants in the distance who are trying to catch the bouquet or garter. This is fine if you’re focusing on the bride and groom, but it’s less than ideal for lighting the group when it is time to focus on them for catching the flying objects.
Hopefully, the bounced light will be strong enough to adequately light the group. You can aid this by bouncing the light up and to the side so that it doesn’t fall as strongly on the closer subjects (usually the bride or groom).
Here are some key tips for capturing the bouquet and garter tosses with bounce flash:
- Bounce = higher power (1/4th to 1/8th)
- External battery recommended (for faster recycle times)
- Higher ISOs (allows for lower flash power & faster recycle times)
- Bounce to cover back group
- High action = more clicks
- Watch shutter speed/ambient
- Toss bad expressions
Even though these moments are candid in nature, photographers can (and should) guide the couple and participants into a position that is going to look great in the photos. Here’s how it should happen:
- Choose the direction you want to shoot
- Place the bride and/or groom (or both)
- Place the group


Get Connected!