The term “exposure” is often used to describe the brightness of an image or the amount of light a sensor (or film) receives. It is not as simple as you might think, however, so we have created this article as an ultimate guide to help you understand everything about exposure, for both technical and creative use!
Exposure can refer to a number of different things in photography. Firstly, an image itself can be referred to as an exposure, for example, “I’m going to make an exposure,” or “I should have taken another exposure.”
In this sense, an exposure is simply an image itself. You can have a long exposure or a short exposure, depending on your shutter speed. Your lens’ aperture and your camera’s ISO also affect your exposure; both can make an exposure brighter or darker. This is known as the Exposure Triangle, but more on that later!

Long Exposure – 80 seconds, f/9, ISO 100, 10-stop Neutral Density Filter
Introduction | Why Are We Here?
This is the very first part of our Official Guide series on the subject of Photography Basics! This series of articles is designed to quickly teach you the fundamentals of photography so that you can get out and create amazing images as soon as possible!
All of the education from these guides is derived from the complete workshops offered in the SLR Lounge workshop store, or with an SLR Lounge Premium Membership. As with all of our education, these official guides are meant to be a field reference tool, not just a boring “user manual.”
 Learn Wedding Photography on SLR Lounge
Exposure has both technical and creative elements; in fact, using exposure creatively is a key part of what makes good, artistic photographs. So, we will cover both subjects in this article: How you can use exposure creatively to achieve an artistic vision, and how you can become a master of exposure from a technical standpoint so that you achieve the best possible image quality. Whether you own a beginner camera or an advanced/professional camera, “nailing” your exposure can make a huge difference in the final result.
What Is A Stop Of Light (EV)
The first question we must answer is the most basic, the one that is relevant to both artistic and technical aspects of photography: How is exposure measured, and what is an “EV” or a “stop of light”?

Most of the time, exposure is measured relative to a “correct” exposure, or a neutral one. For example, a (technically) correct exposure of a grey card would result in an image that shows exactly the same tone of grey, and the exposure meter in your camera would land perfectly in the middle of the scale, at zero:

A Neutral Exposure (light meter at zero)
However, this would change if you were to take that grey card out into the sun, or into a dark closet. It would also change if you traded the grey card for a card of white or black, too. Not only would you have to change your camera settings in order to make the image appear neutral grey, you would also have to decide whether you even want the image to be grey or not!
For this reason, exposure is almost always measured in the amount of change required in order to be “perfect.” If your exposure is too dark, you brighten it. If your exposure is too bright, you darken it.
 A Bright Exposure (light meter at +2 stops)
This level brightness is measured in “stops,” also called EVs. “EV” stands for Exposure Value. Each stop is either half the amount of light (one stop darker), or double the amount of light (one stop brighter).
Light is measured in this way because 2, 3, 4, or more stops of light is indeed a huge difference in the actual amount of light. A four-stop brighter exposure is not just 4X the amount of light, it is 16X the amount of light!
All three camera settings (aperture, shutter speed, and ISO) work in this way- half the light or double the light. If you want to understand each individual camera setting related to exposure, here they are: Shutter speed, aperture, and ISO.
For now, let’s continue on to learn how these three settings come together to create an exposure in various different ways.
The Exposure Triangle | Aperture, Shutter Speed, ISO
The “exposure triangle” refers to the influence that all of the three camera/lens settings have on each other. If you brighten or darken one setting in the triangle, it will make your whole exposure brighter or darker by that amount.
However, let’s jump right to the good part, the beauty of it all: If you brighten one setting while darkening another setting, by an equal number of stops, then your final exposure will remain the same! This is the concept of equivalent exposure.

That is the foundation of what exposure and the exposure triangle is all about. Making such adjustments are what allow for creativity in photography, whether it is a fast shutter speed to “freeze the action,” or a slow shutter speed to create blur. Creative use of aperture is also another reason why people buy camera gear such as neutral density filters, or ultra-fast-aperture lenses. These tools allow you to push the exposure triangle way beyond what is normal!
With that in mind, let’s talk about how to use the exposure triangle for creative effect.
 A Star Trail long exposure, created from merging 1 hour of back-to-back 15-second exposures | Nikon D750, Venus/Laowa 12mm, f/5.6 & ISO 3200
Creative Use Of Exposure
Okay, so, you understand what a stop of light is, and how the exposure triangle gives you different options in choosing the “right” exposure for a scene.
However, as we made sure to point out, there is no such thing as a single “perfect” exposure, since artistic vision must be taken into consideration.
The most common use of the exposure triangle is to keep your image brightness the same while achieving a different creative result. For example, aperture controls the depth of field, and if you want to achieve background blur, (shallow DOF) you would use a wide aperture and then adjust your shutter speed and/or ISO to keep the exposure brightness from changing. Oppositely, if you want everything in focus, you would use a small (narrow) aperture, and re-adjust your shutter speed and/or ISO to compensate. See the example below:

In the above image, the aperture was f/2 and f/22, so the shutter speed had to be dialed as well in order to keep the exposure consistent. Can you count how many stops this is? If you’re not sure, our article here on aperture will clear everything up!
As another example, if you are shooting action sports but your shutter speed is too slow and your subjects are blurring, you could use a faster (darker) shutter speed, while brightening your ISO and/or aperture by the same amount, to achieve the same final exposure yet with the action frozen.
Oppositely, if you intentionally want to blur something, you would have to use a small aperture, low ISO, and/or a very dark neutral density filter in order to achieve a long exposure .
 Short/Fast exposure | Nikon D750, 1/60 sec, f/14, ISO 100
 Long exposure captured using Polar Pro 10-stop ND filter
Nikon D750, 30 seconds, f/5.6 & ISO 100
Before we wrap up this basic understanding of exposure, however, there is one element that has been ignored until now, which you might have noticed; we have often put the words “correct” or “right” in quotations when describing a proper exposure. This is because photography is an art form, of course, and “correct” is entirely subjective.
High-Key and Low-Key Images
Why isn’t there such a thing as one “correct” exposure for any given subject or scene? Because, sometimes, sheer creative inspiration will lead a photographer to create a much brighter or darker image than what would be considered “neutral.”
An image with more dark shadows than anything else is often called a Low-Key image, and an image with more bright highlights than anything else is often called a High-Key image. Often times this is because a scene itself was actually a dark and moody one, or a very bright one. Other times, creative use of exposure can have a profound result for even a “normal” scene.

Low-Key Exposure (Before Sunset)
1/10000 sec, f/1.4, ISO 100
 High-Key Exposure (After Sunset)
1 sec, f/16, ISO 100
Technical Insight About Camera Exposure
First and foremost, let’s answer the biggest technical question about exposure: why is exposure so important? Well, on most cameras, getting your exposure “right” in-camera can make a big difference in your overall image quality. If you’re lucky enough to afford a very good camera, then why let its potential image quality go to waste?
In some images, your brightest highlights might be at risk of “blowing out” or being “clipped,” which means they turn completely white and cannot be recovered in post-processing. If you are presented with this type of situation, you’ll want to choose your exposure very carefully to ensure highlights are preserved.
In other images, your shadow detail is very important, and you will want to make sure that you pick an exposure that allows your camera’s “shadow recovery” to retain detail in the shadows without introducing too much random (or banding/pattern) noise.

If your scene has both bright highlights and deep shadows, what do you do? Well, because highlights are usually a lot less recover-able than shadows (especially for cameras that have ISO-invariant sensors – which is a whole different subject for another article!), you will want to choose an exposure that just barely preserves highlight detail, and then recover the shadows in post-production. Or, you may have to capture multiple exposures with different brightnesses and then create an HDR image later. (Again, a whole new article, which we’ll get to soon!)
Measuring Actual Exposure Brightness EVs
Many photographers are quick to learn what a “stop of light” is and how exposure is measured in EVs. But, is there a “fixed” measurement for the actual brightness level of a scene? If so, can that brightness be translated into EVs? Yes, indeed there is!
For those who are interested, here’s the truth: Even though they usually don’t, EV numbers can indeed represent an actual, fixed measurement of light. For example, a correct exposure of a typical subject in full sun (also known as the “sunny sixteen” rule) is EV 15. A typical overcast day, or open shade on a sunny day, would be EV 12. Indoor ambient light can range from EV 4 to EV 8, and the very dark situations, such as moonlight, can range from -2 and -3 EV, all the way to -9 and -11 EV for the Milky Way’s core or galactic center. These numbers never change, and they correspond to an actual level of brightness that you can always set your camera to. Now you know!
As an example, EV15, or Sunny Sixteen, corresponds approximately to ISO 100, f/16, and 1/125 sec. Personally, I just keep it simple and match the shutter speed and ISO–ISO 100 & 1/100 sec, ISO 200 & 1/200 sec, etc.
Alternately, if you want to shoot a landscape by the light of a full moon (approximately EV-3) then you could use an exposure of f/2.8, 4 seconds, and ISO 1600. A whopping 18 stops different (brighter) than EV15, or normal daylight! (Comment below with how many times more light that actually equals!)
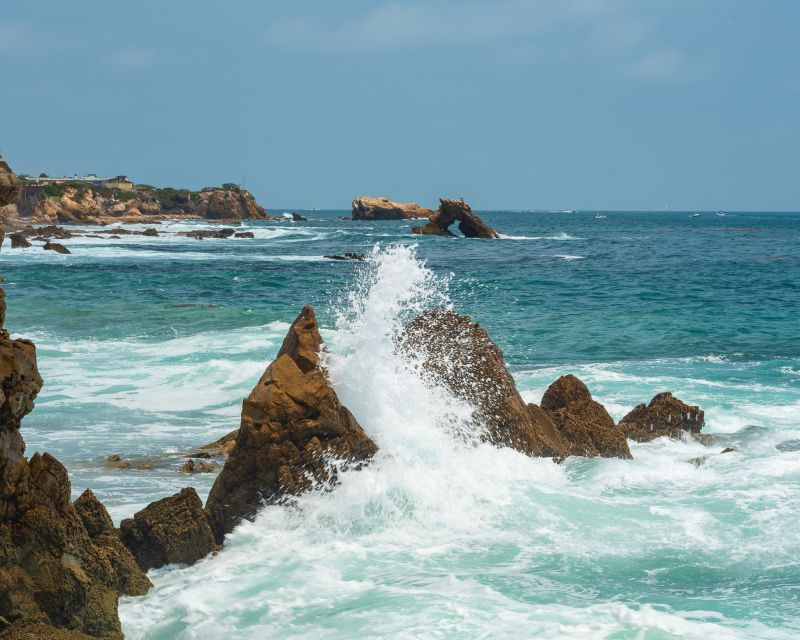
 Can you calculate the fixed EV value of this scene? The settings are:
Canon EOS R, RF 50mm L, 1/10 sec, f/1.2, ISO 3200
Exposure compensation
Exposure compensation is a camera function that allows you to brighten or darken your exposure by a specified amount, usually while your camera is in one of its automatic exposure modes. In aperture priority, for example, the photographer controls the aperture while the camera’s built-in light meter determines what the shutter speed should be in order to achieve a neutral exposure.
However, If a neutral exposure is not what you want, then you would dial in positive EV compensation to make the exposure brighter, or negative EV compensation to make the exposure darker.

Most modern cameras allow Exposure Compensation to be dialed in as much as +/- 3-5 EV, in ⅓ or ½ EV increments.
Beware Of Exposure Compensation In M Mode
As a side note, some advanced cameras also allow you to dial in exposure compensation while in manual exposure mode, not just P/S/Av modes, which can get very confusing. Here’s why. Dialing in positive or negative compensation in M mode doesn’t actually change your aperture or ISO, because those settings are manually controlled. So what is the camera doing with EV comp in M mode? It’s changing what your in-camera light meter will tell you is a “correct” exposure.
Let’s say you are in Manual Exposure (without Auto-ISO, either) and you dial in “-2EV” on the exposure compensation. Then, you dial your actual exposure until it reads neutral, or “0”, on the exposure scale in the viewfinder. What did you just dial in? You didn’t actually dial in “0”, you dialed in “-2” instead!
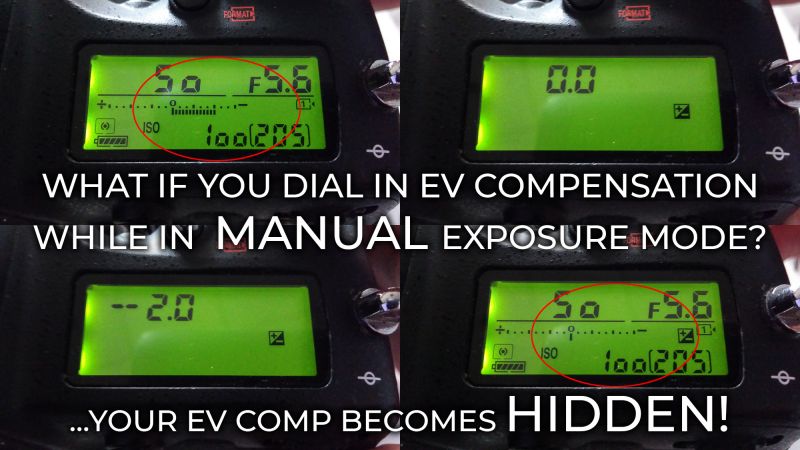
Unfortunately, most cameras that have this feature will not actually give you any indication of that “-2”, aside from maybe a small “+/-” indicator light in the corner of the viewfinder.
So, be careful! If you do a lot of switching from manual to P/S/A modes, and you also use exposure compensation a lot, then be sure to always check your EV comp whenever you change exposure modes. Some cameras have a setting that resets EV comp whenever you change exposure modes; I highly recommend leaving this option on!
 Low-key (dark) exposure | Canon EOS R (Full review HERE!)
1/320 sec, f/1.2, ISO 1600
SUMMARY
Answering the question “what is exposure?” may have been a little more advanced than simply understanding camera settings; however, it is absolutely critical to understand every aspect of creating a proper exposure, even if “correct” isn’t the right exposure for your creative vision.
Now, go take some photos, practice, and experiment with new techniques! Capture high-key or low-key imagery, or simply use the exposure triangle to get the right shutter speed or aperture or ISO for various creative effects. Share your photos with our community! SLR Lounge’s Critique Page and Facebook Group are both excellent places to share the latest creative imagery you’ve made!
Written by Pye Jirsa and Matthew Saville


Get Connected!